|
|
|||

|
|
|||
This halter was inspired by a diamond stitch pattern I saw in a book and for some inexplicable reason immediately thought of using it in a halter top. Inexplicable because I don’t have a halter top kind of body, compounded by the fact this is the second halter top I’ve recently designed. The top is knit in one piece and starts with a deep 2x2 rib which gives it a corset-like look. The back remains ribbed for fit, while the front changes to reverse Stockinette stitch to make the diamond pop. The original diamond stitch pattern was modified so the top half of the diamond could stand alone. The cross over of the diamond becomes the halter tie straps. This could be a great learning to cable project, as the only cabling occurs in the diamond and there are only 2 crossovers per row. It is also easy to finish, with just one seam up the back. |
|||
| SIZE | |||
XS[S, M, L, 1X, 2X, 3X] [shown in size S] |
|||
| FINISHED MEASUREMENTS | |||
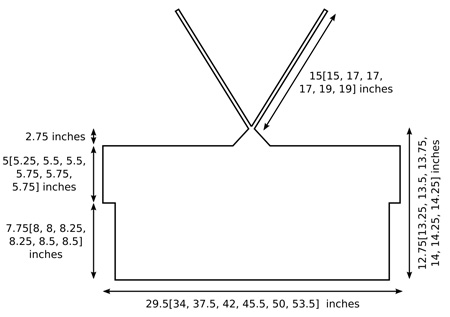
Chest: 29.5[34, 37.5, 42, 45.5, 50,
53.5] inches with ribbed portion lightly stretched |
|||
| MATERIALS | |||
|
Nashua Handknits Cilantro [70%
cotton, 30% polyester; 136yd/125m per 50g skein]; color: #12
Lime Sorbet; 4[4, 5, 6, 6, 7, 7] skeins. Note: Top shown (size S) used almost all of 4 skeins. You may wish to buy an extra skein if making this size. Recommended needle size: [always use a needle size that gives you the gauge listed below -- every knitter's gauge is unique]
GAUGE |
|||
|
PATTERN NOTES [Knitty's list of standard abbreviations and techniques can be found here.] |
|||
|
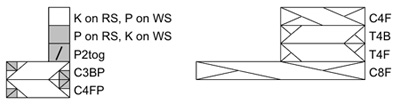
When knitting is complete, top is sewn together at center back. C3BP: Slip next st to cable needle and hold to back of work; k2 from left needle, p1 from cable needle.
C3FP: Slip next 2 sts to cable needle and hold to front of work; p1 from left needle, k2 from cable needle.
C4F: Slip next 2 sts to cable needle and hold to front of work; k2 from left needle, k2 from cable needle.
T4B: Slip next st to cable needle and hold to back of work; k3 from left needle, k1 from cable needle.
T4F: Slip next 3 sts to cable needle and hold to front of work; k1 from left needle, k2 from cable needle.
C8F: Slip next 4 sts to cable needle and hold to front of work; k4 from left needle, k2 from cable needle.
2x2 Rib |
|||
| DIRECTIONS | |||
|
Lower Body: Using smaller needle, CO 134[154, 170, 190, 206, 226, 242] sts. Do not join. Work in 2x2 Rib until work measures 7.75[8, 8, 8.25, 8.25, 8.5, 8.5] inches, ending with a WS row. Bust: Continue in pattern until work measures 9.5[10, 10.25,
10.5, 10.75, 11, 11] inches, ending with a WS row. Next Row [RS]: Work in 2x2 Rib to first marker, p21[27,
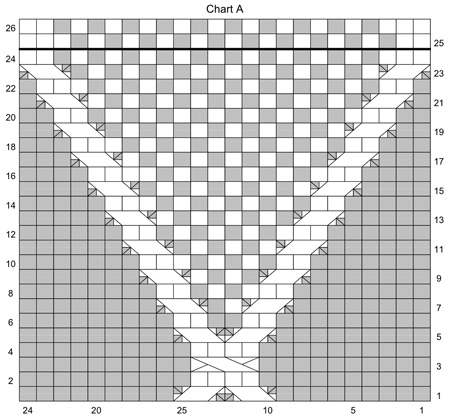
31, 37, 41, 47, 47], place marker, work Row 1 of Chart
A over next 24 sts, place marker, p to next marker, work
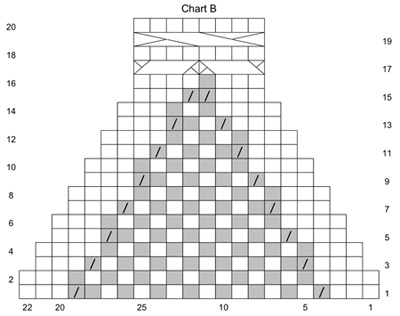
in 2x2 Rib to end. Remove first and fourth markers when working next row. Next Row [WS]: Join yarn to remaining sts with WS facing. P3, [p1, k1] 9 times, p3. Work Rows 1-20 of Chart B. Straps: BO all sts. Place held sts on larger needle and join yarn with RS facing. Work as for first strap. FINISHING |
|||
 |
|||
| ABOUT THE DESIGNER | |||
|
Jill is a published knitwear
designer, designing for
books, magazines, yarn
and pattern companies.
Her patterns often feature intarsia
colorwork or interesting
yarn combinations. She also founded "A Stitch In Time", a vocational training program for disadvantaged and troubled teenagers, who learn job skills by running an internet yarn shop, learning to knit & crochet, and making handcrafted items for retail sale. Her grandmother taught her to knit at the age of 5. Jill has been designing and teaching others to knit for over 25 years. She resides in Connecticut with her husband, two daughters and their misunderstood dog. Jill blogs about her design business at jagentdesigns.blogspot.com |
|||
| Pattern & images © 2009 Jill Gutman Schoenfuss. Contact Jill |

 This top is worked back and forth on circular needles, to accommmodate the large
number of sts.
This top is worked back and forth on circular needles, to accommmodate the large
number of sts.