|
|
|||

|
|
|||
Here in Vermont we call the most rural corner of our state the Northeast Kingdom. The Kingdom is mostly full of empty space and farms, but it does have more then its fair share of magical spots. One day while I was driving past a castle in the Northeast Kingdom (no joke, it’s a real castle) I was inspired to design a pair of gloves with closed loop cables all around the wrist and up the hand. These gloves keep hands warm and allow dexterity during chilly winters. The celtic-inspired cables add embellishment perfect for whatever kingdom or country you chose to wear these in. These gloves are complex, but still a very quick knit. One pair of gloves uses about the same amount of yarn as a single sock and can be knit just as quickly! In fact you can get two pairs of size medium gloves out of just one skein (or one pair size small and one pair size large, you get the idea). The cable pattern directions are written using a cable needle. However, this project will likely go more quickly if you can cable without a needle – why not use this as a chance to learn? |
|||
| SIZE | |||
XS [S, M, L, XL] (shown in size M) |
|||
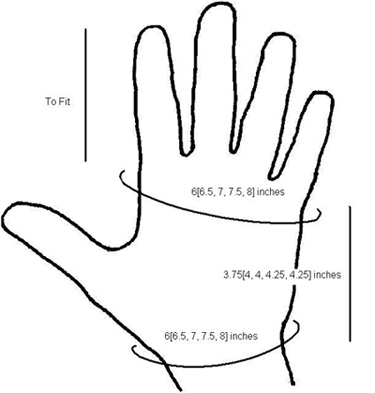
| FINISHED MEASUREMENTS | |||
Wrist circumference: 6[6.5, 7, 7.5,
8] inches |
|||
| MATERIALS | |||
Solid and semi-solid colors are recommended. Recommended needle size:
|
|||
| GAUGE | |||
30 sts/44 rows = 4 inches in stockinette stitch |
|||
|
PATTERN NOTES [Knitty's list of standard abbreviations and techniques can be found here.] |
|||
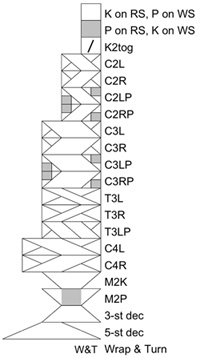
C2L: C2R: Sl next st to cable needle and hold to back of work; k1 from left needle, k1 from cable needle. C2LP: Sl next st to cable needle and hold to front of work; p1 from left needle, k1 from cable needle. C2RP: Sl next st to cable needle and hold to back of work; k1 from left needle, p1 from cable needle.
C3R: Sl next st to cable needle and hold to back of work; k2 from left needle, k1 from cable needle. C3LP: Sl next 2 sts to cable needle and hold to front of work; p1 from left needle, k2 from cable needle. C3RP: Sl next st to cable needle and hold to back of work; k2 from left needle, p1 from cable needle. T3L: Sl next st to cable needle and hold to front of work; k2 from left needle, k1 from cable needle. T3R: Sl next 2 sts to cable needle and hold to back of work; k1 from left needle, k2 from cable needle. T3LP: Sl next 2 sts to cable needle and hold to front of work; k1 from left needle, slip second st on cable needle to left needle, p this st; k1 from cable needle. C4L: Sl next 2 sts to cable needle and hold to front of work; k2 from left needle, k2 from cable needle. C4R: Sl next 2 sts to cable needle and hold to back of work; k2 from left needle, k2 from cable needle. M2K: [K into back loop, p into front loop, k again into back loop] of next st. 1 st increased to 3 sts.
3-st dec: From right to left, next 3 sts on left needle are designated sts A, B and C. Sl sts A and B to right needle, pass st A over st B. Sl st B back to left needle, pass st C over; k remaining st (st B). 3 sts have been decreased to 1 st. 5-st dec: From right to left, next 5 sts on left needle are designated sts A, B, C, D and E. Sl sts A, B and C to right needle, pass st B over st C. Sl st C back to left needle, pass st D over. Sl st C to right needle, pass st A over. Sl st C back to left needle, pass st E over; k remaining st (st C). 5 sts have been decreased to 1 st. RLI (Right Lifted Increase): Use the right needle to pick up the stitch below the next stitch on the left needle. Place it on the left needle, then knit into it. 1 stitch has been increased. LLI (Left Lifted Increase): Use the left needle to pick up the stitch 2 rows below the last stitch on the right needle. Knit into this stitch. 1 stitch has been increased. Wrap and turn. If yarn is at front
of work, bring it between needles to back of work; if it
at back of work, bring it between needles to front of work.
Slip next st, and bring yarn between needles, returning
it to its previous position. Turn work, to begin working
next row.
  |
|||
| DIRECTIONS | |||
|
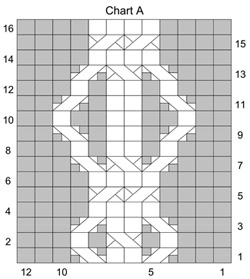
CUFF Note: Cuff is worked back and forth on two needles. If preferred, straight or circular needles can be used instead of double-point needles. Using crochet cast on or other provisional cast on method, CO 24 sts. Set-up Row [WS]: Sl 1, k9, p1, k4, p4, k5. Row 1 [RS]: Sl 1, work Row 1 of Chart A over next 12
sts, k1, p10. Sizes XS and S: Work Rows 3-16 of Chart A. Before continuing to Chart B, review notes in Pattern
Notes re. turning short
rows (Wrap and Turn). Work Rows 1-11 of Chart B. Carefully remove waste yarn from CO edge, placing 23
resulting live sts on needle. Attach yarn with WS facing. Row 1 [WS]: Sl 1, kfb, k2, p4, k4, p1, k10. Continue in pattern, working through Chart A as indicated for your size: Sizes XS and S: Work Rows 15-16 of Chart A, then Rows
1-16. Chart C mirrors Chart B, turning the cable 90 degrees
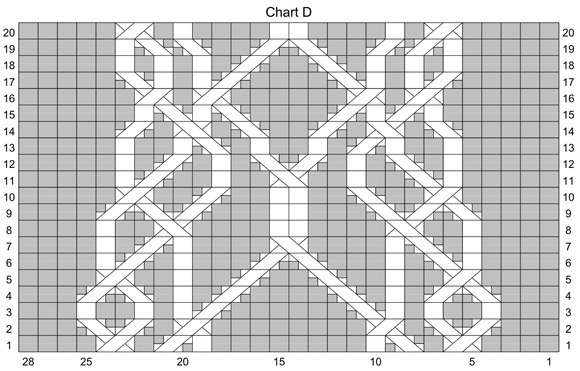
to the left. HAND Place 14 held sts of first half of cuff on needle. Continuing from picked-up sts, work first half of Row 1 Chart D over these 14 sts; join to work in the round, being careful not to twist; using same needle, work second half of Row 1 of Chart D over 14 sts from second half of cuff. This needle will now be designated Needle 1. K all sts on remaining 2 needles (Needles 2 and 3),
evenly increasing 0[2, 2, 6, 8] sts. This point (end
of Needle 3) will now be beginning of round. The next round is worked differently for right and left hands. For sizes XS and S, you will be directed to place a stitch marker at a point between needles; instead, the division between needles will act in place of a stitch marker. If desired, place a removable marker in the work at this point. Right Hand: Work Round 2 of Chart D over sts on Needle
1; k0[0, 2, 2, 4], place marker, k4, place marker, k16[18,
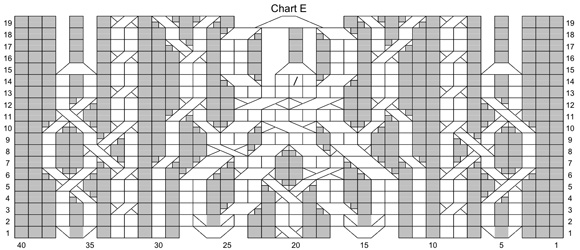
20, 24, 26]. Pattern is set for hand: over sts on Needle 1, work through all rounds of Chart D, then Chart E; over sts on Needles 2 and 3, work in stockinette st, shaping thumb gusset as directed below. Work 2[3, 4, 5, 6] rounds in pattern before proceeding to thumb gusset. Thumb Gusset: Note for Sizes XS and S Only: For right hand, division between Needle 1 and Needle 2 takes place of first marker. For left hand, division between Needle 3 and Needle 1 takes place of second marker. Gusset Increase Round: Work in pattern to first marker,
slip marker, RLI, k to second marker, LLI, slip marker,
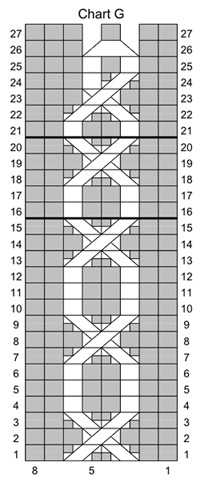
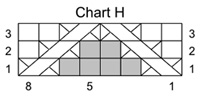
k to end. Next Round: K to first marker, remove marker, place next 12[16, 16, 20, 20] sts on hold on waste yarn, CO 4 sts, remove second marker, join to continue working in the round, k to end of round. 10[11, 13, 15, 17] sts each on Needles 2 and 3. Continue in pattern until all rounds of Chart E have been completed. 49[51, 55, 59, 63] sts. Size XS Only: Work Rounds 1-9 of Chart F. FINGERS Work Each Finger as Follows: Chart H begins 1
st to the right of the
sts which had been worked following Chart G, and ends
1 st to the left of these sts. Setting Up Fingers: RIGHT HAND Little Finger: Slip last 5[5, 6, 7, 8] sts from holder to new double-point needle. This will be third needle of round. Work 7 sts from Needle 1 onto first needle of round, CO 2[2, 3, 3, 3] sts onto second needle of round, work 5[5, 6, 7, 8] sts from third needle of round. Redistribute sts and join to work in the round. 14[14, 16, 17, 18] sts. Ring Finger: Slip last 3[4, 4, 5, 6] sts from holder onto new needle. Attach yarn and k these sts, then CO 3[4, 4, 4, 5] sts onto this needle. This will be third needle of round. Work 7 sts from Needle 1 onto first needle of round, CO 3[4, 4, 4, 5] sts onto second needle of round, work 6[8, 8, 9, 11] sts from third needle of round. Redistribute sts and join to work in the round. 16[19, 19, 20, 23] sts. Middle Finger: Slip last 6[6, 8, 9, 10] sts from holder onto new needle. Attach yarn and k these sts, then CO 3 sts onto this needle. This will be third needle of round. Work 8 sts from Needle 1 onto first needle of round, following Chart G; CO 3 sts onto second needle of round, work 9[9, 11, 12, 13] sts from third needle of round. Redistribute sts and join to work in the round. 20[20, 22, 23, 24] sts. Index Finger: Slip remaining 6[7, 8, 9, 10] sts from holder onto two new needles. These will be second and third needles of round. Attach yarn and k these sts, then CO 4 sts onto third needle. Slip last CO st to new first needle of round; this st will be first st of Chart G. Onto same needle, work remaining 7 sts from Needle 1 following Chart G. Work 9[10, 11, 12, 13] sts from second and third needles of round. Redistribute sts and join to work in the round. 17[18, 19, 20, 21] sts. LEFT HAND Middle Finger: Slip last 6[6, 8, 9, 10] sts from holder onto new needle. Attach yarn and k these sts, then CO 3 sts onto this needle. This will be third needle of round. Work 8 sts from Needle 1 onto first needle of round, following Chart G; CO 3 sts onto second needle of round, work 9[9, 11, 12, 13] sts from third needle of round. Redistribute sts and join to work in the round. 20[20, 22, 23, 24] sts. Ring Finger: Slip last 3[4, 4, 5, 6] sts from holder onto new needle. Attach yarn and k these sts, then CO 3[4, 4, 4, 5] sts onto this needle. This will be third needle of round. Slip last CO st to new first needle of round; this st will be first st of Chart G. Onto same needle, work 7 sts from Needle 1 following Chart G. CO 3[4, 4, 4, 5] sts onto second needle of round, work 6[8, 8, 9, 11] sts from third needle of round. Redistribute sts and join to work in the round. 16[19, 19, 20, 23] sts. Little Finger: Slip remaining 5[5, 6, 7, 8] sts from holder onto two new needles. These will be second and third needles of round. Attach yarn and k these sts, then CO 2[2, 3, 3, 3] sts onto third needle. Slip last CO st to new first needle of round; this st will be first st of Chart G. Onto same needle, work remaining 7 sts from Needle 1 following Chart G. Work 6[6, 8, 9, 10] sts from second and third needles of round. Redistribute sts and join to work in the round. 14[14, 16, 17, 18] sts. THUMB Decrease Round: K2tog, k to last 2 sts of round, ssk. Continue in stockinette st until thumb is desired length. Next Round: [K2tog] to end. Break yarn, draw through all sts and pull tight. Thread yarn through sts again to secure. |
|||
| FINISHING | |||
Sew together CO edges between fingers. Fold reverse stockinette st band at lower edge of cuff to inside of cuff (stockinette st ridge forms a natural fold line) and sew in place, taking care not to sew too tightly. Weave in ends and block. Lightly stretch cuffs during blocking so that cables are spread out.
|
|||
| ABOUT THE DESIGNER | |||
|
Becky lives in Lamoille
county in Vermont with
her husband Neil, two cats
and two dogs, and a growing
number of farm animals.
She knits and designs on
the bus to her real job
every day. She can be found on Ravelry as ladysaphira and blogs here. |
|||
| Pattern & images © 2009 Becky Herrick. Contact Becky |

 C3L: Sl next 2 sts to cable needle and hold to front of
work; k1 from left needle, k2 from cable needle.
C3L: Sl next 2 sts to cable needle and hold to front of
work; k1 from left needle, k2 from cable needle.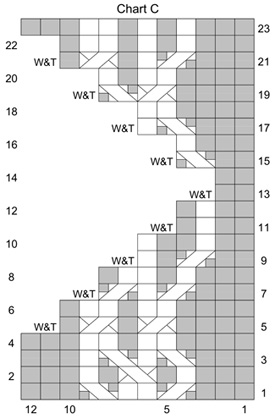 M2P: [K into front loop, then back loop, then front loop
again] of next st. 1 st increased to 3 sts.
M2P: [K into front loop, then back loop, then front loop
again] of next st. 1 st increased to 3 sts.