|
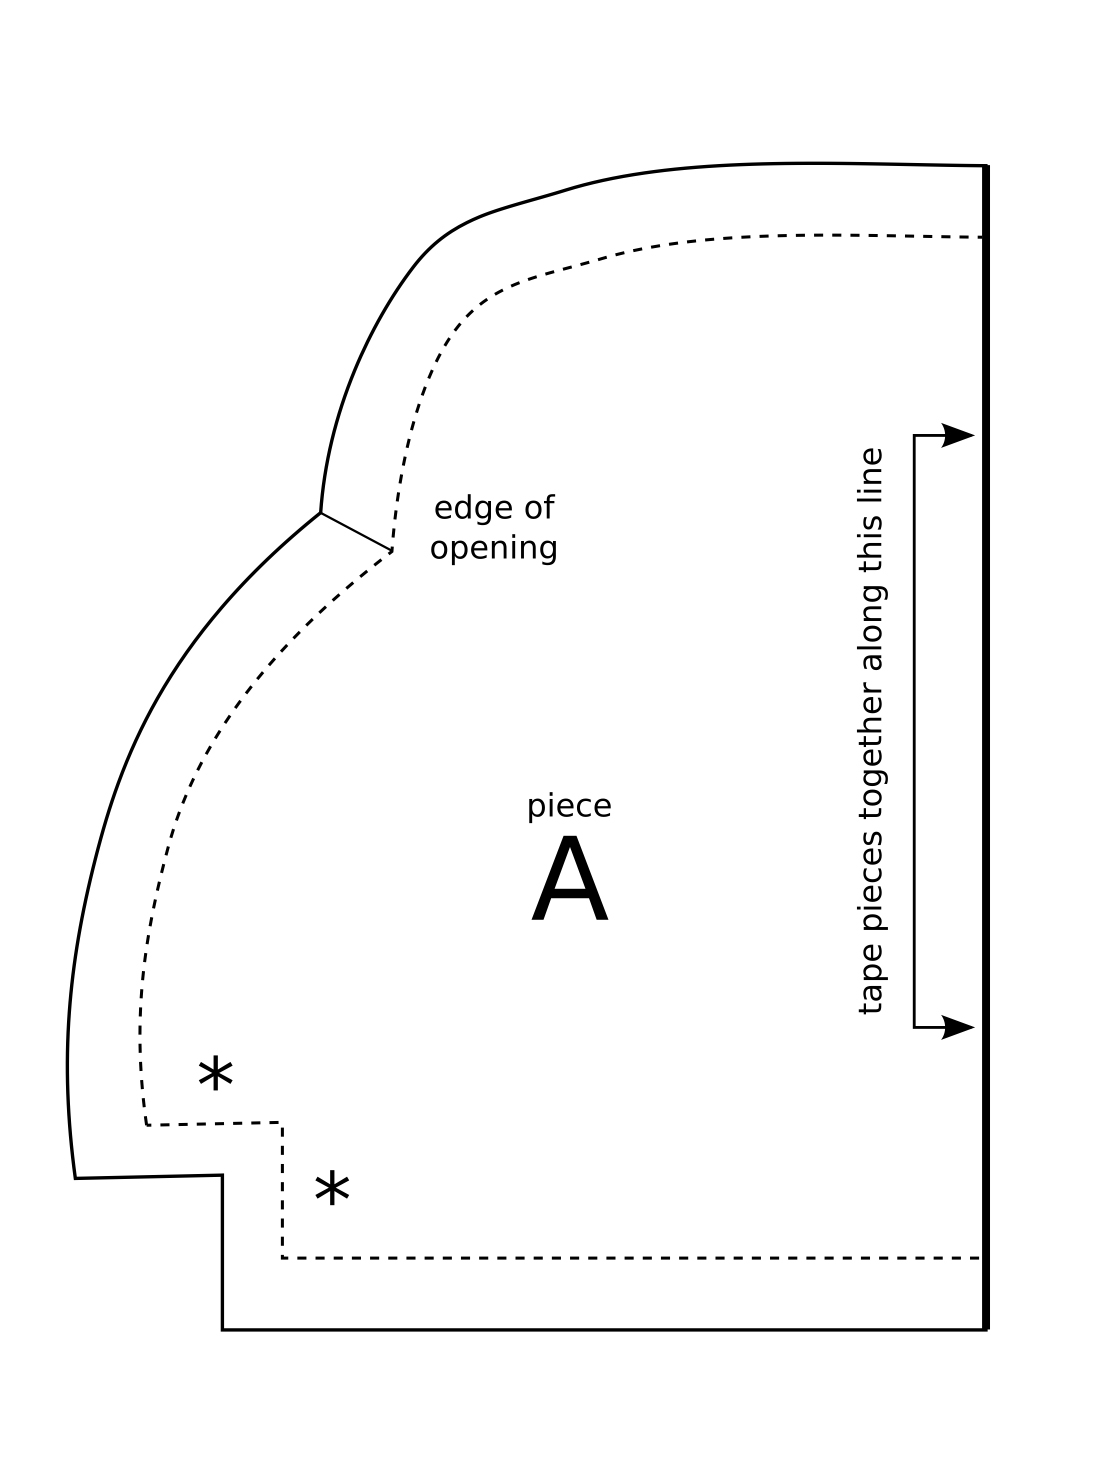
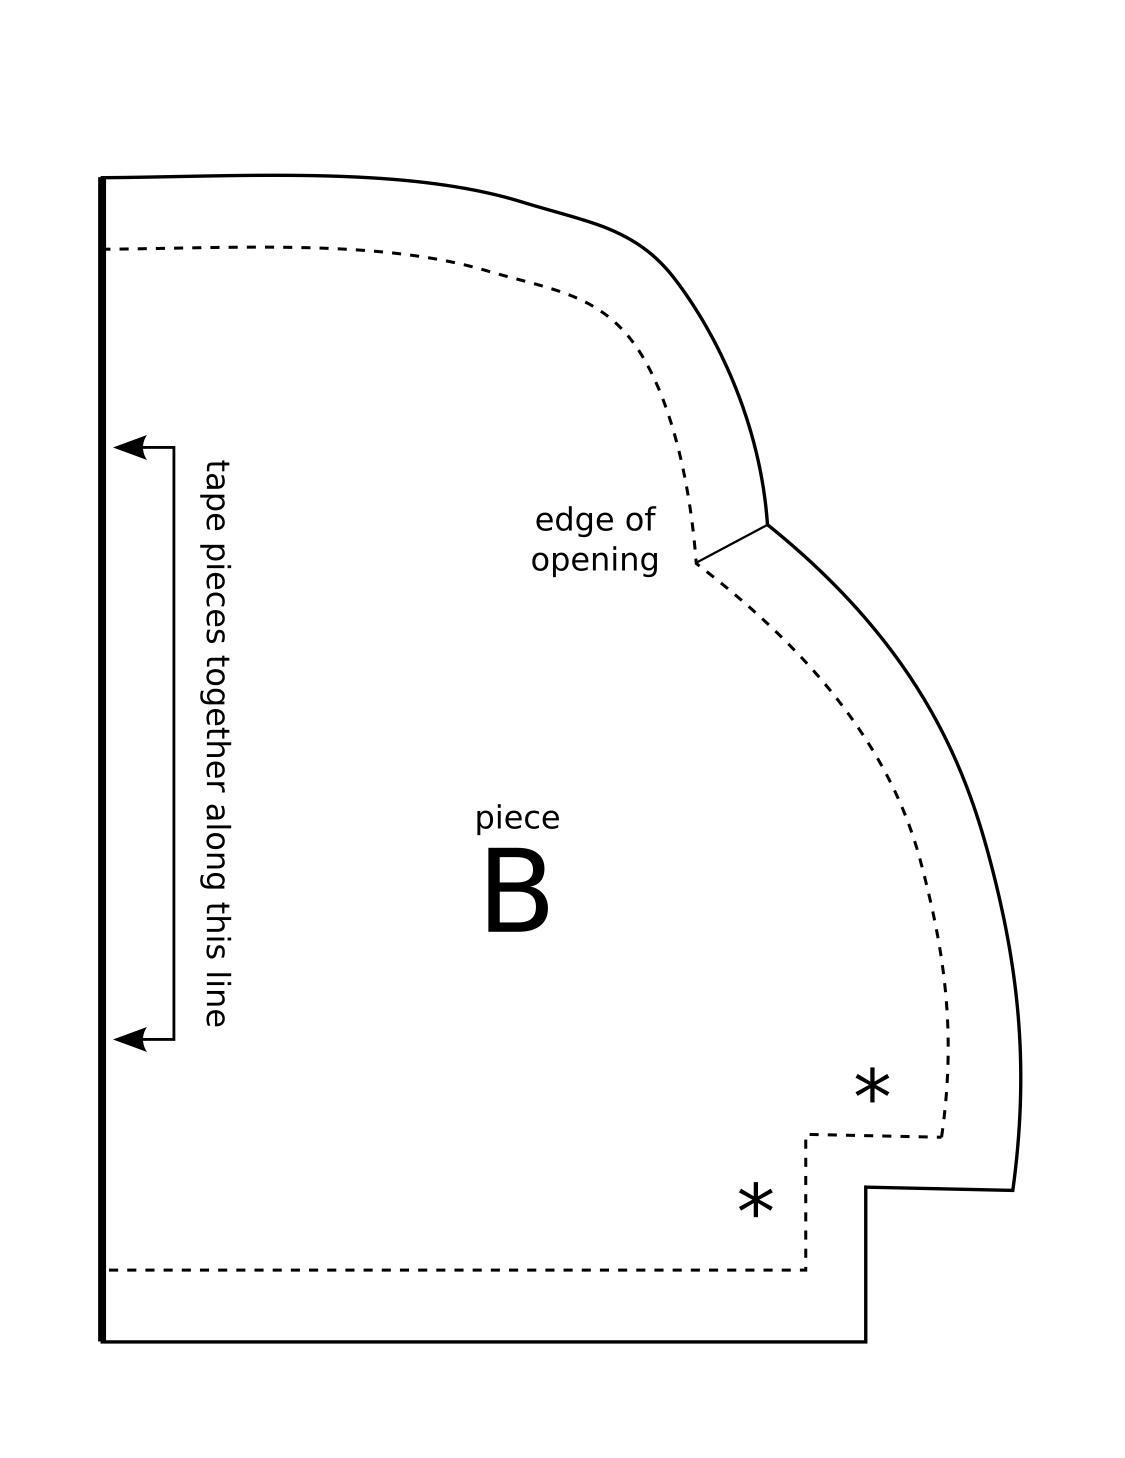
 Step 1: Prepare Pattern and Cut Fabric Step 1: Prepare Pattern and Cut Fabric
Print pattern pieces A and B. Tape together along the
bold line as indicated, to produce a symmetrical pattern.
The solid outer line indicates the cutting line; the
dotted inner line indicates the seamline. Check the shape
of the purse frame against the paper pattern; the frame
should be the same shape as the upper edge of the seamline,
between the edges of the purse opening. If necessary,
adjust the shape of the pattern before cutting it out.
Cut 2 pieces each from underlining fabric, lining fabric,
and interfacing, transfering the markings for the edges
of the purse opening.
If desired, cut seam allowances
from pattern piece along seam lines shown, and use washable
markers to trace seam lines onto fabric as guides for
sewing. Marked seam allowance is 1/2 inch, except at
gusset edges (short edges marked with asterisks), where
it is 3/8 inch.
Step 2: Attach Interfacing and Underlining
Pin interfacing
to WS of underlining, matching edges. Baste together
around edges, using a 3/8 inch seam allowance. Repeat
for other pieces of interfacing and underlining. This
forms the front and back panels of the purse body. The
RS of the underlining fabric is the RS of the panel;
the interfacing forms the WS of the panel.
Step 3: Form Purse Body and Lining
Pin panels together
with right sides together, carefully matching edges.
Working downward from marked
edge of opening and using the marked 1/2 inch seam allowance,
sew panels together along curved side edge, ending at
corner where side edge meets gusset edge (short edges
marked with asterisks). Sew other side together in the
same way.
Sew panels together along
straight lower edge, leaving gusset edges open.
Fold corners of bag, pinching inner corners of gussets
so that gusset edges meet; pin together. Sew gusset edges,
using marked 3/8 inch seam allowance.
Trim seam allowances along curved side edges, clipping
every inch or so to reduce bulk and smooth curves. Turn
right side out, checking to ensure that corners are turned
properly and edges of opening are even. Press if necessary.
Pin lining pieces together with right sides together,
carefully matching edges. Sew together in the same way
as the body panels. Do not turn right side out.
Step 4: Attach Lining to Purse Body
Insert purse body
into lining, so that RS of body faces RS of lining. Carefully
match edges of upper opening, and pin in place. Sew purse
body to lining along edges of opening, leaving a gap
approx. 3 inches long. It will be easiest to finish the
bag neatly if this gap is left along the straight upper
edge of the opening.
Turn lined purse body right
side out by pulling carefully through gap. Sew gap closed
by hand. Press if necessary.

KNITTED SHELL
Using Judy's Magic Cast On, CO 73 sts onto each of two
circular needles. Working back and forth over the sts
on one needle, work 19 rows in stockinette st, ending
with a RS row.
Continuing from last row worked, pick up and k 10 sts
(approx. 1 st for every 2 rows) along one short edge
of piece; using second circular needle, k all sts on
second needle, then pick up and k 10 sts along remaining
short edge of piece. Divide sts between needles so that
5 sts from each short edge are placed on each needle.
K 1 round, ending at end of second needle (last 5 picked-up
sts are on first needle and remain unworked for
this round). This point will be beginning of round. 166
sts: 83 sts on each needle. Break yarn.
Thread large beads onto one ball of yarn, and small
beads onto the other ball
of yarn. It is not necessary
to thread all beads at one time. You can always break
yarn during knitting and thread more beads. When working
the charted bead pattern, some rounds will be worked
with one ball of yarn, and some rounds with the other
ball, depending on which beads are required. For rounds
that do not require beads, use the ball that was not
used for the preceding beaded round.
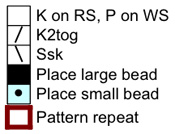
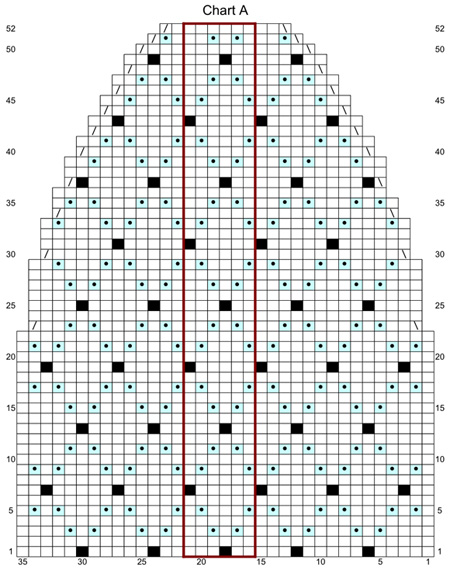
Work Rounds 1-52 of Chart A, decreasing as shown. Chart
A is worked twice in each round, once over sts on on
first needle, and once over sts on second needle. Outlined
pattern repeat is worked nine times in each half of the
round. 118 sts when Round 52 is complete: 59 sts on each
needle.
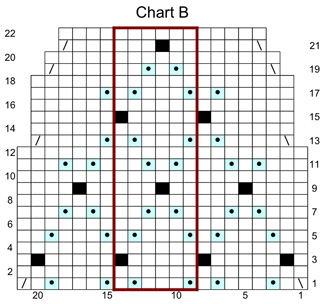
Divide for Opening:
Work Rows 1-22 of Chart
B back and forth over sts on first needle, leaving
remaining sts on hold on second needle. Outlined pattern
repeat is worked 7 times in each row. When Row 22 is
complete, 51 sts remain on first needle.
Bead placement for this panel is complete.
Shape Upper Edge:
Row 1 [RS]: Ssk, k to last
2 sts, k2tog. 49 sts.
Row 2 [WS]: BO 2 sts, p
to last 2 sts, p2tog tbl. 46 sts.
Row 3 [RS]: BO 2 sts, k
to last 2 sts, k2tog. 43 sts.
Row 4 [WS]: BO 3 sts, p
to last 2 sts, p2tog tbl. 39 sts.
Row 5 [RS]: BO 3 sts, k
to last 2 sts, k2tog. 35 sts.
BO remaining 35 sts purlwise.
Join yarn to sts on second needle with RS facing. Work
as for sts on first needle.
|


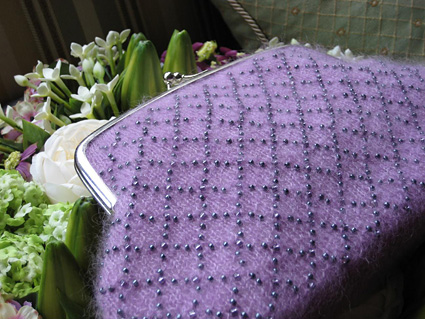
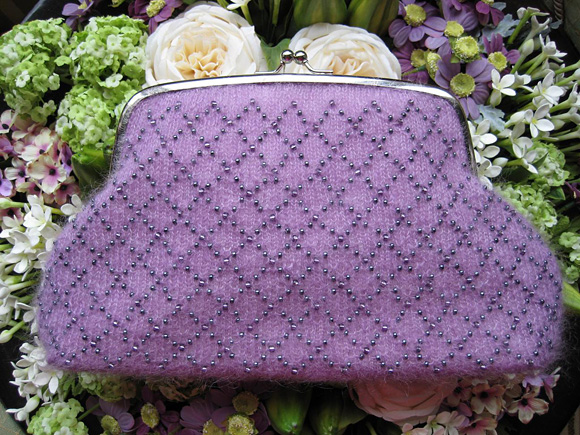
 This purse has
four layers: a beaded knitted exterior shell, an ivory
silk dupioni underlining to show off the knitted fabric,
a heavy-weight sew-in interfacing to shape and support
the purse, and a pink silk dupioni lining for a clean
interior finish.
This purse has
four layers: a beaded knitted exterior shell, an ivory
silk dupioni underlining to show off the knitted fabric,
a heavy-weight sew-in interfacing to shape and support
the purse, and a pink silk dupioni lining for a clean
interior finish.