
|
|
 |
|
|
 |
This project came about last June when Amy Singer passed by the booth at TNNA [the yarn industry trade show] and admired the model sweaters that I had designed to show off my bulky merino yarn “Granite”. Stitches such as cables and lace really take on drama and become expressive in this yarn. It has a very sculptural quality—it’s a rustic singles, but with a channel of nylon stitches sewn down the center of the strand that forms a core. Being that the yarn is also very suitable for outerwear, Amy had the brilliant idea of asking me if I’d be interested in contributing a piece to Knitty for this issue that she was beginning to plan at the time. In all these years Amy and I had greeted each other and shot the breeze at TNNA and other events, but I’d never submitted to Knitty. I usually have more design work than I can handle and I was just finishing an intense book of lace patterns at the time of the show. I had also just joined in Facebook and Ravelry and was enjoying how the connections made online had revved up my experience of the trade show. I particularly felt proud of the strength of the indie designers at the event and felt invigorated by the display of creativity and professionalism among their ranks. So much wonderful stuff has come from the internet knitting site pioneers. And so it seemed that it really was about time to do something for Knitty. |
Besides, my knitterly muses are temptress sirens that sing to me and if you tied me to a mast to protect me from embarking on new projects, I would try to knit something with the rope. So since Amy asked I was powerless to refuse. Amy asked for a cardigan or jacket, something with texture and perhaps a shawl collar. I’m sure she meant your typical, traditional shawl collar, but the muses drove me and what I came up with is a literal shawl (or capelet) as a detachable collar. This is what happens when an editor says she trusts you, much rowing about until some excitement is whipped up. I saw my Knitty debut as an opportunity for something a little dramatic that could express what I’ve been most intrigued by over the past few years: Lace. I wanted to work out an original stitch pattern that resembled the kunststicke doilies that have been my obsession. So I created a chart repeat that might work for the overall fabric of the garment with 3[4 or 5] repeats around and some creative sizing solutions. The chart incorporated a curved decrease that was intended to draw in from the hip to flatter the waist for a cropped, fitted jacket which is a favorite silhouette of mine. I knit a swatch of one repeat that could also serve as a sleeve and pinned it up all over the dress form. I loved the look of the lace arches at the chunky gauge, but, besides the difficulty involved in charting the various sizes, the scale of the lace was not as flattering when draped over the hips to bust as I had hoped; large lace arrows seemed to point to the bust and these strong lines would hit very differently for each size and not always be aligned with the “princess seam”. I decided that as a longer, less fitted “duster” jacket with the pattern featured only on the hem and the rest plain would be a solution. So I cast on four repeats with a garter band at each edge. Then I pinned this up around the dress form from hip to top thigh. It had potential. But how I really liked the piece was slung around the shoulders. I wanted to bind off and wear it as a shawl. I was at an impasse. I wanted to see how the duster would look, but it would require more yarn and more knitting. It would be a nice sweater coat that would appeal to advanced knitters but it didn’t seem that special to me—the lace was dramatic, yes, and I was going to carry a small lace motif as a stripe up to the shoulders--but would it just be another nice sweater coat? I try to make each piece I do something that calls to be knit. I kept draping the large swatch over the thighs and then over the shoulders. Well, didn’t Amy want a shawl collar? I decided to scrap the duster version—or, actually, to hold onto the 4-rep piece to use as a “shawl” collar. I went back to the cropped jacket silhouette but created a subtler hip lace dart motif. And I used the dramatic lace chart for the sleeves. I think the jacket looks great and special on its own and so does the shawl. Together they are knock out. The muses are appeased for a brief moment. I named it the Lady Lovelace after Ada Lovelace to honor the internet pioneers such as Knitty (and with the built-in pun of course it celebrates my own love of lace). Lady Ada Lovelace, Byron’s daughter, a mathematician and an early computer scientist, is a historical person who has long fascinated me. My lovely model is none other than Liana Allday, an editor
at STC Craft whom I had the pleasure of working
with on my most recent book, Loop-d-Loop
Lace. When I first met Liana, we joked that her hairstyle (kind
of a Swiss Miss girl, braided up-do) resembled those of the
models in my first book. When the photoshoot for this project
came up I emailed Liana to see if she I could put her
hair to work. I also called on a photographer
I worked with on as a stylist for another STC Craft book, Marianne
Rafter. |
|
|
|
 |
|
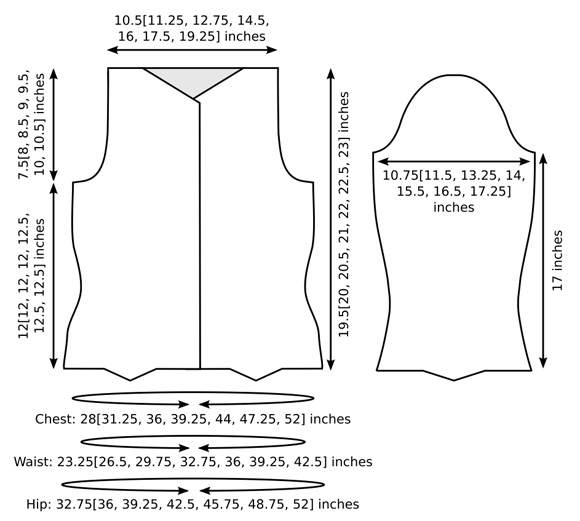
SIZE |
|
FINISHED MEASUREMENTS |
|
MATERIALS Notions |
|
GAUGE |
10 sts/14 rows = 4" in
stockinette st using larger needle |
|
PATTERN NOTES |
|
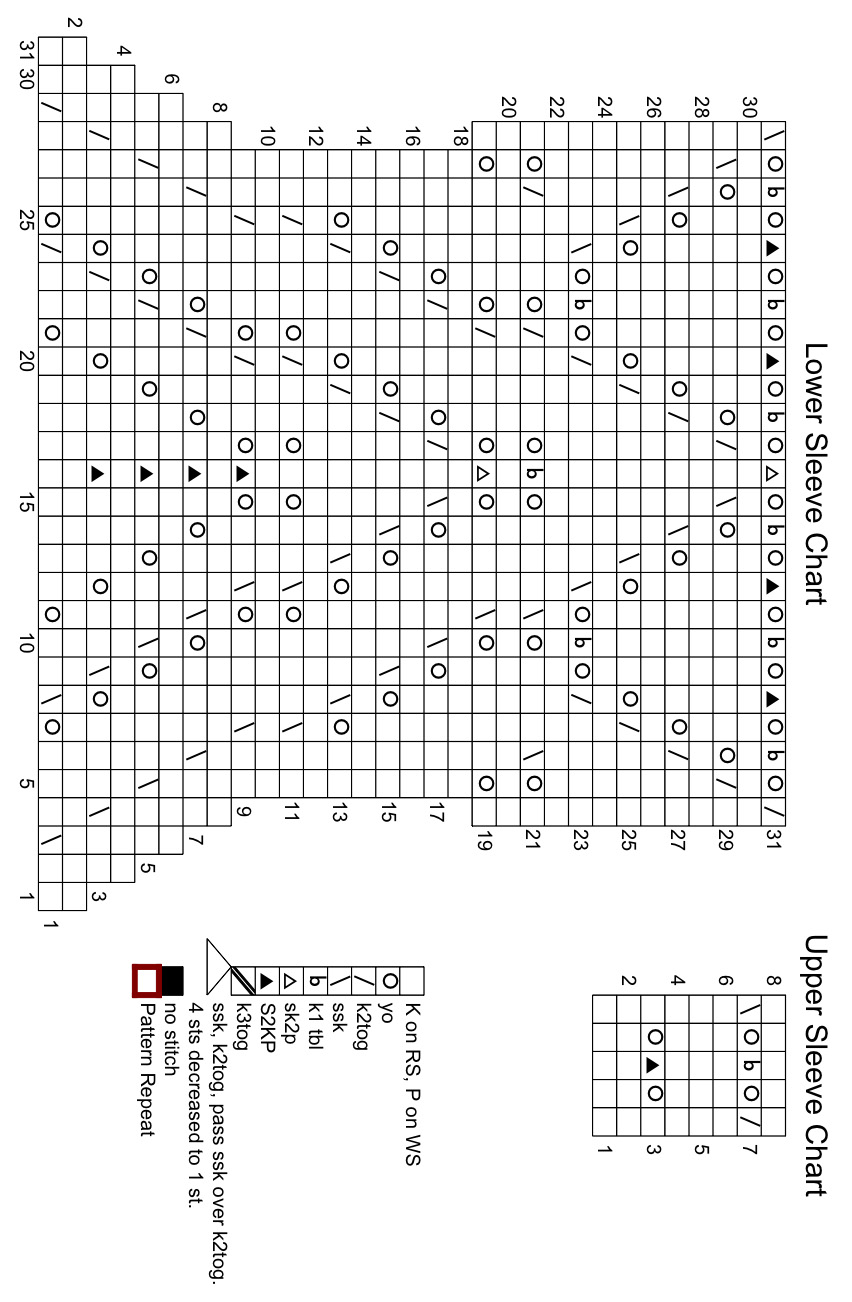
Jacket is worked in one piece to armholes. Shawl collar is a seperate piece, and can be knit on its own as an accessory. m1p (Make 1 purl stitch): Insert left needle, from back to front, under strand of yarn which runs between last stitch on left needle and first stitch on right needle; purl this stitch. 1 st increased (stitch will be twisted). sk2p: Sl 1 knitwise, k2tog, pass slipped st over. 2 sts decreased. S2KP: Slip next 2 sts together, knitwise, as if to work a k2tog. Knit next st, then pass both slipped sts together over st just knit. This forms a centered double decrease. Instructions for the Long-Tail Cast On can
be found here. |
|
|
DIRECTIONS Row 1 [RS]: P2, k3[4, 5, 6, 7, 8, 9], [place marker, ssk, k2,
yo, k9, yo, k2, k2tog, place marker, k2[4, 6, 8, 10, 12, 14]]
three times, place marker, ssk, k2, yo, k9, yo, k2, k2tog, place
marker, k3[4, 5, 6, 7, 8, 9], p2. Continue in pattern until work measures 6[6, 6, 6, 5.5, 5.5, 5] inches, ending with a WS row. Shape Bust: Continue in pattern until work measures 12[12, 12, 12, 12.5, 12.5, 12.5] inches or desired length to underarm, ending with a WS row. Next Row [RS]: P2, k16[17, 20, 22, 25, 26, 29], BO 2[4, 4, 4, 4, 6, 6] sts, k31[33, 39, 43, 49, 51, 57] (32[34, 40, 44, 50, 52, 58] sts on right needle after bound off sts), BO 2[4, 4, 4, 4, 6, 6] sts, k to last 2 sts, p2. Left front will be worked over last 18[19, 22, 24, 27, 28, 31] sts; place all other sts on st holders or waste yarn. LEFT FRONT Continue in pattern until work measures 5.5[6, 6.5, 7, 7.5, 8, 8.5] inches from beginning of armhole shaping, ending with a WS row. Shape Neckline: Place 32[34, 40, 44, 50, 52, 58] held sts of back on needle and join yarn with WS facing. P 1 row. Work in stockinette st until work measures 7.5[8, 8.5, 9, 9.5,
10, 10.5] inches from beginning of armhole shaping. RIGHT FRONT P 1 row. Continue in pattern until work measures 5.5[6, 6.5, 7, 7.5, 8, 8.5] inches from beginning of armhole shaping, ending with a RS row. Shape Neckline: Using larger needle, CO 31[31, 33, 33, 35, 35, 37] sts. P 1 row. Row 1 [RS]: K0[0, 1, 1, 2, 2, 3], work Row 1 of Lower Sleeve
Chart, k0[0, 1, 1, 2, 2, 3]. Next Row [WS]: P10[10, 11, 11, 12, 12, 13], place marker, p5,
place marker, p to end. Shape Sleeve: Sizes XS, S, M, L, 1X Only: Sizes 2X, 3X Only: All Sizes: Shape Sleeve Cap: Decrease Row [RS]: K1, k2tog, work in pattern to last 3 sts,
ssk, k1. Work 4[6, 4, 4, 4, 6, 4] rows in pattern. Work Decrease Row. P 1 row. Using larger needle, CO 128[128, 128, 128, 159, 159, 159] sts. P 1 row. Row 1 [RS]: P2, work Row 1 of Lower Sleeve Chart 4[4, 4, 4,
5, 5, 5] times, p2. Next Row [RS]: P2, work Row 1 of Shawl Chart, working outlined
pattern repeat 3[3, 3, 3, 4, 4, 4] times; p2. Next Row [RS]: BO 16 sts, transfer st on right needle to smaller
needle; using smaller needle, [p1, k1]
to last 2 sts, p2. Strap: Using larger needle and with RS facing, pick up and k 3 sts along right front edge of shawl, beginning 3 rows below bound off edge and ending at upper right front corner (see photos for strap placement). Work in garter st until strap measures 4 inches. BO all sts. |
|
FINISHING Sew snaps to front bands, placing bottom snap 1.5 inches up from lower edge and top snap 5 inches down from neck edge, spacing remaining snaps evenly between. Sew female piece of each snap to RS of left front band, and male piece to WS of right front band. Use yarn and yarn needle to sew buckle to RS of shawl, close to left front edge, just below ribbed band - try on shawl and use photos as guides to determine best location for buckle. |
|
|
| ABOUT THE DESIGNER |
|
Teva Durham is the author of Loop-d-Loop (STC Craft 2005), Loop-d-Loop
Crochet (STC Craft 2007) and the soon to be released Loop-d-Loop
Lace (STC Craft, May 2011). Teva has developed a line of yarns
and patterns distributed through Tahki Stacy Charles. |
|
Pattern & images © 2011 Teva Durham. Contact Teva |