|
|
 |
|
Tweet
|
|
|
|
|
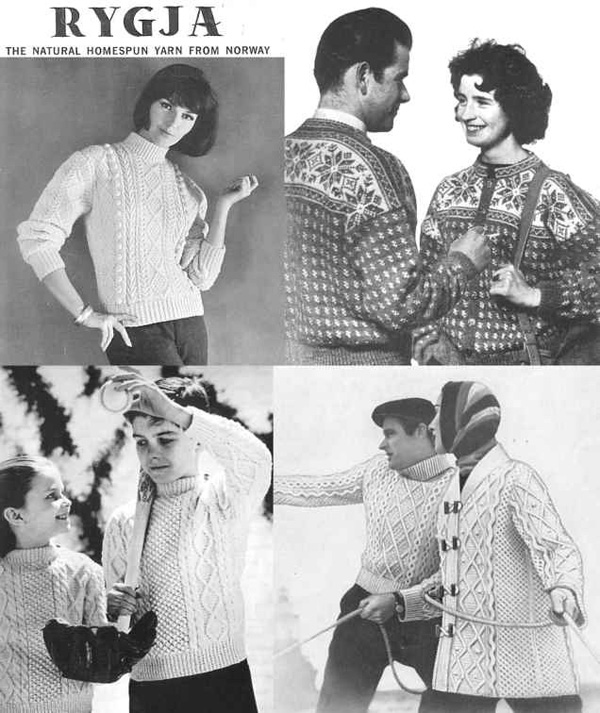
Aran Sweaters in America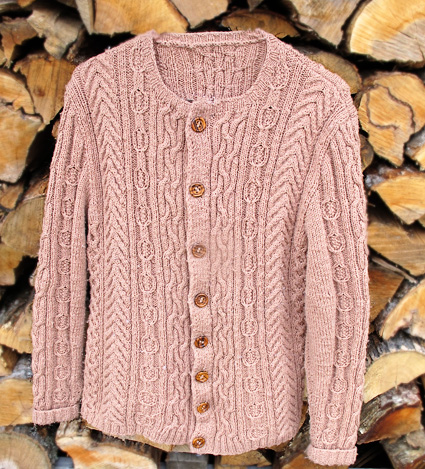 Americans are in love with the magic and mystery of Ireland. Every March, Saint Patrick's Day greeting cards and green milkshakes become bestsellers. Leprechauns decorate cereal boxes in our grocery stores. Four-leaf clovers and pots of gold at the end of the rainbow fuel our collective imagination. Celtic knotwork motifs adorn our jewelry, clothing, and even our skin, as tattoos. And last, but not least, knitters and non-knitters alike have a never-ending love affair with cable-knit sweaters from the Aran Islands, the kind my grandmother, Ruth, used to call "Irish pattern sweaters." Mystery and misinformation surround the history of Aran-style knitting, named for a trio of small islands in the west of Ireland. Some basic questions need to be asked to understand the iconic garment, the "Aran sweater." What is it? When did it originate? And how did it begin? These questions are all complicated and the answers are murky. The style has also evolved and been interpreted in different ways over the years, for both commercial and artistic reasons. At its simplest, an Aran sweater is a heavily textured garment, decorated with combinations of stitch patterns that most often emphasize intricate cable patterning, sometimes also embellished with bobbles, and frequently worked in creamy or white yarn. This type of patterning, especially when constructed in a natural white, brings the word "Aran" to the experienced knitter's consciousness. That said, similar patterning worked in yarns of other colors is equally "Aran," although certainly cables and bobbles show up best in the light-colored yarns that are most readily associated with the tradition. The style originated in the early twentieth century as a localized interpretation of the fisherman's gansey. This much we do know. How it began brings up many theories and stories. Much of the misinformation has arisen through the efforts of Heinz Edward Kiewe, a twentieth-century master of recognizing a fine thing and marketing the heck out of it. His contribution includes the development of a mythology about the sources of Aran knitting and the meanings of its patterns. Kiewe did the world a great service by bringing the Aran sweater to its attention, but finding its real roots takes more than creative imagination -- and may not, in fact, be entirely possible. While proficient knitting was well established in the Aran Islands before this type of garment appeared, the interactions between knitters that resulted in the development of this distinctive style have not been completely determined. Alice Starmore has gathered and evaluated a lot of material relating to the- style's origins in her classic book Aran Knitting. Several writers on the topic, including Starmore, have discussed what some of them call the "American connection." In A History of Handknitting and in Irish Knitting, respectively, authors Richard Rutt and Rohanna Darlington both relate a story about a woman from the Aran Islands who spent some time near Boston, Massachusetts, where she reportedly learned to knit cables from an immigrant from another part of Europe, then brought the techniques back to Ireland and shared them with her neighbors. In The Aran Sweater, Deirdre McQuillan shares a different version of the story, where the woman visiting America saw blue fisherman's sweaters in a shop window, copied the designs in her own knitting, and embellished the idea further by creating new cables based on plants found near her Irish home. Without question, Aran-style sweaters have been important both in Ireland and in North America, and both culturally and artistically. Whether the style began with a spark struck in the United States that was transported back to Ireland or the lantern was lit entirely on Irish soil, the connections are strong. Between the 1820s and the 1920s, several waves of emigration to the United States brought large numbers of people west across the Atlantic in search of jobs or, sometimes, simply more food than was available in Ireland. These Irish American immigrants kept strong ties to their homeland that passed down through generations, and those relationships swirl around the history of Aran knitting. The flow goes both directions, and it affects many art forms. "There are traditions that have built up around Irish-America that are actually Irish American and are not actually Irish," Deirdre Thornton, an Irish blogger, explains in her Aran Knitting FAQ. "For a long time Ireland was very dependent on Irish Americans for money and maintaining some illusions were in many ways more important than the truth and while both cultures have roots in the same source there have been different growth and in ways it has been quite different." "To the Irish diaspora in North America, these sweaters were indeed powerful symbols of loss," designer Kate Davies wrote on her blog, "in the imagined sense of a lost identity: old family connections, tribal belongings, a national heritage, the sense of place." The almost magically complex interlacing patterning of Aran designs -- formed, as always in the craft, with variations on just the two stitches, the knit and the purl -- carry some of those senses that Kate Davies speaks of not only to Irish knitters but, somehow, to all knitters: a sense of identity and tribal belonging seems to arise from the forms of the crossing stitches and the high-relief of the bobbles. Perhaps this sense of loss and deeper meaning is why my grandmother, an Eastern-European Jew living in America, felt such a strong compulsion to knit Aran sweaters. Whatever their source, the sweaters began to be knitted at about the time of the last big wave of Irish emigration to North America. In Ireland itself, Aran-style sweaters first appeared in the early decades of the twentieth century when local knitters modified traditional fisherman's guernseys by making them more elaborate and more densely textured. In 1936, Heinz Kiewe discovered the one that inspired him in a shop in Dublin. Obviously, if the garment had made it to Dublin and was sufficiently realized to catch Kiewe's eye so effectively, someone had been knitting items of this type for a while. Intricacy at this level doesn't get invented overnight. Twenty years later, in 1956, the style began to make a significant impact on the American knitting scene, when Woman's Day published a booklet of Hand Knits from the Aran Islands. Perhaps the first Aran patterns published in the United States, this collection included instructions to make a slipover (pullover), coat, socks, and "two-finger" mittens (shooting gloves). The materials called for undyed wool yarn from the Norwegian company Rygja and suggested using a toothpick to hold the moving stitches while working the cable crossings! The patterns were not charted, but each project was accompanied by a small diagram showing the layout of stitches on the knitted pieces. Sadly, the designer was not credited, so we may never know whether these beautiful sweaters were designed by an Irish or an American knitter.
Probably the most influential person in bringing the Aran sweater into popularity in the United States was Elizabeth Zimmermann, who knit a man's pullover decorated with diamond and staghorn cables for Vogue Knitting in 1958. It would be an understatement to say that she was quite unhappy when she discovered that her pattern, written for construction in the round, had been rewritten by the publisher for flat knitting! The original Aran sweaters were, indeed, knitted in the round, but the construction was changed to flat knitting later when the garments were produced for commercial markets and flat-knitted pieces could more easily be adapted to multiple sizes. This eventually also led to a change from a design with a strap or saddle-shoulder construction, which allowed a cable motif to be carried all the way from sleeve cuff to neckline, to other types of shoulder shaping, including drop-shoulder, raglan, and set-in sleeves. Shaping for a Modern Fit I've designed my version of my Grandma Ruth's Irish pattern sweater with some simple armhole and sleeve-cap shaping to eliminate underarm bulk, and with a saddle shoulder so one of the cable motifs can make a traditional journey all the way up to the neckline. I've also added waist shaping, hidden in the reverse stockinette stitch sections between the cables, for a flattering outline. If you prefer a less fitted body, just skip the waist decreases and increases. Converting this to a unisex sweater for men can be accomplished in the same way, and the armhole and sleeve-cap shaping can be eliminated as well. To convert to a unisex drop-shoulder construction, simply knit the body straight up and continue to increase on the sleeves until they are the full length to the shoulder. Further Reading: |
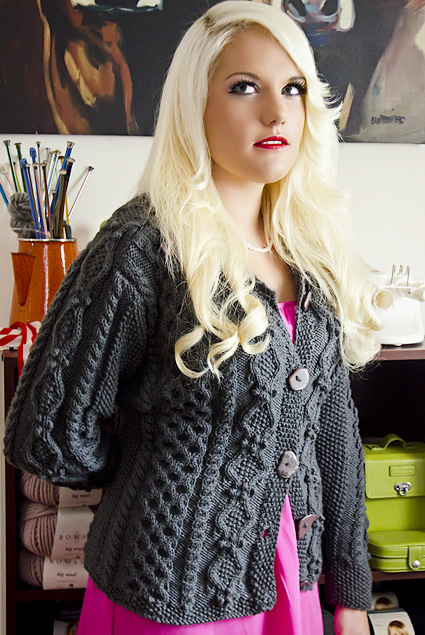 |
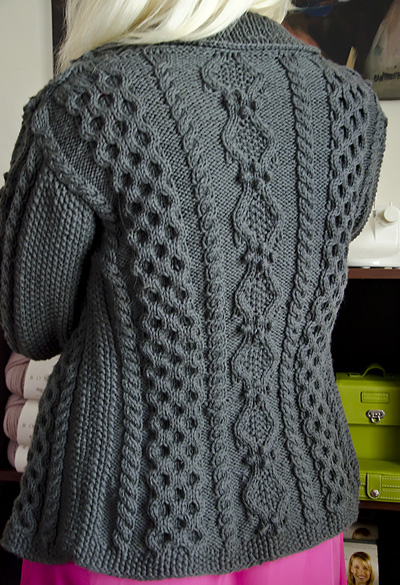
by Donna Druchunas This cardigan is based on the designs my grandmother made in the 1970s using two of my favorite cable stitches: honeycomb and hollow oak. The first I learned from my grandmother when I was a girl, and the second I learned from the owner of my local yarn shop after I returned to knitting in my mid-thirties. Saddle shoulders give a nod to tradition and waist shaping -- worked in the purl columns between the cable motifs -- updates the silhouette with a contemporary fit.
 |
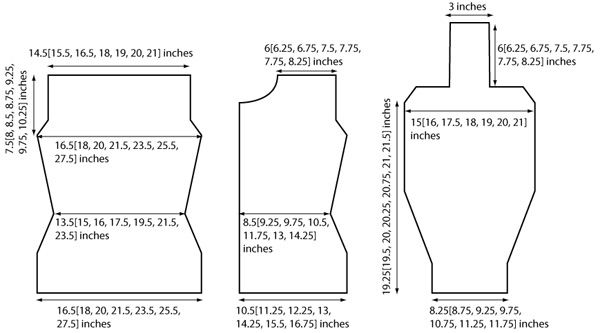
SIZE |
|
MATERIALS Notions |
| GAUGE |
16 sts/28 rows = 4 inches in Reverse Stockinette stitch with larger needles, blocked. |
|
PATTERN NOTES |
Work armhole decreases using k2tog or p2tog as needed to maintain seed stitch pattern. When all seed st stitches have been decreased, work all decreases as p2tog. When working decreases at neck, maintain pattern wherever possible. If maintaining a cable pattern becomes impossible, simply work all knit sts as knit and purl sts as purl. Reverse Stockinette Stitch Seed Stitch (worked over an odd number of sts) Seed Stitch (worked over an even number of sts) C4B: Sl 2 sts to cn and hold in back, k2; k2 from cn. |
| CHARTS The charts for this pattern are very large and fit on a letter-sized page. |
|
DIRECTIONS |
 With smaller needles, CO 71[77, 83, 89, 97, 105, 113] sts. Hem: Begin charts: Row 2 [WS]: Seed st 5[8, 5, 8, 8, 8, 8], k4[4, 4, 4, 5, 6, 7], (work Row 2 of Left Rope Cable, k0[0, 4, 4, 5, 6, 7]) 0[0, 1, 1, 1, 1, 1] time, work Row 2 of Honeycomb Cable, k4[4, 4, 4, 5, 6, 7], work Row 2 of Right Rope Cable, k4[4, 4, 4, 5, 6, 7], work Row 1 of Hollow Oak Cable, k4[4, 4, 4, 5, 6, 7], work Row 2 of Left Rope Cable, k4[4, 4, 4, 5, 6, 7], work Row 2 of Honeycomb Cable, (k0[0, 4, 4, 5, 6, 7], work Row 2 of Right Rope Cable) 0[0, 1, 1, 1, 1, 1] time, k4[4, 4, 4, 5, 6, 7], seed st 5[8, 5, 8, 8, 8, 8]. Continue working charts, seed st, and reverse stockinette st as established until piece measures approx. 4 inches from cast on, ending after a WS row. Begin waist shaping: Work even in patt for approx. 4 inches more, ending after a WS row. Begin bust shaping: Work even in patt for approx. 4 inches more, ending after a WS row. Work 1 WS row even in patt, or work until piece measures desired length to armhole, ending after a WS row. Shape armholes: 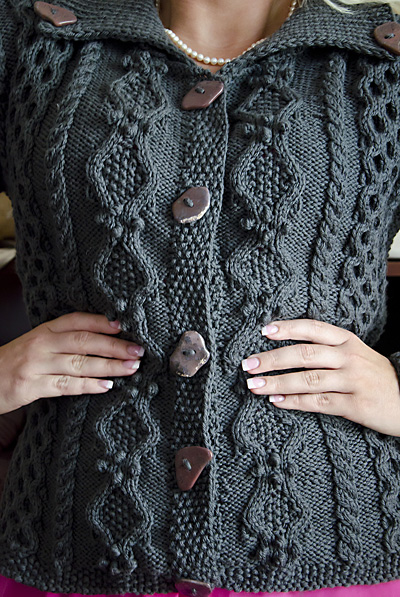 With smaller needles, CO 44[47, 50, 53, 58, 63, 68] sts. Row 1 [RS]: P1, work in seed st to end. Row 2 [WS]: Work seed st to last st, k1. Rep Rows 1-2 twice more, then rep Row 1 once more. Increase row [WS]: Seed st 11[14, 9, 12, 13, 14, 15], pfb twice, (seed st 0[0, 6, 6, 7, 8, 9], pfb twice) 0[0, 1, 1, 1, 1, 1] time, seed st 4, pfb twice, seed st 6[6, 6, 6, 7, 8, 9], pfb twice, seed st 8[8, 8, 8, 9, 10, 11], pfb twice, seed st 7[7, 7, 7, 8, 9, 10]. 52[55, 60, 63, 68, 73, 78] sts. 8[8, 10, 10, 10, 10, 10] sts increased. Begin charts: Row 2 [WS]: Seed st 5[8, 5, 8, 8, 8, 8], (k0[0, 4, 4, 5, 6, 7], work Row 2 of Left Rope cable) 0[0, 1, 1, 1, 1, 1] time, k4[4, 4, 4, 5, 6, 7], work Row 2 of Honeycomb Cable, k4[4, 4, 4, 5, 6, 7], work Row 2 of Right Rope Cable, k4[4, 4, 4, 5, 6, 7], work Row 2 of Hollow Oak Cable, k4[4, 4, 4, 5, 6, 7]. Continue working charts, seed st, and reverse stockinette st as established until piece measures approx. 4 inches from cast on, ending after a WS row. Begin waist shaping: Work even in patt for approx. 4 inches more, ending after a WS row. Begin bust shaping: Work even in patt for approx. 4 inches more, ending after a WS row. Work 1 WS row even in patt, or work until piece measures same as Back to armhole, ending after a WS row. Shape armholes: Shape neck: Cont in patt, binding off 5[5, 6, 7, 8, 8, 8] sts at beg of next RS row, 4[4, 4, 3, 4, 4, 4] sts at beg of foll RS row, then 2[2, 2, 2, 2, 3, 3] sts at beg of foll 2[3, 3, 3, 3, 3, 3] RS rows. Dec 1 st at neck edge on every foll RS row 4[3, 2, 2, 2, 2, 2] times. 31[32, 35, 38, 39, 39, 42] sts rem. Work even until piece measures same as Back to shoulder. With smaller needles, CO 44[47, 50, 53, 58, 63, 68] sts. Row 1 [RS]: Work in seed st to last st, p1. Row 2 [WS]: K1, work seed st to end. Rep Rows 1-2 twice more, then rep Row 1 once more. Increase row [WS]: Seed st 7[7, 7, 7, 8, 9, 10], pfb twice, seed st 8[8, 8, 8, 9, 10, 11], pfb twice, seed st 6[6, 6, 6, 7, 8, 9], pfb twice, seed st 4, (pfb twice, seed st 0[0, 6, 6, 7, 8, 9]) 0[0, 1, 1, 1, 1, 1] time, pfb twice, seed st 11[14, 9, 12, 13, 14, 15]. 52[55, 60, 63, 68, 73, 78] sts. 8[8, 10, 10, 10, 10, 10] sts increased. Change to larger needles. Begin charts: Row 2 [WS]: K4[4, 4, 4, 5, 6, 7], work Row 2 of Hollow Oak Cable, k4[4, 4, 4, 5, 6, 7], work Row 2 of Right Rope Cable, k4[4, 4, 4, 5, 6, 7], work Row 2 of Honeycomb Cable, k4[4, 4, 4, 5, 6, 7], (work Row 2 of Left Rope cable, k0[0, 4, 4, 5, 6, 7]) 0[0, 1, 1, 1, 1, 1] time, seed st 5[8, 5, 8, 8, 8, 8]. Continue working charts, seed st, and reverse stockinette st as established until piece measures approx. 4 inches from cast on, ending after a WS row. Begin waist shaping: Work even in patt for approx. 4 inches more, ending after a WS row. Begin bust shaping: Work even in patt for approx. 4 inches more, ending after a WS row. Work 1 WS row even in patt, or work until piece measures same as Back to armhole, ending after a WS row. Shape armholes: Shape neck: Cont in patt, binding off 5[5, 6, 7, 8, 8, 8] sts at beg of next WS row, 4[4, 4, 3, 4, 4, 4] sts at beg of foll WS row, then 2[2, 2, 2, 2, 3, 3] sts at beg of foll 2[3, 3, 3, 3, 3, 3] WS rows. Dec 1 st at neck edge on every foll RS row 4[3, 2, 2, 2, 2, 2] times. 31[32, 35, 38, 39, 39, 42] sts rem. Work even until piece measures same as Back to shoulder. 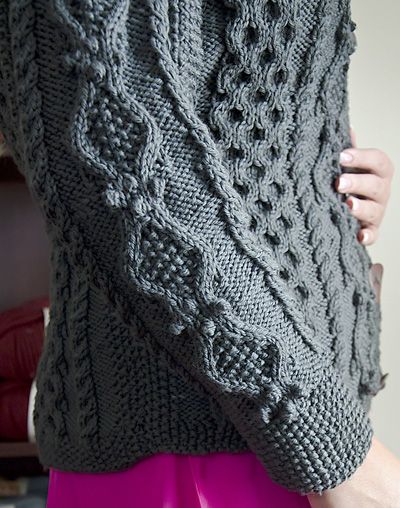 With smaller needles, CO 33[35, 37, 39, 43, 45, 47] sts. Row 1 [RS]: K1, seed st to last st, k1. Row 2 [WS]: P1, seed st to last st, p1. Continue to work in seed st with St st edge sts as established for 3 inches, ending after a RS row. Increase Row [WS]: P1, seed st 5[6, 7, 8, 10, 11, 12], pfb twice, seed st 8, pfb twice, seed st 7, pfb twice, seed st 5[6, 7, 8, 10, 11, 12], p1. 39[41, 43, 45, 49, 51, 53] sts. 6 sts increased. Change to larger needles. Begin charts: Work even in patt until sleeve measures 19.25[19.5, 20, 20.25, 20.75, 21, 21.5] inches from cast on, ending after a WS row. Shape cap: Saddle: |
| FINISHING |
Block all pieces. Using mattress stitch, sew front and back shoulders to sides of saddle. Sew front and back armholes to sleeve cap. Sew side seams and underarm seams. BUTTONBAND Mark button placement be placing a pin or removable marker in the buttonband 0.5 inch above the hem, 0.5 inch below the neck edge, then 4 more pins/markers evenly spaced in-between. BUTTONHOLE BAND Next row [RS]: *Patt to marker, yo, dec 1; rep from * five times more, patt to end of row. COLLAR Collar Buttonholes Sew buttons on buttonband opposite buttonholes. Weave in all remaining ends. |
|
|
| ABOUT THE DESIGNER |
 Visit Donna's website at sheeptoshawl.com.
|
| Pattern & images © 2012 Donna Druchunas. All rights reserved. Contact Donna |