Knitty: little purls of wisdom
Lorna's Laces - Chimera sock
Title
beauty shot
Tangy

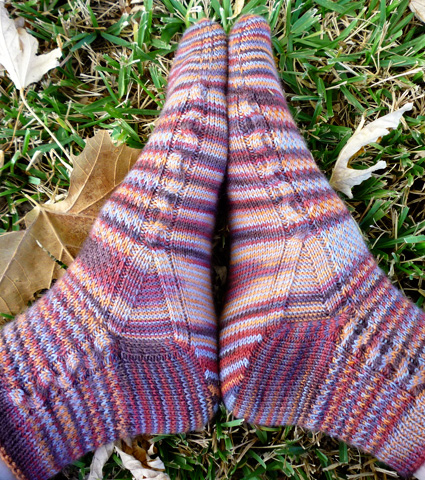
I have a weakness for beautiful hand-painted yarns, with all their stunning colors mixed together into one harmonious skein. Because of the tendency of these yarns to pool, it can sometimes be tricky to pick a pattern that works well with them. Since it seems like these yarns keep appearing in my stash, I am always searching for stitch patterns that can show off these yarns.

Worked from the toe up with a slipped stitch pattern, these socks are ideal for showing off a hand painted yarn. The stitch pattern on the main part of the sock was originally inspired by the half-linen stitch. By holding the yarn to the back while slipping stitches, the resulting piece keeps the appearance of a stockinette fabric, while blending together the various colors in the yarn.

A mirrored sinuous cable pattern on either side of the sock splits into two halves at the gusset, is reunited again while working the leg, and finally splits again when working the cuff. while working the leg, and finally splits again when working the cuff.

spacer
photos: Dena Stelly
   Pin It!


SIZE
Women's S [M, L] (shown in size L)

FINISHED MEASUREMENTS
Leg circumference, unstretched: 6.5 [7.5, 8.5] inches
Foot size: adjustable

spacer

MATERIALS
Yarn

spacer Lorna's Laces Shepherd Sock [80% superwash merino, 20% nylon, 430 yds per 100gm skein]; color #1412 Pocket Square, 1[1, 1] skein

Recommended needle size
[always use a needle size that gives you the gauge listed below -- every knitter's gauge is unique]
spacer US #1/2.25mm needles for working in the round: DPNs, 1 long circular or 2 short circulars

Notions
spacer yarn needle
spacer 4 stitch markers
spacer cable needle

spacer

GAUGE

36 sts/48 rounds = 4 inches in stockinette stitch
40 sts/62 rounds = 4 inches in pattern stitch


PATTERN NOTES
[Knitty's list of standard abbreviations and techniques can be found here.]

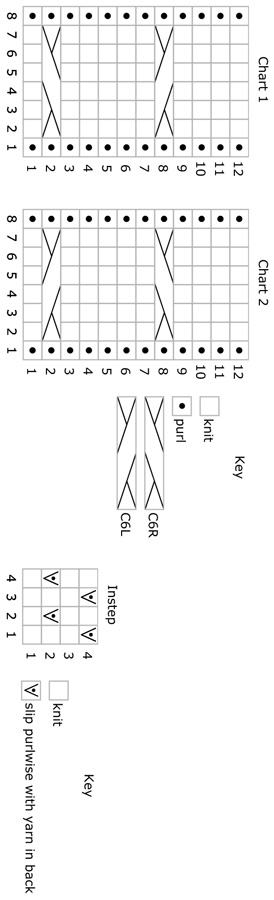
C6R: Slip next 3 sts to cn and hold in back of work, k3; k3 from cn.

C6L: Slip next 3 sts to cn and hold in front of work, k3; k3 from cn.

M1L: Insert left needle, from front to back, under the horizontal strand which lies between the stitch just knit, and the following stitch; then knit into the back of this loop. 1 stitch increased.

M1R: Insert left needle, from back to front, under the horizontal strand which lies between the stitch just knit, and the following stitch; then knit into the front of this loop. 1 stitch increased.

M1P: Insert left needle, from back to front, under the horizontal strand which lies between the stitch just knit, and the following stitch; then purl into the front of this loop. 1 stitch increased.

T4R: Slip next st to cn and hold to back of work; k3, then p1 from cn.

Instructions for Judy's Magic Cast On can be found here.

Instructions for Jeny's Suprisingly Stretchy BO can be found here.

spacerCharts
The chart for this pattern is very large and fits on a letter-sized page.
Click here and print the resulting page.


DIRECTIONS
Toe
Using Judy's Magic Cast On, CO 20[20, 24] sts.

Distribute sts across needles as you prefer and join for working in the round. The first 10[10, 12] sts form the instep; the second 10[10, 12] sts form the sole.

Round 1: Knit.

Round 2: K1, M1R, k to 1 st before end of instep, M1L, k1; k1, M1R, k to 1 st before end of round, M1L, k1. 4 sts increased.

Repeat Rounds 1 & 2 8[10, 11] more times, until you have 56[64, 72] sts total.

Next round: Knit.

Final toe round: K4, M1P, k to four stitches before end of instep, M1P, k4; k2, M1P, k to two stitches before end of round, M1P, k2. 60[68, 76] sts.

Foot
Foot setup round: K4, p1, PM, k to 5 sts before end of instep, PM, p1, k4; k2, p1, k to 3 sts from end of round. This is the new start of round; the final 3 sts of the round become part of the instep; in addition, the first 3 sts of the sole become part of the instep. Rearrange your sts on your needles as you prefer. 36[40, 44] stitches on the instep (beginning and ending with a purl), 24[28, 32] stitches on the sole.

Foot round: Work Chart 1 across first 8 sts, work instep patt across next 20[24, 28] sts to marker, work Chart 2 across next 8 sts; k to end of round.

Work as set until sock is 3[3.25, 3.5] inches shorter than desired finished length, ending after row 2, 3, 8 or 9 of Charts 1 & 2. (Make note of which row you end with. If you ended on row 2 or 3, you will resume with row 7 when beginning the ankle, if you end with row 8 or 9 you will resume on row 1.)

Gusset
Gusset round 1: P1, k3, M1P, k3, p1; work next row of instep chart to marker, p1, k3, M1P, k3, p1; k to end of round.

Gusset round 2:
P1, k3, p to 4 stitches before marker, k3, p1, work next row of instep chart to marker, p1, k3, p to 4 stitches before marker, k3, p1; k to end of round.

Gusset round 3: P1, k3, p to 4 stitches before marker, M1P, k3, p1, work next row of instep chart to marker, p1, k3, M1P, p to 4 stitches before marker, k3, p1; k to end of round.

Repeat Gusset Rounds 2 and 3, until sock measures 1 inch from desired foot length, ending with Round 2.

Note: On the sides of the foot you'll have two 3-stitch knit ribs, divided by purl stitches. These purl stitches are the gusset. Count them – you'll need this number to keep track of the decreases after the heel turn.

Heel
Heel setup row [RS]: P1, k3, p to 4 stitches before marker, M1P, k3, p1, work next row of instep chart to marker, p1, k3, M1P, p to 4 stitches before marker, k3, p1. STOP at this point. Heel will now be turned on the 24[28, 32] sole sts – the rest of the round. It's helpful if you group them all together on one needle.

Heel turn row 1 [RS]: K23[27, 31], wrap & turn.
Heel turn row 2 [WS]: P22[26, 30], wrap & turn.
Heel turn row 3 [RS]: K21[25, 29], wrap & turn.
Heel turn row 4 [WS]: P20[24, 28], wrap & turn.
Heel turn row 5 [RS]: K19[23, 27], wrap & turn.
Heel turn row 6 [WS]: P18[22, 26], wrap & turn.
Heel turn row 7 [RS]: K17[21, 25], wrap & turn.
Heel turn row 8 [WS]: P16[20, 24], wrap & turn.
Heel turn row 9 [RS]: K15[19, 23], wrap & turn.
Heel turn row 10 [WS]: P14[18, 22], wrap & turn.
Heel turn row 11 [RS]: K13[17, 21], wrap & turn.
Heel turn row 12 [WS]: P12[16, 20], wrap & turn.
Heel turn row 13 [RS]: K11[15, 19], wrap & turn.
Heel turn row 14 [WS]: P10[14, 18], wrap & turn.
Heel turn row 15 [RS]: K9[13, 17], wrap & turn.
Heel turn row 16 [WS]: P8[12, 16], wrap & turn.
Size S only: Proceed to Heel Flap

Heel turn row 17 [RS]: K-[11, 15], wrap & turn.
Heel turn row 18 [WS]: P-[10, 14], wrap & turn.
Size M only: Proceed to Heel Flap.

Heel turn row 19 [RS]: K-[-, 13], wrap & turn.
Heel turn row 20 [WS]: P-[-, 12], wrap & turn.

Heel Flap
Heel flap row 1 [RS]: K16[19, 22], working wrapped sts together with their wraps, p1, k2, ssk, turn.
Heel flap row 2 [WS]: Sl 1, p2, k1, p24[28, 32], working wrapped sts together with their wraps, k1, p2, p2tog, turn.
Heel flap row 3 [RS]: Sl 1, k2, p1, k24[28, 32], p1, k2, ssk, turn.
Heel flap row 4 [WS]: Sl 1, p2, k1, p24[28, 32], k1, p2, p2tog, turn.

Repeat Heel flap rows 3 & 4 until all gusset sts are decreased. 24[28, 32] instep sts, 40[44, 48] sole sts. (The sole sts are patterned as follows: p1, k6, p1, 24[28, 32] knit sts, p1, k6, p1, and you are positioned 4 sts in from the start of the sole.

Leg
You will resume working in rounds at this point.

From here, the back of leg stitches will be worked using the Instep chart. Work the same chart row on the back of the leg as on the instep.

Leg setup round: K3, p1, k24[28, 32], p1, k6, p1, work next row of instep chart to end of instep, p1, k6, p1, work instep chart over next 24[28, 32] sts. This is the new start of round.

You will now resume working Charts 1 & 2 on the sides of the Leg. If you ended the foot patterning on Row 2 or 3 of Charts 1 & 2, you will resume with Row 7 when beginning the leg, if you ended with Row 8 or 9 you will resume on row 1.

Leg round: Work next row of Chart 1, work next row of instep chart over 24[28, 32] sts, Work next row of Chart 2, work next row of instep chart over 24[28, 32] sts.

Work as set until sock measures approx 1.5 inches short of desired height, ending with a knit row on the instep chart.

Cuff
Cuff setup round: T4R, k3, p1, (k1, p1) to end of instep; T4R, k3, p1, (k1, p1) to end of round.
Cuff round: (K3, p1) twice, (k1, p1) to end of instep; (K3, p1) twice, (k1, p1) to end of round.
Repeat Cuff round until cuff measures 1.5 inches or desired length.

spacer

FINISHING
Bind off loosely, using Jeny's Suprisingly Stretchy BO, block and weave in ends.

spacer
ABOUT THE DESIGNER

Dena Stelly lives in Texas with her husband and two sons. She first learned to crochet at age 10, and has since branched out into knitting, sewing, spinning and weaving.

Read more about her adventures with fiber arts on her blog or find her on Ravelry.

spacer