|
|
 |
|
|
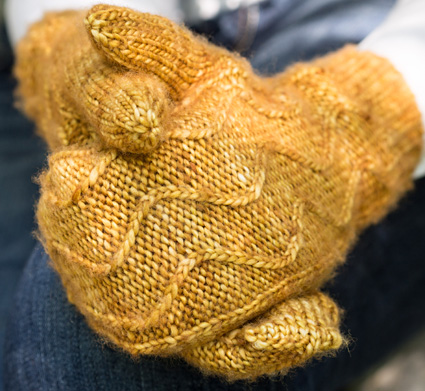
I have cold hands. Really. 364 days of the year. The other day (or two) they're just plain freezing. I cannot get enough mittens, gloves, mitts or sweater sleeves to cover them. The Wool Dispensary Greater Restorative yarn is a soft and lofty singles yarn, perfect to trap all the warmth I can get! The undulating pattern makes me think of waves of heat while I try to convince myself my hands are actually warm. Due to the small cables and small stitch count, these mittens are a good intro to cable knitting -- not to mention that the anatomically correct thumb patterning will make you comfortable in winter. Perfect little travelling project for the easy to remember patterning and also, great as a quick gift -- I made these in 48 hours! |
||
|
|
 |
Tweet
 |
|
SIZE |
|
|
FINISHED MEASUREMENTS |
|
MATERIALS Notions |
|
GAUGE |
| 20 sts/36 rounds = 4 inches in stockinette stitch |
|
PATTERN NOTES |
|
If you're working on DPNs, try to keep a full chart repeat on the needle to avoid having to cross cables and needles at the same time. The mittens are started at different points in the chart for mirroring. Try your hand at charting your own cables over a 6 stitch gap to customize your own mittens! To have that perfect finishing touch, make a note of how many rows are worked before the thumb separation and how many are worked to the tip decrease. This will ensure the pattern is mirrored throughout even during the tip decreases!
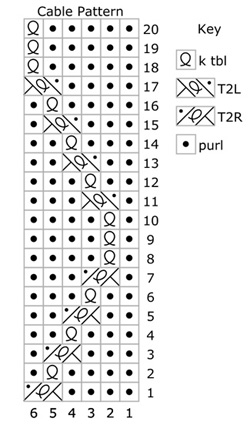
This project uses a provisional cast on. Use your preferred provisional cast on technique; directions for one technique may be found here. Instructions for grafting can be found here. T2R: Slip next st to cable needle and hold to back of work; k1 tbl, then p1 from cn. Cable Pattern |

|
|
DIRECTIONS 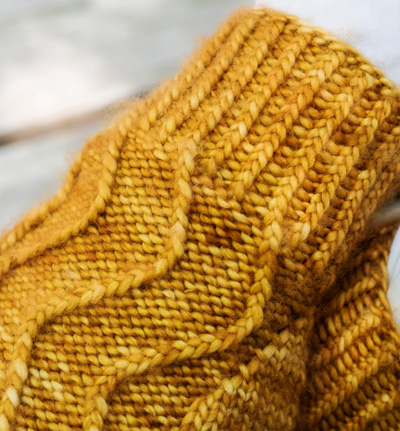
Ribbing round: [P1, k1tbl] around. Setup round, Left Mitten only: K20[26, 32], pm, k1, m1, k1; pm, work cable pattern 3[4, 5] times, p2. 1 st increased; 3 sts between markers for thumb. Work 2 rnds even. Thumb gusset increase round: Work in patt to marker, sl marker, m1, k to next marker, m1, sl marker, work in patt to end. 2 sts increased. Cont even in patt until mitten measures 5[5.5, 6] inches from CO or it meets base of thumb. Separation round: Work in patt to marker, slip sts 17[19, 21] between markers to waste yarn and stitch holder and provisionally CO 6 sts to close the gap, leaving the markers in place. 46[58, 70] sts. Next Rnd: Work to first thumb marker in patt, ssk, k2, k2tog, work in patt to end. 44[56, 68] sts. Cont even in patt until mitten measures 1.75 inches less than desired length.  Decrease round, Right Mitten only: P2togtbl, work in patt to 2 sts before marker, p2tog, ssk, k to last 2 sts, k2tog. 4 sts decreased. Following round: Work even in pattern. Repeat the last 2 rounds until 20 sts rem, keeping patt as correct as possible (on the top patterned half, if there are not enough sts to create a cable when the chart calls for it, work as ktbl. Also, if the hand presents a p and then a ktbl, you may wish to do a knit-decrease to follow the flow of the undulating pattern) until 20 sts rem. Thumb Round 1: Knit. K even until thumb measures almost full length of wearer's thumb. Dec Rnd: K2tog around. 9[10, 11] sts. |
|
FINISHING |
| ABOUT THE DESIGNER |
|
|
|
Pattern & images © 2014 Ruth Garcia-Alcantud. Contact Ruth |
 Twisted German CO: Instructions can be found