|
|
|
|

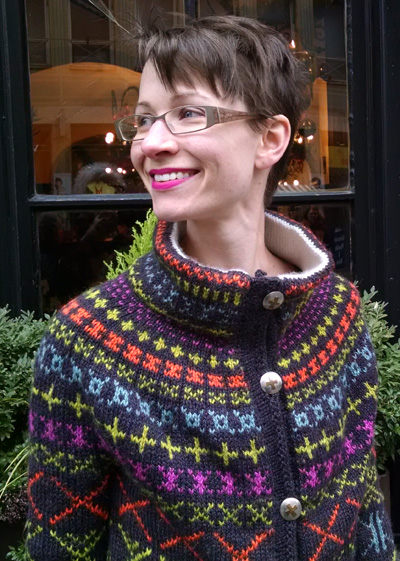
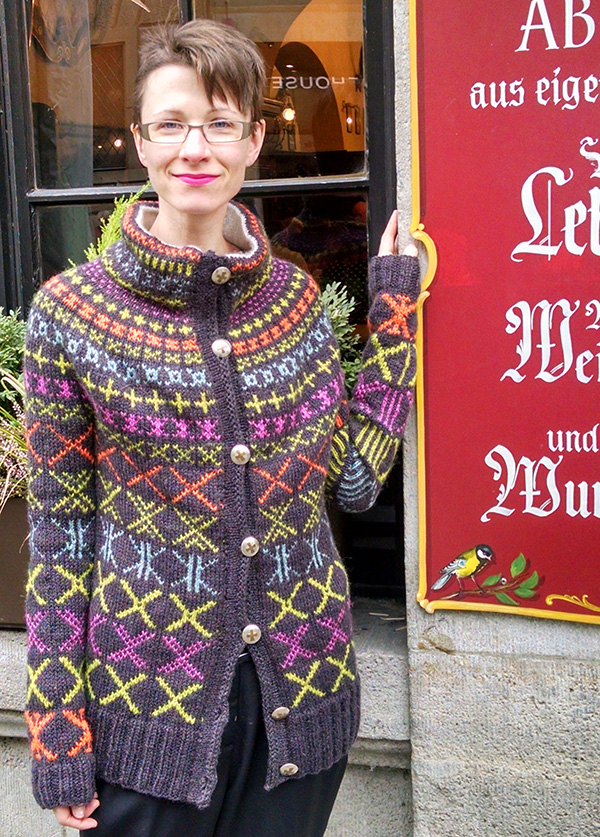
"When all the preliminaries were over and Peleg had got everything ready for signing, he turned to me and said, 'I guess, Quohog there doesn't know how to write, does he? I say, Quohog, blast ye! dost thou sign thy name or make thy mark?'" Queequeg (whose name Peleg conflates with the name of a type of large clam native to the eastern shores of North America, the quohog), the tattooed harpooner on the Pequod, makes his mark -- "a queer round figure which was tattooed upon his arm" -- on his contract. In this warm, rustic, seaworthy sweater, I've represented different marks reminiscent of signature Xs and graphic tattoos.
|
||
|
|
||
|
SIZE |
|
|
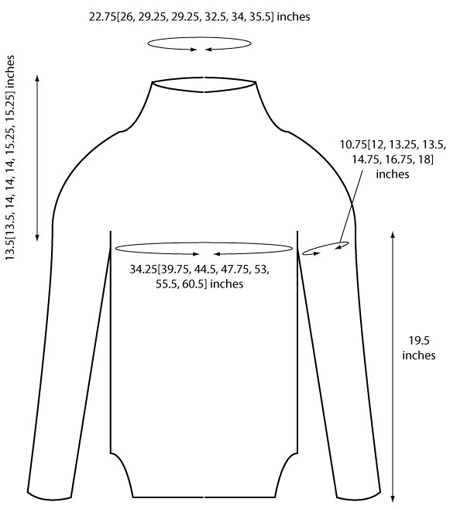
FINISHED MEASUREMENTS Note: Cardigan is meant to fit with 3 to 5 inches of positive ease to allow layering. |
|
MATERIALS Woolfolk Får [100% Merino; 142 yd/130m per 50g skein] Note: CC5 is used only for the collar facing. Feel free to use any soft worsted-weight yarn from your stash if you wish to substitute.
Notions |
|
GAUGE |
| 20 sts/21 rnds = 4 inches in stranded stockinette stitch on largest needles |
|
PATTERN NOTES |
|
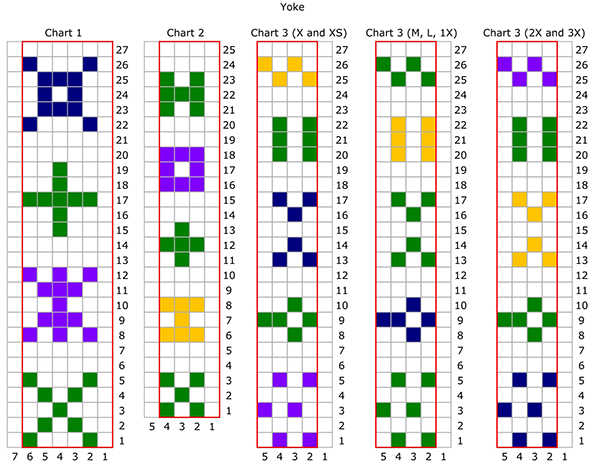
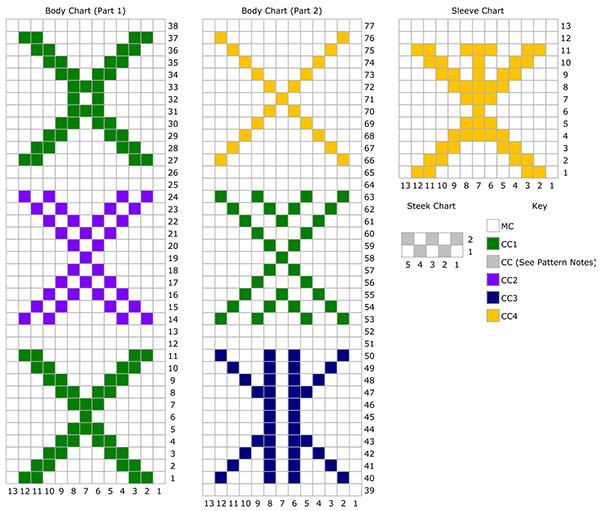
The body and sleeves are worked in the round to the underarms, then they are joined before working the yoke. After reinforcing the edges of the front steek, the sweater is cut open to create a cardigan. If you're using Heirloom Romney or a similar rustic, "sticky" yarn like the Fancy Tiger Heirloom Romney I've used, you can crochet your steeks. Here’s a tutorial for crocheted steeks. I crocheted the steeks on this cardigan, and there is no sign of unravelling! Here's a clear, step-by-step tutorial on sewn steeks. I recommend sewing your steeks if you are using a wool blend or superwash wool. Each rnd of Body and Yoke begins after center front steek. At the correct row gauge, Body measures 15 inches from top of ribbed hem to underarm, and Sleeve measures 17.5 inches from top of ribbed cuff to underarm. Adjust length of ribbing to suit desired length or differences in gauge. Charts are worked in St st unless otherwise noted, joining and breaking yarns as required Due to length, Body Chart is split into two parts to fit on page. When Body Chart is worked in MC only, continue in MC only across steek and sleeve increase section. Work sleeve increases into alternating color pattern. This yarn will benefit from a vigorous wet blocking! With the wet blocking, the yarn will bloom and soften without shrinking. |
|
|
DIRECTIONS 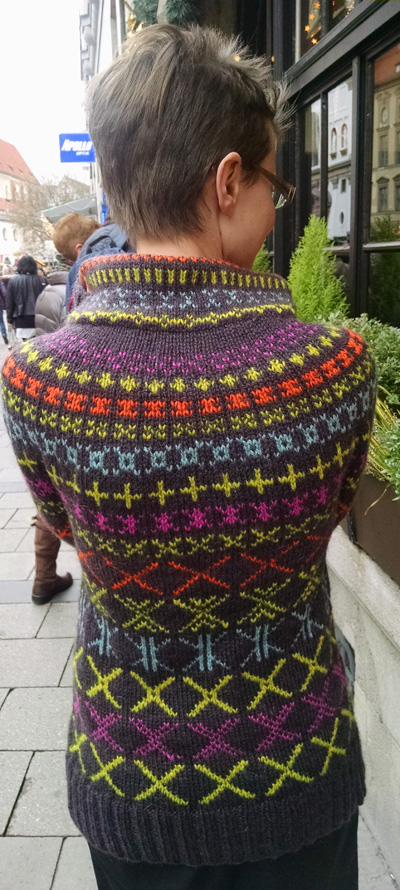
Using MC and smaller 32-inch or longer circular needle, CO 42[49, 54, 58, 64, 68, 74] sts for Left Front, place marker 1 (m1) to indicate side "seam"; CO 82[96, 110, 118, 132, 137, 149] sts for Back, place marker 2 (m2) to indicate side "seam" (m2); CO 42[49, 54, 58, 64, 68, 74] sts for Right Front, place marker (m3), CO 5 sts for steek panel, pm of second color to indicate beg of rnd (m4). Join to work in the rnd, being careful not to twist sts. 171[199, 223, 239, 265, 278, 302] sts total. Rib rnd: [P2, k2] to 2 sts before m3, p2, sl m, k5. Knit 1 rnd, inc 3[1, 3, 0, 0, 0, 2] sts evenly spaced between m1 and m2 for Back. 174[200, 226, 239, 265, 278, 304] sts total. Knit 1 rnd more. Begin Body Chart and Steek Chart: SLEEVES (make 2) Rib rnd: [K2, p2] around. Knit 1 rnd. Next rnd: K2tog, knit to end of rnd. 39 sts.
 Begin Sleeve Chart: Begin Body Chart and Sleeve Increases: Next rnd: Work Body Chart to m, sl m, M1R with MC, k1 with CC1, M1L with MC. 42 sts: 3 sts between markers for sleeve increase section. Cont in Body Chart and sleeve increase section pattern as est for 5[5, 3, 3, 2, 2, 0] rnds more. Inc rnd: Work Body Chart to m, sl m, M1R in patt, patt to end, M1L in patt. 2 sts inc’d. Size 2X Only: Rep Inc rnd. All Sizes: Work even in patt for 16[2, 5, 4, 5, 0, 0] rnd(s) more, ending after Rnd 76 of Body Chart. Next rnd (Rnd 77 of Chart): Remove beg of rnd m, knit to m, remove m, k3[6, 8, 9, 11, 16, 17], BO next 10[10, 12, 12, 14, 14, 17] sts. Place rem 44[50, 54, 56, 60, 70, 73] sleeve sts on holder. Repeat for second sleeve. Yoke Begin Yoke Chart 1: Dec rnd: With MC, k7[8, 8, 7, 7, 7, 7], (k1, k2tog) to 9[8, 8, 6, 6, 6, 6] sts before m, k7[6, 6, 6, 6, 6, 6], k2tog 1[1, 1, 0, 0, 0, 0] time, work steek. 166[190, 210, 222, 242, 266, 282] sts. Begin Yoke Chart 2: Dec rnd (Rnd 15 of chart): With MC, (k2tog, k1) 0[0, 0, 1, 0, 0, 1] time, k2[2, 0, 0, 8, 0, 11], (k1[1, 3, 3, 3, 3, 2], k2tog) to 3[3, 5, 4, 9, 1, 15] sts before m, k3[3, 5, 1, 9, 1, 12], (k2tog, k1) 0[0, 0, 1, 0, 0, 1] time, work steek. 114[130, 170, 178, 198, 214, 218] sts. Sizes M, L, 1X, 2X & 3X only: Begin Yoke Chart 3, All Sizes: Cont in patt as est through Rnd 6 of chart. Work short rows to shape back of neck as follows: With MC, k75[87, 107, 123, 138, 150, 151], w&t, p41[49, 49, 73, 83, 91, 89], w&t, knit to 5 sts before wrapped st, w&t, purl to 5 sts before wrapped st, w&t; rep from * once more, knit to end of rnd, knitting wraps together with wrapped sts. Cont in patt as est (beginning with Rnd 7 of chart) through Rnd 27[27, 11, 11, 11, 11, 11] of chart, knitting wraps together with wrapped sts on Rnd 7. Sizes M, L, 1X, 2X & 3X only: Cont in patt as est through Rnd 27 of chart. Collar Facing, All Sizes: |
 |
|
 Sew underarm seams. Steeks Front Bands Buttonhole Band Using MC and long circular needle in larger size, with RS facing and beginning at lower right front corner, pick up and knit 3 sts for every 4 rows along right front edge. Next row [WS]: [Knit to desired position of buttonhole, BO 2 sts] 7 times, knit to end. Do not turn. Applied i-cord bind off: CO 3 sts at end of row. Turn so RS is facing. *[K2, ssk. Slip these 3 sts back to LH needle, bringing yarn behind work] until only 3 i-cord sts remain before gap created by BO on previous row. [K3, slip these 3 sts back to LH needle] twice. Rep from * six times more. [K2, ssk. Slip these 3 sts back to LH needle, bringing yarn behind work] until only 3 i-cord sts rem. Cut yarn and draw through rem sts.
Buttonband Knit 4 rows. Next row [WS]: [Knit to desired position of buttonhole, BO 2 sts] 7 times, knit to end. Do not turn. Applied i-cord bind off: CO 3 sts at end of row. Turn so RS is facing. [K2, ssk. Slip these 3 sts back to LH needle, bringing yarn behind work] until only 3 i-cord sts rem. Cut yarn and draw through rem sts. Collar Facing Sew buttons to button band opposite buttonholes. Weave in all ends and wet block vigorously to measurements. |
| ABOUT THE DESIGNER |
|
You can read more about Ann on her blog and her website. Her Ravelry name is weaverknits. |
|
Pattern & images © 2014 Ann Weaver. Contact Ann |