
|
|
|
|
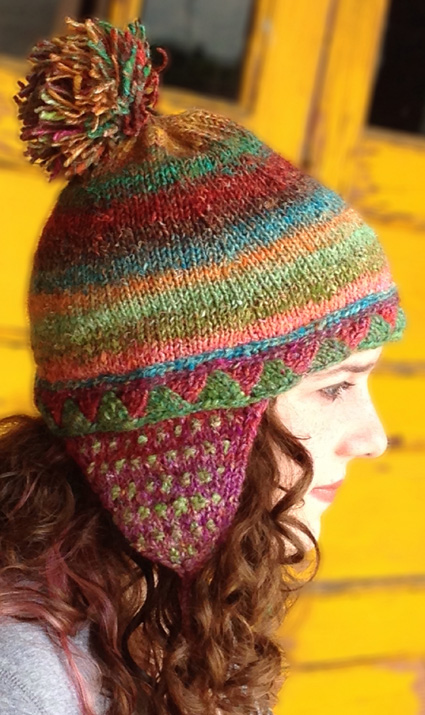
Starting a new project is always so full of anticipation and promise - until the knitting ADHD kicks in. Either it’s acres of plain knitting (yawn) or nupps placed every 9 stitches (yikes) and we’re scouting around for something new. This fun top-down hat has you working a little bit of a lot of different techniques, but none of them last long enough to take you around the bend. A pinhole cast-on, a bit of Entrelac, a lateral braid or two, some stranded colorwork, tassels and a pom-pom, oh, and a little stockinette stitch will keep you engaged right to the end. Plus, for all the Noro junkies in the world, there’s plenty of color to play with. Additionally, there is the great fun of German Short Row. GSR is one of my very favorite techniques, and one whose glories I want to spread abroad to every knitter as it is intuitive, elegant, easy to work and looks absolutely fabulous! Standard wrap-and-turn short rowing always left me cold, with wraps that buried themselves at the base of the stitch and required digging out to incorporate. The extra yarn wrapped around the stitch left an inevitable loop on that back after picking up the wraps, which seriously offended my inner Anal Knitter. German Short Row doesn’t introduce any extra yarn into the piece, but instead pulls up a stitch from the previous row, actually shortening the stitch rather than introducing more yarn. Yeehah! Less is more. |
||
|
|
||
|
SIZE |
|
|
FINISHED MEASUREMENTS Hat is most comfortably worn with 0-1 inch of positive ease. |
|
MATERIALS Notions |
|
GAUGE |
|
PATTERN NOTES |
|
ssp: slip one st knitwise, slip another st knitwise; replace both sts back on the left-hand needle. Purl 2 together through the back loops. DS(s): Double Stitch(es) Main Color/Contrast Color: When using Noro yarn, ‘Main color’ is a bit of a misnomer, since you’ll be moving through a series of glorious colors as the work progresses. There is no real need to designate a main color when you begin, just start with a color that makes you happy. The pattern calls for a succession of contrast colors when knitting the braids, Entrelac, and colorwork for the earflap. When a new CC is called for, select a color from another part of the skein (or the alternate skein) that has a high contrast with the color you have just finished using. Even if you have to unwind a bit to get to a color that works, the finished result will be worth it. Don’t be afraid of the pieces that have been broken off the main skein, as there are plenty of opportunities in this hat to use up small bits of color. Lateral Braid Entrelac German Short Rows
In the pattern, we’ve abbreviated this as GSR-DS. If you inspect your newly-created Double Stitch, you will notice that the stitch has two legs on each side of the needle which interlock at the top. From this point on, the Double Stitch is treated as a single stitch. When it’s time to work through the stitch and reincorporate it – the equivalent would be ‘picking up the wraps’ in a standard w&t – you simply work both legs of the stitch together as one, whether working knitwise or purlwise. A tutorial is available here. |
|
DIRECTIONS 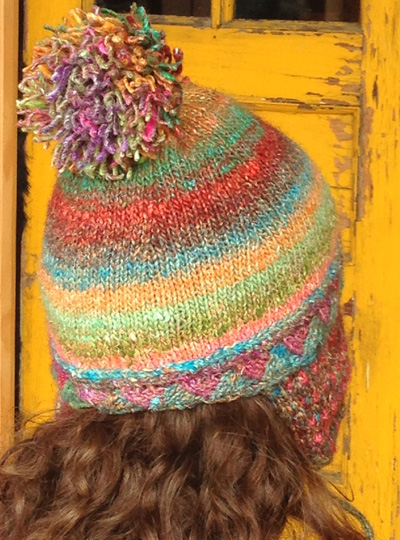
Using larger needles for small circumference circular knitting, and crochet hook, CO 8 sts using the Pinhole Cast On. If using Magic Loop technique, distribute sts so that there are 4 sts on either side of cable. If using DPNs it’s easiest to distribute 4 sts on each of 2 DPNs to begin work, then add a third or fourth needle as more sts are created. Join in round, being careful not to twist the stitches. Change to larger 16-inch circular needle when you have 72 sts on your needle. Rnd 1: [K1, LLI] to end of round. 16 sts Size S only: Size M only: Large size only: The lateral braid creates rather tall ‘stalks’ of stitches on the row following the braid. For this reason it is recommended that you both go down a needle size and work the stitches a bit more tightly than normal. Pulling horizontally on the finished braid also helps absorb the extra height from the row above. The braids are the only place on the hat where you will be using the smaller circular needle. Change to smaller 16 inch circular needle. Next round, Create Lateral Braid: Attach new CC yarn, m1R, then slip that worked st back onto the left-hand needle. *Knit into the back of the second st, then knit into the front of the first st and slip them both off the needle. Replace just-worked st back onto the left-hand needle; repeat from * until you’ve worked the entire round. When you reach the end of the round, break the yarn, leaving a 6 inch tail. (Note: The yarn is broken at this point in order to perfectly join the braid without any visible jog.) Gently unknit the last stitch and bring the live end through the last live stitch of the braid from back to front. Locate the nearest complete chain stitch immediately to the left of the last bound-off stitch. Bring the needle up underneath the narrow end of the chain stitch and pull through. Bring needle back into the same opening it came out of, from front to back. As with the first braid, choose another CC from a different part of the skein and work another Lateral Braid. Break yarn, leaving a 6 inch tail and finish as the first braid. 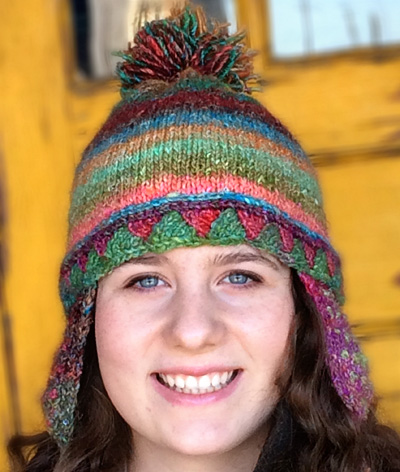 Change to larger 16-inch circular needle, attach new CC yarn and work as follows: Row 1 [RS]: Skp, k1, turn. Row 2 [WS]: GSR-DS, p1, turn. Row 3 [RS]: Sl 1, k2, incorporating DS as you go, turn. Row 4 [WS]: GSR-DS, p2, turn. Row 5 [RS]: Sl 1, k3, incorporating DS as you go, turn. Row 6 [WS]: GSR-DS, p3, turn. Row 7 [RS]: Sl 1, k4, incorporating DS as you go. 5 sts. DO NOT TURN. Repeat Rows 1-7 until you have worked across all the sts on the needle. Break yarn. 85[90, 95] sts. Entrelac: Ending Triangles – First Triangle Entrelac: Ending Triangles – All Subsequent Triangles Repeat Rows 1-9 until you have worked and bound off all the sts on the needle. Break yarn, leaving a tail, and join bind off together as for Lateral Braid. 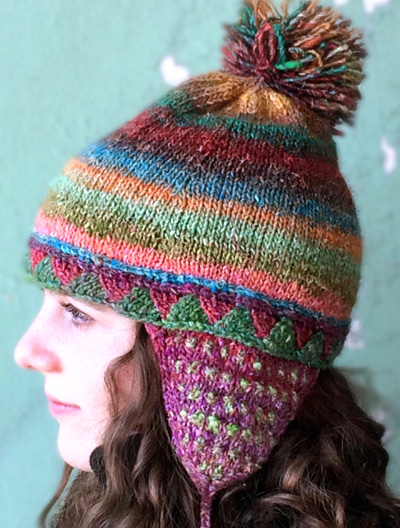 To mark where ear flap stitches will be picked up, use the bound-off edge stitches as a guide and designate the end-of-round join as the starting place for counting. Using removable stitch markers and working from right to left, count 10[11, 12] sts, PM, count 27 sts, PM, count 29[32, 35] sts, PM, count 27 sts, PM. This should leave you with 19[22, 25] sts before first marker (4 markers placed). For a truly custom fit, try the hat on and place ear flaps just where you want them, counting across 27 stitches along bound-off edge for each flap. You will want a larger opening at the front of the hat than at the back. Note: When knitting the CC on the wrong side of the ear flap on rows 7, 11, 15, 19, and 23, be sure to bring the CC yarn forward again before purling the next stitch. Choose a color to be your background/MC, join yarn and pick up and knit 27 sts under the purl bumps just on the inside of the hat. Row 2 [RS]: Sl 1, k1, p1, [k1 MC, k1 CC] to last 4 sts, with MC, k1, p1, k2. I-Cord: |
|
FINISHING Position your I-cord between the strands and with the threaded tail from the I-cord, bring yarn around one clump of strands, pierce cord above the strands to enclose them. Bring yarn around the other clump of strands and pierce needle through cord once more at the starting point underneath. Tie off end. With a 20-inch length of yarn on a needle, wrap yarn tightly around all strands starting about 1.5 inches from the tassel head, hiding the end of the yarn with the wrapping itself. When you’ve made a wide enough ‘neck’, plunge the needle tightly down into the center of the tassel. Remove needle and trim ends even. Pom Pom: Weave in all ends. I chose not to block this hat to preserve the texture of the Entrelac and the colorwork. The tassels were lightly steamed just to settle the ends down. |
| ABOUT THE DESIGNER |
|
Mimi also designs for her own knitting line, Pastiche Knitwear.Patterns are available on Ravelry. |
|
Pattern & images © 2015 Mimi Kezer. Contact Mimi |
