Knitty: little purls of wisdom
Title
spacerbeauty shot
Tangy

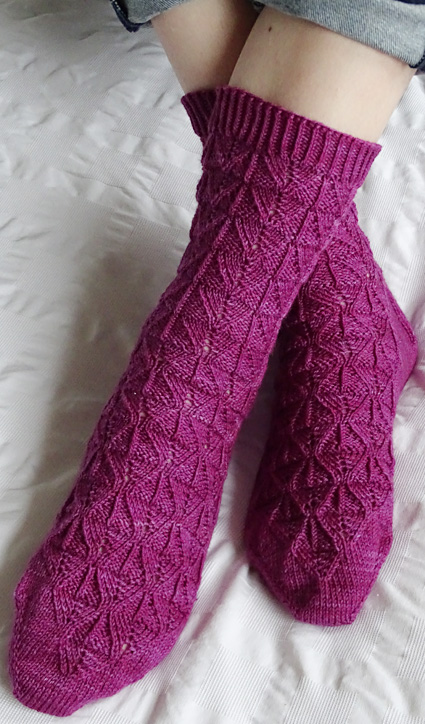
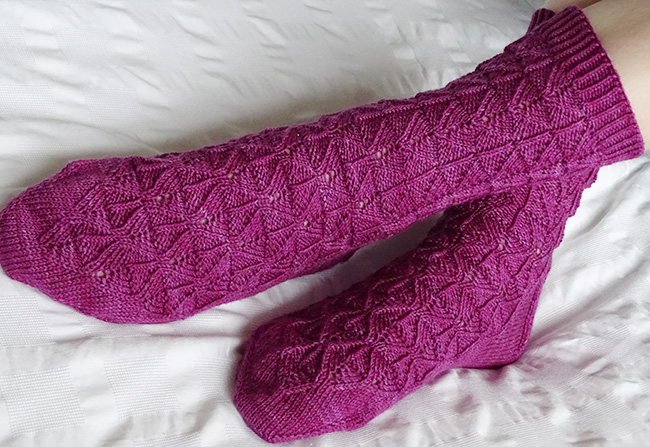
As far as socks go I have always been a cuff-down sort of girl. This has of course led to me avoiding certain designs due to the direction of the pattern. I realized this was just annoying so attempted my first pair of toe-ups 3-4 months ago. Now that I understand the way they are structured, the world is my oyster!

I think the texture of this pattern looks very much like a scaly reptilian skin. And when explorers were mapping the world the unknown was often marked “here be dragons”...pretty much as I felt when I attempted my first pair of toe-ups.

But don’t let the name faze you! This is a step-by-step pattern which will guide you through the troubled waters of your first toe up sock.


spacer photos: Tim Gent
Pin It!


SIZE
Adult S[M, L]

FINISHED MEASUREMENTS
Foot circumference: 7[8, 9] inches. Choose a size with 1–1.25 inches of negative ease
Foot length: adjustable to fit
Leg length: adjustable to fit

spacer

MATERIALS
Yarn

spacer Indigodragonfly CaribouBaa [100% Superwash Merino; 435yd/398m per 100g skein]; 1 skein; color: Sargasm

Recommended needle size
[always use a needle size that gives you the gauge listed below — every knitter's gauge is unique]
spacer US #1.5/2.5mm needles for small circumference in the round: DPNs, 1 long circular or 2 shorter circular

Notions
spacer yarn needle
spacer stitch markers

spacer

GAUGE

32 sts/44 rounds = 4 inches in stockinette stitch
 

PATTERN NOTES
[Knitty's list of standard abbreviations and techniques can be found here.]

Instructions for Judy's Magic Cast On can be found here:

Instructions for Jeny’s Surprisingly Stretchy Bind Off can be found here:

spacerCharts
The charts for this pattern are very large and fit on a 2 letter-sized pages.
Click below and print the resulting pages for your size.

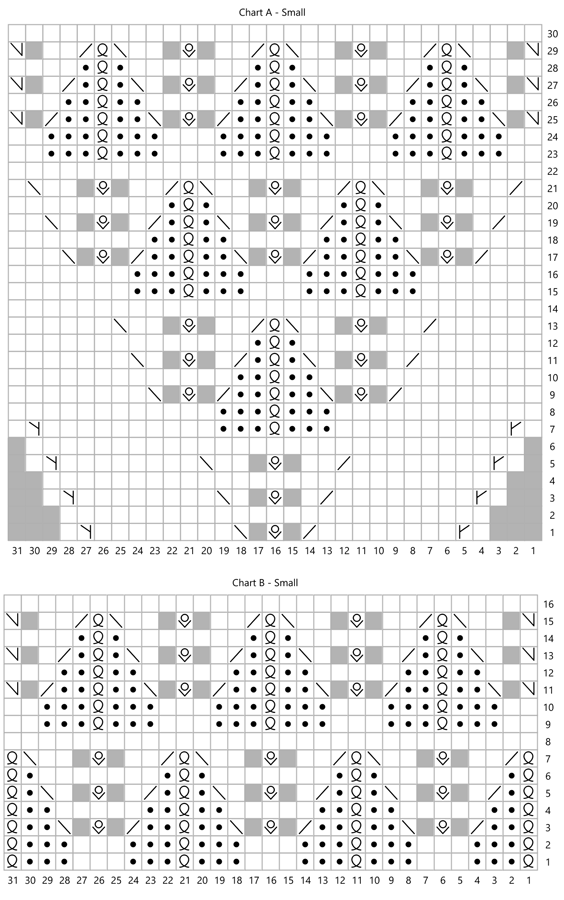
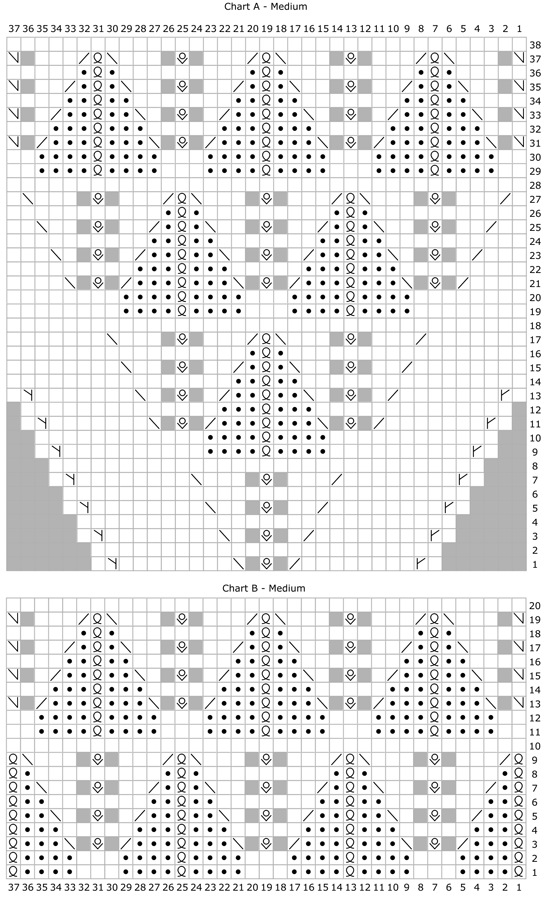
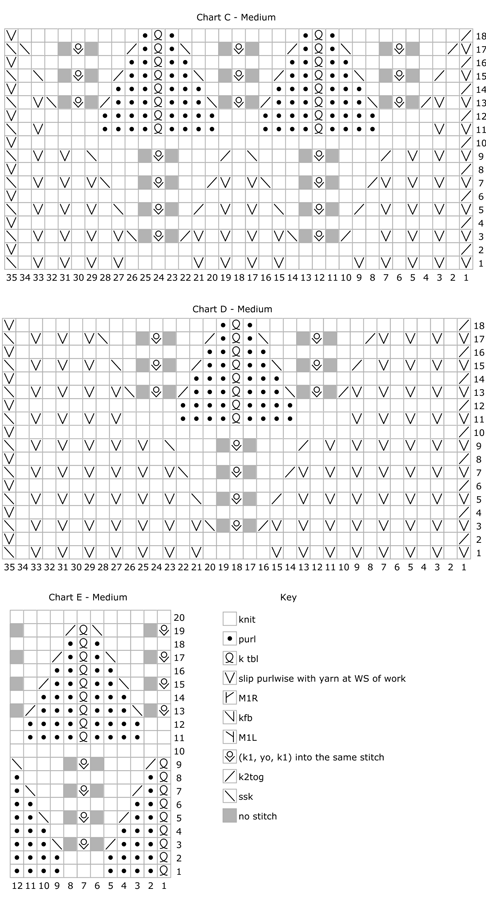
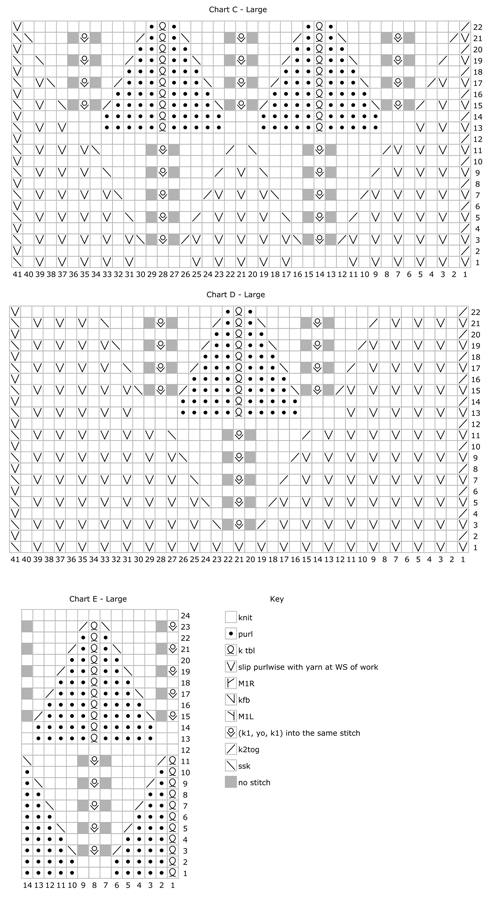
small chart 1 | small chart 2 | medium chart 1 | medium chart 2 | large chart 1 | large chart 2

IMPORTANT: When working Chart E, there are places where the (k1, yo, k1) into same st is worked at the beginning of a round. When working these stitches, you will need to do the following: At the end of that round slip the first stitch of the round back to the right hand needle, to become the last stitch of the round. This ensures that the start of the round does not move and those stitches get worked the correct number of times. Failing to do this results in an unsightly “jog” in the pattern.


DIRECTIONS

spacer
Using Judy’s Magic Cast on, CO 22 sts total, 11 per side.

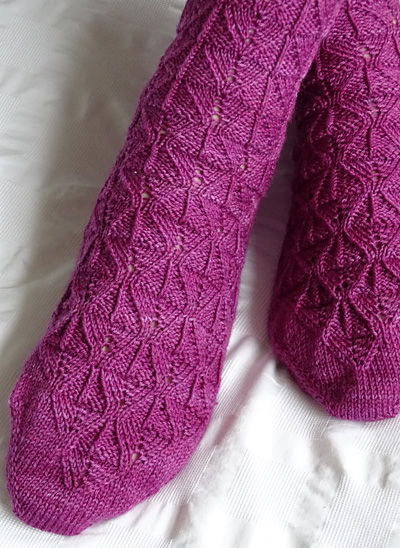
Round 1: Knit, distributing sts across your needles as you prefer.
If you’re on Magic Loop, or two circulars, divide the stitches half and half, if you’re on DPNs, divide across three or four as you prefer.

The first 11 sts, the first half of the round is the instep, the second 11 sts, the second half of the round is the sole.

Round 2: (K1, M1R, k to 1 st before end of instep, M1L, k2, M1R, k to 1 st before end of sole, M1R, k1. 4 sts increased.

Round 3: Knit

Repeat the last 2 rounds 5 more times. 46 sts: 23 each on instep and sole.

Next round, start charts: Work appropriate size Chart A across instep; k1, M1R, k to 1 st before end of sole, M1R, k1. 4 sts increased.

Following round: Work next chart row across instep, k to end of round.

Work as set until chart round 6[12, 18] is complete. 58[70, 82] sts - 29[35, 41] sts each for instep and sole.

Next round: Work next chart round across instep, k to end of round. 60[72, 84] sts total; 31[37, 43] sts for instep, 29[35, 41] sts for sole.

Continue as set, working chart on instep and even on sole, until chart is complete.

Foot
Foot round: Work appropriate size Chart B across instep; k to end of round

Work even in pattern as set until foot measures approximately 2 inches less than desired length, ending with an even numbered round of Chart B.

spacer
Gusset
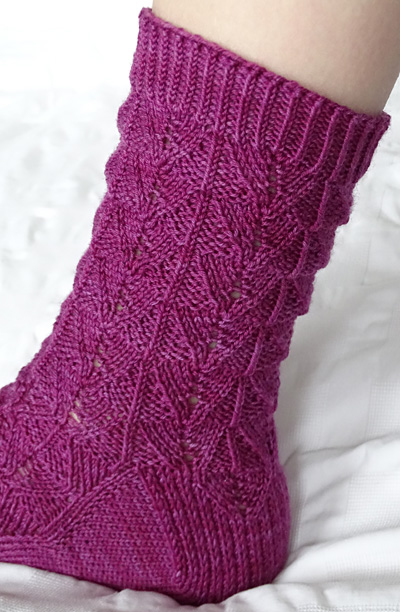
Next round: Work instep as set; k1, M1R, k to 1 st before end of round M1L, k1. 2 sts increased.

Next round: Work instep as set, k to end of round.

Repeat last two rounds 10 more times. 51[57, 63] sts on sole.

Heel
Working in rows shape the heel as follows:
Row 1 [RS]: Work across instep as set, k33[36, 39], M1L, k1, w&t.

Row 2 [WS]: P17, M1L pwise, p1, w&t.

Row 3 [RS]: K15, M1L, k1, w&t.

Row 4 [WS]: P13, M1L pwise, p1, w&t.

Row 5 [RS]: K11, M1L, k1, w&t.

Row 6 [WS]: P9, M1L pwise, p1, w&t.

Row 7 [RS]: K7, M1L, k1, w&t.

Row 8 [WS]: P5, M1L pwise, p1, w&t.

8 sts added to sole, 59[65, 71] sts on sole.

Next row: K to end of heel sts, working wrapped sts together with their wraps, and k across instep as per Chart B, taking note of last pattern row worked.

This is now the end of the round. Beginning of round moved to start of heel.

Heel Flap:
The main pattern is introduced again during the working of the heel. Please read ahead to establish which row to introduce pattern. The following tables tell you which Chart to use for the Heel Flap – C or D, which row of the heel flap to start working the chart, and which rows of that given chart to work.

Small

Last row of Chart B worked on instep

Chart to Use for Heel Stitches

Heel flap rows to be worked before chart begins

Rows of Chart to be completed

16

C

22

1-8

2

C

20

1-10

4

C

18

1-12

6

C

16

1-14

8

D

22

1-8

10

D

20

1-10

12

D

18

1-12

14

D

16

1-14


Medium

Last row of Chart B worked on instep

Chart to Use for Heel Stitches

Heel flap rows to be worked before chart begins

Rows of Chart to be completed

20

C

20

1-10

2

C

18

1-12

4

C

16

1-14

6

C

14

1-16

8

C

12

1-18

10

D

20

1-10

12

D

18

1-12

14

D

16

1-14

16

D

14

1-16

18

D

12

1-18


Large

Last row of Chart B worked on instep

Chart to Use for Heel Stitches

Heel flap rows to be worked before chart begins

Rows of Chart to be completed

24

C

18

1-12

2

C

16

1-14

4

C

14

1-16

6

C

12

1-18

8

C

10

1-20

10

C

8

1-22

12

D

18

1-12

14

D

16

1-14

16

D

14

1-16

18

D

12

1-18

20

D

10

1-20

22

D

8

1-22


Working in rows again continue as follows:

Row 1 [RS]: K43[49, 55], working wrapped sts together with their wraps, SSK, turn.
Row 2 [WS]: Sl1, p27[33, 39], p2tog, turn.
Row 3 [RS]: (Sl1, K1) 14[17, 20] times, SSK, turn.
Row 4 [WS]: Sl1, p27[33, 39], p2tog, turn.

Repeat Rows 3 & 4 until you have worked the appropriate numbers of rows before the heel chart.
Next row [RS]: Work Heel Chart across, turn.
Next row [WS]: Work Heel Chart across, turn.

Work as set until 2 rows remain to be worked, as per the table above.

To ensure there is no gap between heel and leg, at the end of each of the next two rows you will slip as stitch from the instep to the heel and w&t as follows:

Row 29 [RS]: Work Heel Chart across, w&t (first instep st).
Row 30 [WS]: Work Heel Chart across, w&t (first instep st).

Note: the last 2 wrapped sts will be the first & last sts of the top of the foot.

Leg
At this point, you’ll start to work Chart E, all the way around the leg. You’re also going to move the start of round back one stitch. To keep the continuity of the pattern correct you will need to start Chart E based on the last row worked of Chart B. For example, if you finished Chart B on row 10 then you start Chart E on row 11

Setup round 1: Starting with stitch 2 of row appropriate of chart E, work Chart E around to end of round, working wrapped stitches together with their wraps (in pattern), until 1 st rems. Work this stitch as stitch 1 of Chart E.
Set up round 2: Work as set for Chart E leaving the last stitch of the round unworked. This is the new start of round

Complete pattern rounds up to and including either round 8[10, 12] or round 16[20, 24], whichever is soonest.

Continue by repeating the previous 8[10, 12] rounds. That is, if you are starting chart E at round 1 repeat rounds 1-8[10, 12], or if starting at round 9[11, 13] repeat rounds 9-16[11-20, 13-24])

Continue until leg measures approximately 1 inch less than desired length finishing at the end of a pattern block.

Cuff:
Ribbing round: [K1 tbl, p1] around.
Work ribbing as set for 1 inch.

Bind off loosely using an appropriate method such as Jeny’s Surprisingly Stretchy bind off.

spacer

FINISHING
Block and weave in ends.

spacer
ABOUT THE DESIGNER

designernamespacer Rachel is maths teacher with a strong interest in the arts and all things creative who has been knitting since she was 7. She first got into socks 5 years ago and has been dabbling in design, enjoying the mathematical challenge of applying a flat pattern to one in the round and accommodating the shape of the sock. “Here Be Dragons” is her first published design.

She lives north of Cambridge, England, on the edge of the Fens with her 2 teenage children and husband who all appreciate her sock knitting efforts. The children are most useful for modelling her socks as they fall into the Small and Medium categories.

You can find her on Ravelry as RachGentKnits.

spacer