Knitty: little purls of wisdom
Blue Sky Alpacas
Title
beauty shot

Tangy

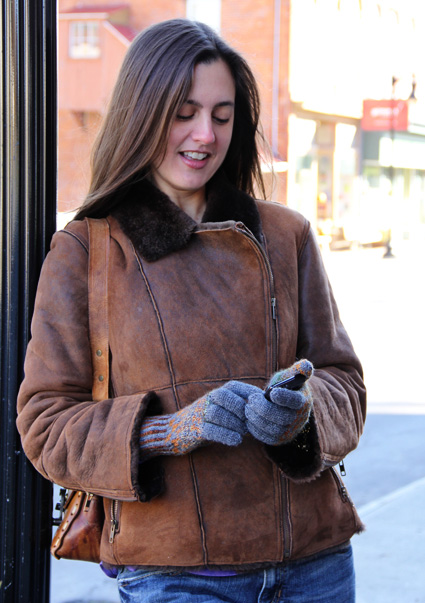
Do you HATE taking off your gloves to answer your phone when it is freezing out?  I do! 

Last winter my hubby hounded me until I ordered some conductive thread to try out…. And oh my goodness, it really works! No more peeling off your gloves while your phone rings and rings, and your fingers freeze. 

Of course I needed to design some colorwork gloves to show off this technological advance! Worked with a two-color tubular cast on, ribbing and a dot matrix design
these gloves will fly off your needles.

spacer model: Ms Baxter
spacer photos: Laura Nelkin


SIZE
One

FINISHED MEASUREMENTS
Palm circumference: 7.5 inches

spacer

MATERIALS
Yarn

spacer [MC] Spud and Chloe Fine [80% SUPERWASH wool, 20% silk; 248 yd/227 m per 65g skein]; color: Hippo; 1 skein
spacer [CC] Schoppell Wolle Crazy Zauberball [75% SUPERWASH wool, 25% nylon; 459 yd/420 m per 100g skein]; color: 1660 Flussbett; 1 skein

Recommended needle size
[always use a needle size that gives you the gauge listed below -- every knitter's gauge is unique]
spacer US #0/2mm needles for working in the round
spacer US #1.5/2.5mm needles for working in the round

Notions
spacer yarn needle
spacer 5 yards Conductive thread
spacer several lengths of scrap yarn for provisional cast on and for use as stitch holders
spacer stitch markers

spacer

GAUGE

34 sts/ 38 rounds= 4 inches in colorwork pattern, in the round, after blocking.


PATTERN NOTES
[Knitty's list of standard abbreviations and techniques can be found here.]

What is Conductive Thread and WHY use it?
When you use a touchscreen with your finger, your skin acts as a conductor to send a low voltage message to your device that tells it what to do. If you are wearing gloves, the conductive property of your skin is masked and then your touchscreen can’t complete the circuit with your finger! Enter conductive thread, a material that conducts electricity at a low voltage. If you incorporate this into your knit fabric then you can use your phone and NOT take off your glove/mitten to do it!

Using Conductive Thread in this pattern:
When you are about a half inch shorter than the desired length of your conductive finger (for most people this is your index finger, and possibly your thumb) begin to knit the remaining rounds of the pattern with the conductive thread held together with your yarn. Leave a 10-inch tail at the beginning and end, this is IMPORTANT! Then weave in your ends taking care to sew across the stitches on the pad of your finger.  This will ensure that there is a higher density of conductive thread right where you need it. 

Cast-on Notes:
If you don’t wish to use the cast on method specified, just use MC and a long tail cast on for 64 sts.

Provisional Cast-on
This project uses a provisional cast on. Use your preferred provisional cast on technique; directions for one technique may be found here.

M1L: Insert left needle, from front to back, under strand of yarn which runs between last stitch on left needle and first stitch on right needle; knit this stitch through back loop. 1 stitch increased.

M1R: Insert left needle, from back to front, under strand of yarn which runs between last stitch on left needle and first stitch on right needle; knit this stitch through front loop. 1 stitch increased.

Working Thumb: If your color work gauge becomes tighter on the thumb you can help this by turning your work inside out and working the thumb chart backwards OR using needles one size larger.

spacerCharts
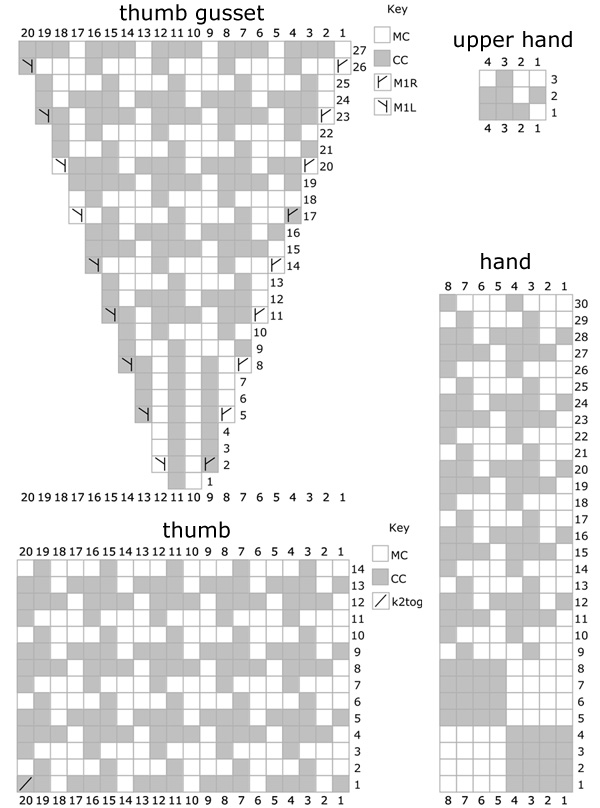
The charts for this pattern are very large and fit on a letter-sized page.
Click here and print the resulting page.

DIRECTIONS

2 –Color Tubular Cast On:
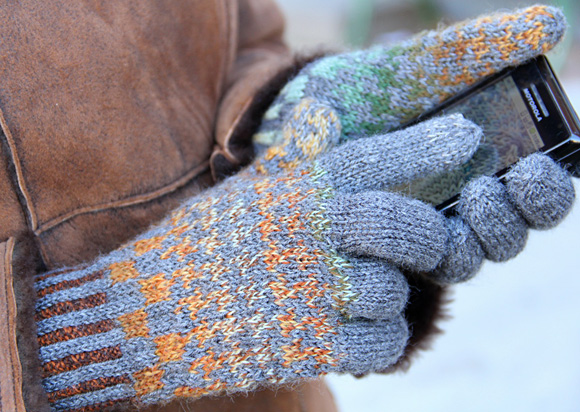
On larger needles and with scrap yarn, provisionally cast on 32 sts.
Join CC and knit 1 row, purl 1 row. 
Join MC, knit 1 row, purl 1 row.

Carefully undo provisional cast on and slip resulting 32 sts to a spare needle.  Fold in half so that spare ndl is to back of work.

Ribbing setup row: Using MC, k2 from front ndl, with CC p2 from spare ndl, rep across until all sts have been worked. 64 sts.

Change to smaller needles, distributing stitches as you prefer, and join for working in the round.  Place marker if required for start of round.
Ribbing round: [Using MC, k2, using CC, p2] around.
Work ribbing as set for 3 inches.

Change to larger needles.
Increase round: Using MC, K31, kfb twice, k31.  66 sts.

Shaping the Thumb Gusset
Round 1: Work Hand Chart row 1 four times, pm, Work Thumb Gusset Chart row 1, pm, work Hand Chart row 1 to end of round.
Round 2: Work Hand Chart row 2 four times to marker,  work Thumb Gusset Chart row 2 to second marker, work Hand Chart row 2 to end of round.
Continue as set until 27 rows of charts are complete.  At this point you will have 20 thumb gusset sts.

Next round: Work Hand Chart as set to marker, slip 20 sts to scrap yarn or holder, work Hand Chart again to end of round. 64 sts.

Continue to work chart through row 30 of chart. Work should measure approx. 3.5 inches from end of rib section.

Yarn will be placed to begin pinky finger.

spacer
PINKY FINGER
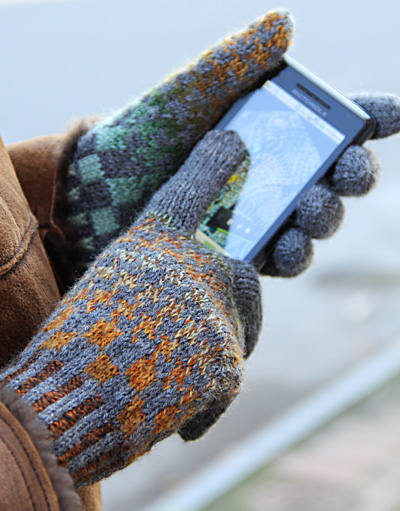
Change to smaller needles.

Setup: With MC k8, slip next 50 sts to scrap yarn or holder, CO 2 sts using backward loop over gap, work rem sts. 16 sts.
Distribute sts as you prefer and join for working in the round.

Knit even until work measures 2 inches from base of finger or until desired length.

Decrease round: K2tog around. 8 sts.

Work Decrease round once more. 4 sts.

Break yarn, leaving a 4-inch tail, thread tail through rem sts, and pull tight.

SET UP FOR REMAINING FINGERS
Next round: Return 50 held sts to larger needles. Using MC, and leaving a long tail pick up and k4 sts along CO edge of pinky finger, work around to picked up sts as per Upper Hand chart, k2tog twice in pattern.  52 sts.

Work 2 rounds even in Upper Hand chart.

RING FINGER
Change to smaller needles.

Setup: With MC k8, slip next 35 sts to scrap yarn or holder, CO 1 st over gap, work rem 9 sts. 18 sts.
Distribute sts as you prefer and join for working in the round.

Knit even until work measures 2.5 inches from base of finger or until desired length.
Decrease round: K2tog around. 9 sts.
Last round: K2tog 4 times, k1. 5 sts.
Break yarn, leaving a 4-inch tail, thread tail through rem sts, and pull tight.

spacer
MIDDLE FINGER
Continue with smaller needles.

Setup: Using MC, and leaving a long tail pick up and k2 sts along CO edge of ring finger, k8 from holder, leave next 17 sts on holder, CO 1 st over gap, k last 10 sts from holder, join for working in the round, k2tog. 20 sts.
Distribute sts as you prefer.

Knit even until work measures 2.75 inches from base of finger or until desired length.

Decrease round: K2tog around. 8 sts.

Work Decrease round once more. 4 sts.

Break yarn, leaving a 4 inch tail, thread tail through rem sts, and pull tight.

INDEX FINGER
Continue with smaller needles.

You will be working with last 17 sts from holder.

Using MC and leaving a long tail, pick up and k3 sts along CO edge of middle finger, k16, join for working in the round, k2tog twice. 18 sts.
Distribute sts as you prefer.

OPTIONAL CONDUCTIVE ELEMENT: When finger measures 2 inches from base of finger or.5 inches shorter than desired length knit rest of sts with conductive thread. See notes.

Knit even until work measures 2.5 inches from base of finger or until desired length.

Decrease round: K2tog around. 9 sts.
Last round: K2tog 4 times, k1. 5 sts.
Break yarn, leaving a 4 inch tail, thread tail through rem sts, and pull tight.

THUMB
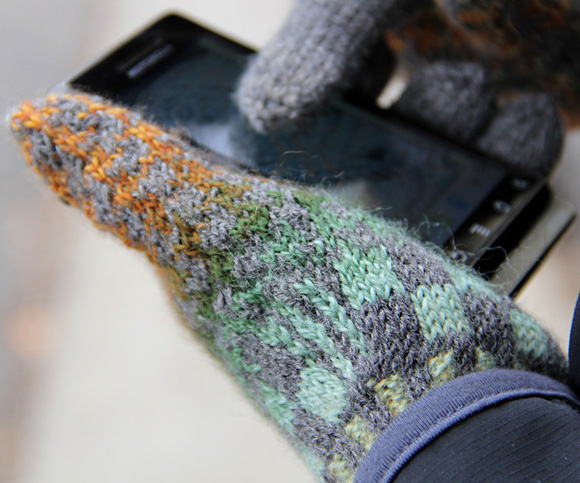
Return the 20 held thumb gusset sts to larger needles.
Using MC and leaving a long tail, pick up and k1 along gap between thumb and hand, work Round 1 of Thumb Chart. (K2tog at end of chart is worked over last of gusset sts and the picked up st.) 20 sts.
Distribute sts as you prefer.

Work Thumb Chart until round 8 is complete.

OPTIONAL CONDUCTIVE ELEMENT: On round 9 of chart begin to knit rest of sts with conductive thread. (See Notes.)
Complete all rounds of thumb chart adding on a few rounds of MC at the top if necessary until work reaches top of thumb. Cut other strands when chart is complete.

Thumb is completed in MC only.

Decrease round: K2tog around. 8 sts.
Work Decrease round once more. 4 sts.
Break yarn, leaving a 4-inch tail, thread tail through rem sts, and pull tight.
spacer

FINISHING
Weave in all ends, making sure to close up gaps at the base of fingers and the thumb. Block if desired.

spacer
ABOUT THE DESIGNER

designernamespacer Laura lives in upstate NY where the sunny season is short and there is plenty of time to wear gloves. Laura is currently enamored with lace, and incorporating beads into knitted jewelry, so most of her designs lean in this direction. Laura travels often to teach these techniques and more at workshops around the country and on-line at Craftsy.com. Besides being a prolific self-publisher, her designs have been published in a multitude of print and on-line publications including Interweave, Knitty.com, Schaefer Yarn Company, Webs and Creative Knitting.

When Laura is not designing or knitting, she is whipping up yummy feasts with her family, riding her bike, skiing, and taking time to play!  You can follow Laura (and her design exploits) on her blog, twitter, facebook, and in her Ravelry group

spacer