|
Back
when I was on my spindle road trip in 2003,
one of the many wise spinners I met taught me
this handy plying method, and I have since called
on it in many situations. I call it "handy
plying" and, punny as it may sound, you
too may soon find it handy.
But wait: why would I handy ply? Why not just
Andean
ply if I want to quickly create a two-ply
yarn with one singles?
A few reasons:
When the "bracelet" is slid onto the
wrist, it can't fall apart because it is actually
a continuous loop (unlike Andean plying -- it
took me a hundred goes at it to realize that
Andean plying is just a series of loops resting
on top of one another, first from one side,
then from the other). This is especially important
for lengths under 8 yards that are too short
to wrap more than a couple times around.
Some find the more commonly used Andean plying
confusing, are intimidated by it, or have to
relearn it every time they attempt it. Handy
plying by comparison is very simple.
When plying a fine, high twist singles (such
as a fine silk) or a fibre that is apt to snarl
and tangle (such as mohair), this method means
the singles can be tensioned by sliding the
"bracelet" only as far as the widest
part of the hand, and using the hand-span to
keep tension on the singles as it is plied off.
Even right up to the very last length, this
tension will hold the yarn in place until it
enters the plying process.
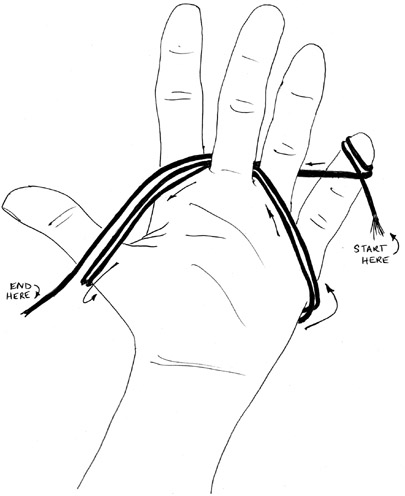 |
The
"handy plying" method, illustrated
in the diagram above, is especially practical
in a workshop setting where lots of small
singles are being spun up. |
Instructions
So how does one handy ply? See the diagram at
right, and follow these steps:
1. With the palm of your non-preferred hand
facing you, anchor one end of your singles onto
your baby finger (a couple snug -- not tight
-- wraps should do it).
2. Thread the yarn behind your middle finger,
in front of your index finger and thumb, around
the back of your hand, trailing in front of
your pinky and ring finger, and returning behind
your middle finger.
3. Follow the trail of the loop you just made,
until you run out of singles.
4. Angle your middle finger down enough to let you
slide the yarn out from in between your fingers, down
over your middle finger so the loops are around your
whole hand. This creates a "bracelet" or
a set of loops of yarn that you can then slide onto
your wrist or, in the case of a tangle-prone yarn,
onto your stretched hand-span.
5. Unwrap the anchored end from your pinky and
pinch it together with the other end.
Ply away!
The singles
will thread off your wrist much like with Andean
plying, and you'll find that with very short
lengths, you will soon be holding the folded
mid-point of the singles and recalling that
"ply" really means "fold"
and this is an easy way to fold your yarn in
two.
This article was originally printed in Spinners'
Quarterly.
For more information or to subscribe, visit
spinnersquarterly.com
|
|
Toronto-based spinner, Lorraine
Smith, is the Publisher and Editor of Spinners' Quarterly,
a printed newsletter discussing handspinning in the
modern world. She has also written for Spin Off Magazine
and Fibre Focus.
Find the source of more articles
like this one and other delights at spinnersquarterly.com.
|


