Gold, Frankenknits
and Myrrh
  It's
the time for winter gift giving and where better
to draw inspiration than the only gifts even
MORE traditional than a fruitcake doorstop --
gold, Frankenknits and myrrh? It's
the time for winter gift giving and where better
to draw inspiration than the only gifts even
MORE traditional than a fruitcake doorstop --
gold, Frankenknits and myrrh?
In this column you'll find
some great project ideas that will make perfect
gifts for the knitters in your life. They're
quick, you'll likely find what you need to
make them at home, and they won't them is
expensive.
Going for the gold
I like the idea of homemade
gifts. And I also like re-using things that
have outlived their moment. Not only is the
end of the year a time of giving, I always
think of it as a time to separate the wheat
from the chaff and start the new year with
just the good stuff.
So can you just give old stuff
or old stash away as gifts? Maybe if it's still
unused and you have enough of something to make
a certain project that is really perfect for
your friend then it counts as a gift. But what
about those more ambiguous cases? The half knit
(or all knit!) sweater that never fit. The various
left over single and partial skeins that are
"too small to use and too big to throw
away" or were impulse purchases in weak
moments. Clearly charitable donations are one
possibility. Knitting them into something is
another, but it's already December and time
is running short on the holiday knitting schedule.
My suggestion: take these leftovers (or hunt
for some sweaters aching to be unravelled at
the local second hand shop) and remake them
into new yarns that the recipient could never
buy for herself.
Here's one way to turn straw
into gold: If you've got loads of little balls
of yarn, and bits of novelty yarns you have
no idea what to do with or what made you buy
them in the first place, this is the project
for you. First, find a color range or palette
you like. Maybe it's pink-orange-red or green-brown-gold,
but limit yourself so you end up with a pleasing
result -- many knitters find themselves gravitating
toward certain colors anyway, so you may have
already unintentionally taken this step. If
you don't have a bunch of different yarns, consider
getting together with your knitting pals and
doing this as a group activity. You should also
think about how thick the yarns are. Four stitches
per inch or finer belong in one pile, the chunkies
and bulkies deserve their own project.
Then, start taking lengths
from the various balls of yarn, each between
1 and 6 yards long and tie them together, winding
a ball or skein as you go. Be mindful of spacing
textural elements like mohair or eyelash so
that they come up at somewhat regular intervals,
work groups of dark colors together, then groups
of lights to create subtle stripes rather than
alternating between dark and light. Keep going
like this until your ball has between 200 and
400 yards of yarn.
Knitting from this ball will
be like unwrapping a present all the way down
as the recipient will never know what's coming
next.

This issue, I've challenged Betz White to get Frankenknitty
with us. Betz combines the ancient technique
of felting with today's cast-away sweaters to
create what she calls "felted wool, artfully
stitched". You can see her work, including
my favorite, the Cup O' Joe Pincushion, at betzwhite.com.
For us, she's created this beautiful Winter
Garden Shibori Scarf. I can't wait to make one
(or three) myself!
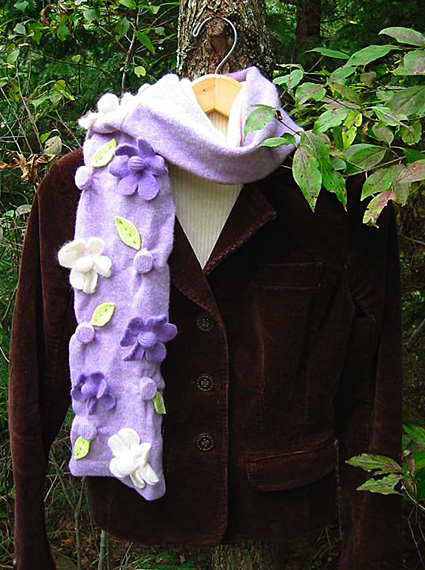
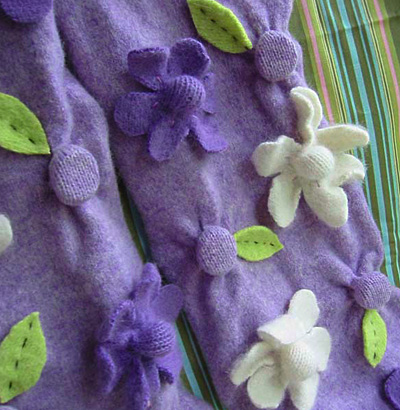
Winter Garden Shibori Scarf
by Betz White
Shibori is a term for traditional
Japanese resistance dye techniques. Similar
techniques can be used when felting wool.
Various objects are tied into the wool fabric
as a "resist" before felting. Keeping
parts of the fabric from felting creates amazing
three dimensional surfaces.
The Winter Garden design
takes this technique one step further. To
add a little extra pop and dimension, I've
added shibori flower appliques to the scarf.
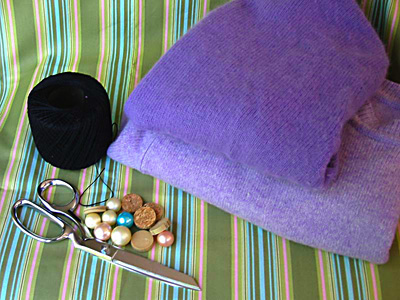
MATERIALS
 unfelted feltable wool sweaters
washing machine
sewing machine (optional)
scissors
cotton string
corks, beads, coins, buttons (Several of one
these items, or a mix of all will do.)
felt scraps (optional)
embroidery floss or yarn (optional)
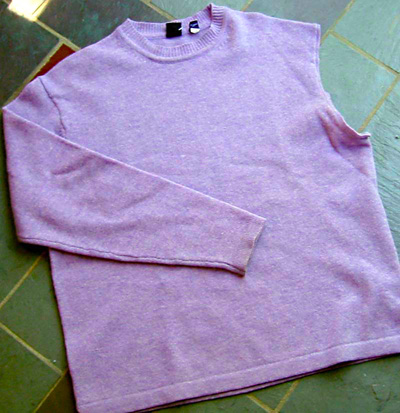
The first step is to select
a sweater. This sweater is a fine gauge lambswool.
The content should be at least 80% wool. Other
animal fibers are okay, such as angora or mohair.
Betz cut off a sleeve to test-felt to be sure
she would get a good result before trying the
shibori techniques. She washed the sleeve in
the washer (on hot) and dryer (on low) with
some other laundry. The sleeve shrunk about
4" compared to the unwashed one so the
sweater seemed like a good candidate.
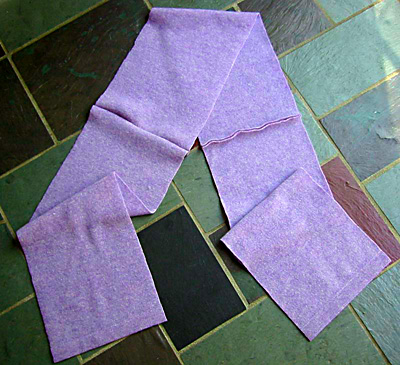
Next I cut the sweater into
3 rectangles (each about 8" x 20")
and sewed them short end to short end. I chose
to use the hem from this sweater to be the ends
of the scarf, but raw edges will do just as
well.
I also cut swatches of two
other sweaters in coordinating colors for the
extra shibori embellishment. These swatches
are about 5" x 5".

Lay out your design on the
scarf and mark placement. I am using corks that
were sliced into 1/4" thick "buttons".
Many items can be used (buttons, corks, super
balls, soda bottle caps, whatever!) and it is
fun to experiment.
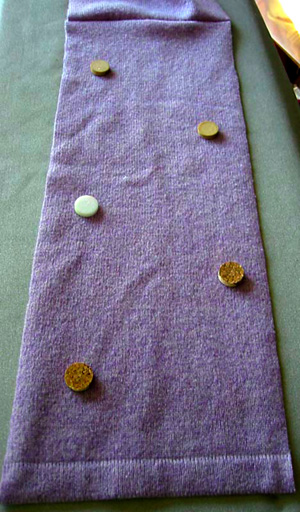
Tie cotton string tightly
around your chosen "felt resisting"
objects. Wrap the string several times and
tie off securely. The wool will shrink everywhere
except where it is tied off. Be sure to use
COTTON string because it has a high wet strength
and it won't felt.
I left the center rectangle
plain, without any objects. This will leave
the scarf smooth, without texture at the back
of the neck.
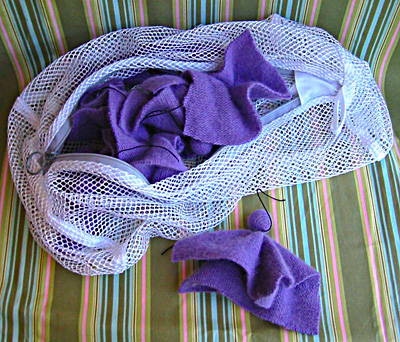
Put the scarf
in a lingerie bag. Felt in the washer by using
hot water and a little detergent. Put some jeans
in the load for some added friction. Check after
one cycle. If it doesn't look like it felted
very much, put it through again. Stop when you
get the desired result. Dry in the dryer on
medium then air dry. Use a seam ripper to cut
the string and remove objects after it is completely
dry. Be patient, it may need to sit overnight
and it must be totally dry before you remove
the objects.
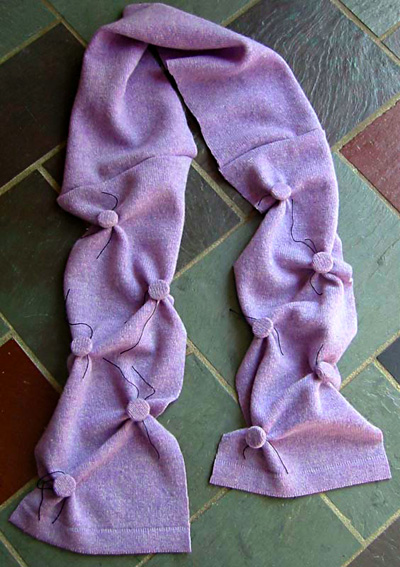
You could stop now and have
a fabulously textured shibori scarf. But for
this design, I wanted to add some extra embellishment
using the swatches cut earlier. These will be
made into flowers to add onto the background
scarf. I tied a round bead in each swatch and
put them in a lingerie bag to felt (as with
everyday laundry, it's best to felt like colors
together. I also tied ivory swatches and felted
them in a separate load.)
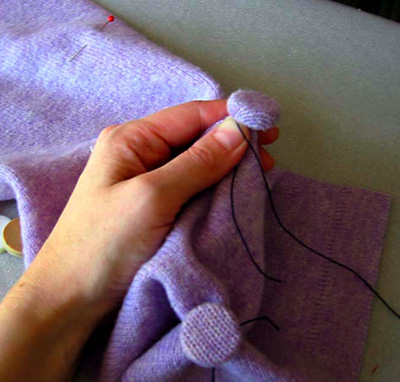
The result is these felted
little bobbles, after removing the string and
beads.
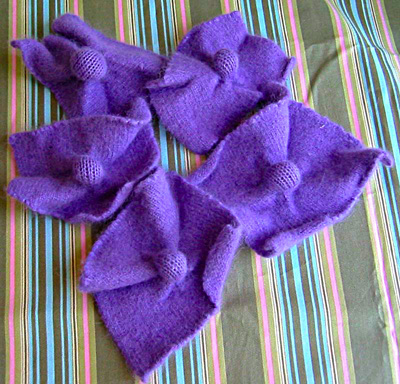
To create flowers,
mark the swatch with pins at the positions of
12:00, 2:00, 4:00, 6:00, 8:00, and 10:00. Snip
with scissors at each mark, stopping 1/2"
from center bobble. Trim into petal shapes.
Don't worry about the permanent folds formed
in the felt. That's what gives the flowers dimension
and makes them more flower-like!
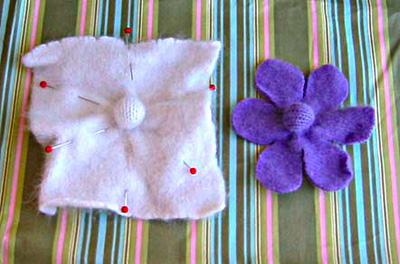
Lay out shibori felted scarf
(completely dry with all string and objects
removed). Place shibori flowers where desired
and pin into place. I decided mine needed
a little color pop, so I added the green leaves
cut out of felted wool scraps. Wool craft
felt would work nicely as well.

I used embroidery floss to
decoratively attach the elements. Leaves were
stitched up the center, flowers have one stitch
in each petal near the bauble. Plain matching
thread could be used to attach them invisibly.
|