Grandma Knitty Home
Knitty: little purls of wisdom
what's the editor up to lately?feature articlesKnitty's generous selection of patternsKnittyspin³archive of previous issuesMeet other Knitty readers and chat in our coffeeshop!sign up for the free Knitty newsletterLooking for an ad fromone of our advertisers? Click here!Our tiny, perfect online shopping mallGet yourself a little Knitty treat!read the behind-the-scenes news at Knitty


Find exactly what you're looking for

The answer to your question about Knitty is probably here!

Take home something Knitty today

Advertise with Knitty

Get your cool stuff reviewed in Knitty

Full information about how  to get published in Knitty

Read exactly what FREE PATTERNS really means...respect our designers and authors rights [and thank you]

Knitty is produced in a pro-rabbit environment

© Knitty 2002-2006. All rights reserved. Unauthorized reproduction prohibited. This means you.


<click for more!
 
Fabulous Yarn

Calorimetry is a scientific term describing the measurement of heat lost or gained.

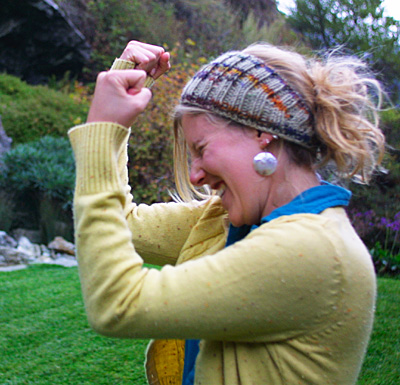
Knit hats are a wonderful way to block out the cold, but when you have long hair it usually requires wearing it down, not often the most comfortable option on a blustery day. This headscarf allows you to wear your hair up while keeping your ears warm and preventing heat from escaping from the top of your head.

My friend Meredith wears hers all around San Francisco and is modeling it here on the Big Sur coast. This can be knit quickly for a last minute gift, and as it only requires one skein of yarn you can afford to knit one for all of your friends.

model: Meredith Dearborn, a law student and knitted garment connoisseur in Berkeley, CA
photos:
Kathryn Schoendorf

SIZE
One
 
FINISHED MEASUREMENTS

Length: Stretches to 24 inches

 
MATERIALS

Filatura di Crosa 127 Print [100% Merino Wool; 93yd/85m per 50g ball]; color: #21 Beige; 1 skein

1 pair US #8/5mm straight needles
2 stitch markers
Safety pin (optional)
Tapestry needle
1 button (Buy the button after the project is completed, to determine the size needed.)

GAUGE
20 sts / 22 rows = 4 inches in 2x2 Rib, lightly stretched
PATTERN NOTES

[Knitty's list of standard abbreviations and techniques can be found here]

The project is worked using short rows. To work short rows, work to the point indicated in the pattern, then turn your work around and begin working back in the other direction. Holes will form in your work at the turning points of the short rows; don't worry! This is to be expected. One of these holes will be used as a buttonhole when the project is completed.

The pattern uses 2 stitch markers to help you keep track of your short rows. The first half of the piece is worked in short rows which progressively decrease in length, the second half in short rows which progressively increase in length.

2x2 Rib (Worked back and forth over a multiple of 4 sts):
Row 1: [K2, p2] to end.
Repeat this row for 2x2 Rib.

IMPORTANT NOTE: It is very important to obtain the correct gauge for this piece. If worked to the gauge stated above, your Calorimetry will be 24 inches long. If you want a shorter piece, you can either cast on fewer stitches, or work at a smaller gauge. For example, using sport weight yarn (on smaller needles) worked at a gauge of 24 sts = 4 inches will yield a piece that is 20 inches long.
It is also very important to consider the characteristics of the yarn you are choosing. Best results will be obtained from a yarn that is springy and resilient, which will retain the elasticity of the ribbing. Do not use a yarn which will lose its shape, becoming drapey and flaccid with wear.

DIRECTIONS

CO 120 sts.

Row 1: Work all sts in 2x2 Rib.

Row 2: Work in 2x2 Rib as set to last 2 sts, turn work.

Row 3: Sl 1, work 3 sts, place marker, work to last 2 sts, turn work.

Row 4: Sl 1, work 3 sts, place second marker, work to next marker, turn work.

Row 5: Remove marker, sl 1, work 3 sts, replace marker, work to next marker, turn work.

Repeat Row 5 fifteen times more.

Row 6: Do not remove marker. Sl 1, work to next marker, turn work. 44 sts between markers; 38 sts at each side of piece, outside of markers.

Row 7: Sl 1, work to marker, remove marker, work 4 sts, replace marker, turn work.
Repeat Row 7 seventeen times more. 2 sts remain outside markers at each end of the piece.

Row 8: Sl 1, work to marker, remove marker, work last 2 sts.
Work 1 more row, removing final marker.

Loosely BO all sts.

FINISHING

Weave in ends, using one yarn end to sew a button to one end of the piece. No buttonhole is necessary; one of the holes which formed at a short-row turning point can serve as a buttonhole.

ABOUT THE DESIGNER

When not constructing knitted garments, Kathryn is learning how to construct furniture and other things in art school in San Francisco.