|


![Read exactly what FREE PATTERNS really means...respect our designers and authors rights [and thank you]](../images/OFFnavLEGAL.gif)

 
|
|
 <click
for more! <click
for more!
 
|
| 
 by
Rosemary Hill by
Rosemary Hill

Years ago my mother and I
took a three week trip to Europe in late autumn.
We were to stop by Venice for two days, but
loved the city so entirely, we stayed for ten.
By day, we lost ourselves
in back alleys and odd museums. By night, we
found our way back to a little cafe whose specialty
was seafood risotto. We were armed with little
more than a rudimentary knowledge of Italian
and a dictionary, but that trip still stands
in my mind as perfect in every respect.
One day, while wandering
an obscure back alleyway, we came upon an extraordinary
gate. It was an abstract netting of wrought
iron, with chunks of sea glass embedded among
the strands of metal. There were blues, greens,
reds, amber and clear pieces of every size.
We stared open-mouthed as the afternoon light
glanced across the glass, glowing and flashing.
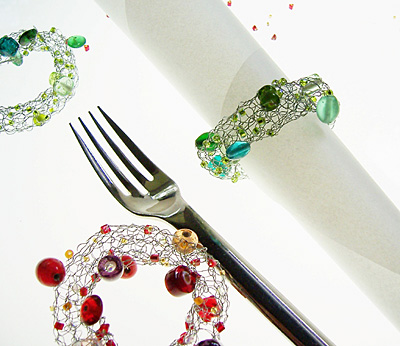
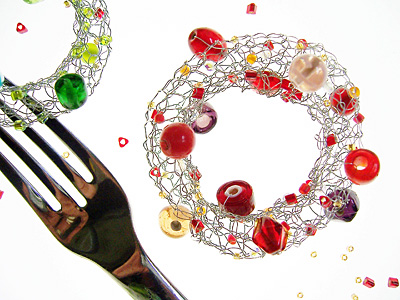
The Venezia napkin rings
are my homage, small though it is, to the beauty
of that gate, still bright and clear in my mind
after so much time. They are best used for seafood
risotto, a little bottle of chianti and fond
memories. |
|  photos: Rosemary Hill
 |
|
| |
|
Measurements are taken after pulling fabric
into shape.
Measured flat before seaming:
Width: 2.25 inches
Length: 5.5 inches
Measurements after seaming:
Inner circumference:
4.5 inches
Outer circumference:
7.5 inches |
|
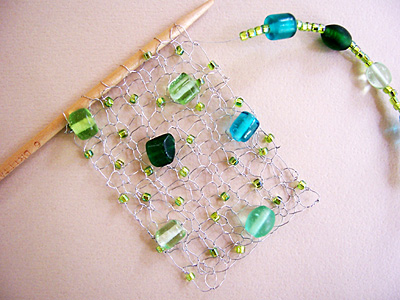
Beading
wire, 34 gauge [24yd/22m per spool]; color:
silver; 1 spool will make 3 napkin rings
1 set US #6/4mm needles: Bamboo is recommended,
and you may find it easier to use two double-point
needles rather than long straight needles.
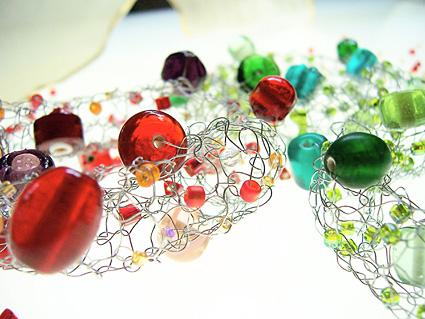
Glass seed beads, sizes 13 through 8; 55 per
napkin ring (buy extra, you'll drop some)
Assorted larger glass beads, sizes 6-12mm; 11
per napkin ring (buy extra!)
Waste yarn
1 piece of dowel, 0.5 inch diameter, at least
8 inches long |
|
| 7 sts/35 rows = 2.25 inches
wide x 5.5 inches long (exact gauge is not critical
for this project) |
| [Knitty's
list of standard abbreviations and techniques
can be found here] |
 I
used two double-point bamboo needles because
they are short and not very slick, and I found
it very easy to manipulate the wire. I had no
problems with losing stitches. You can use any
needles you like, though. I
used two double-point bamboo needles because
they are short and not very slick, and I found
it very easy to manipulate the wire. I had no
problems with losing stitches. You can use any
needles you like, though.
Beads are placed between stitches. To place
a bead in your work, knit the stitch before
the place you want your bead to go, slide the
bead up the wire until it rests next to your
right needle, then knit the next stitch. It's
as easy as that!
Instructions for the Backward Loop Cast On
can be found here. |
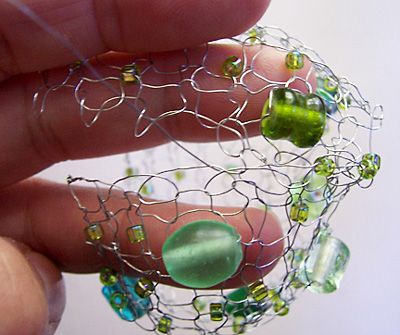
 Using
color combinations that are aesthetically
pleasing to you, pre-string beads in this
pattern: [1 large bead, 5 seed beads] 11 times. Using
color combinations that are aesthetically
pleasing to you, pre-string beads in this
pattern: [1 large bead, 5 seed beads] 11 times.
Using the Backward Loop technique, CO 7
sts, placing at least 1 bead in the CO row.
K 35 rows, placing approximately 2 beads
per row. Five of the rows (or approx. 1 row
in 7) will have to have only 1 bead; be sure
to keep this in mind as you work, and plan
accordingly. Place the beads in different
places in the rows; you want to achieve fairly
even coverage, with a seemingly random appearance.
When all the beads have been used, cut the
wire, leaving a 17-inch tail.
Ensure that all the larger beads sit on
one side of the fabric, so that they will
face out when the rectangle is seamed. It
is easy to push the beads through and close
the wire behind, so they do not slip back
through.
|
| |
|  Stretch
rectangle so that it measures 2.25 inches x
5.5 inches. Stretch
rectangle so that it measures 2.25 inches x
5.5 inches.
Remove needle from live stitches,
inserting a piece of waste yarn through the
stitches to keep them from unraveling. Wrap
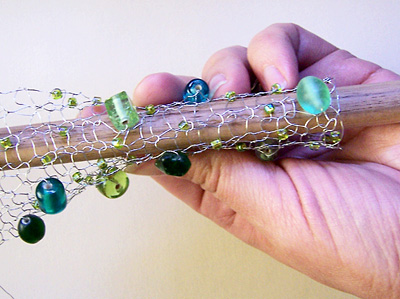
rectangle lengthwise around dowel to curve it
into a tube (see photo), making sure the larger
beads are on the outside of the fabric.
|
 Remove
rectangle from dowel and graft live stitches together
with CO edge. Remove waste yarn. Without cutting
wire, sew together edges of rectangle to form
a tube. Wrap wire around itself several times
and clip, being careful not to leave ends sticking
out. Remove
rectangle from dowel and graft live stitches together
with CO edge. Remove waste yarn. Without cutting
wire, sew together edges of rectangle to form
a tube. Wrap wire around itself several times
and clip, being careful not to leave ends sticking
out. |
|  Rosemary
lives with three wonderful men in wine country,
where she is a graphic designer and illustrator.
In 2005 she became a purveyor of shawl, scarf
and sweater pins when she launched Designs
by Romi. She's just happy to be mixing work
with play. Rosemary
lives with three wonderful men in wine country,
where she is a graphic designer and illustrator.
In 2005 she became a purveyor of shawl, scarf
and sweater pins when she launched Designs
by Romi. She's just happy to be mixing work
with play.
Drop by her
blog to see what she's up to these days! |
| Pattern & images
© 2006 Rosemary
Hill. Contact Rosemary |
|
|
|
|
|