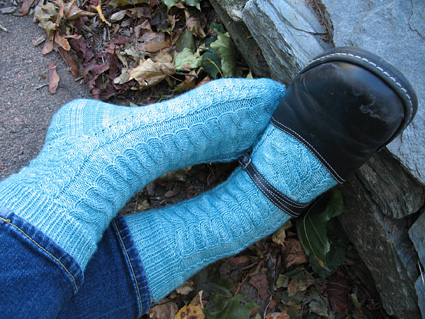
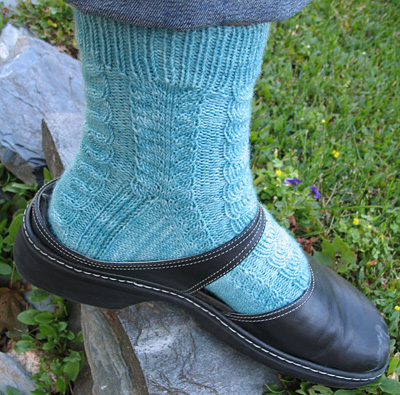
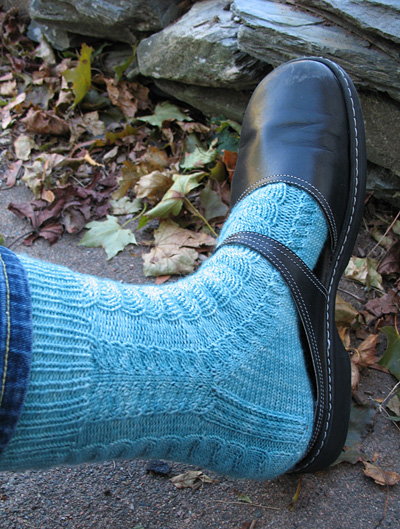
Sizing
and Yardage Notes
The increases and decreases within the stitch pattern cause some biasing,
resulting in a less elastic fabric and possibly necessitating the use
of more than your usual number of stitches for a sock. Swatch generously
before committing to a size.
Those with high insteps or voluptuous legs may wish to go up a size
after the heel flap by adding an additional purl stitch in each of
the four purl columns of the sock. The sample sock, worked in size
M to the heel turning and size L for the leg, fits my size 11B feet
with limited tugging.
The yardage of the listed yarn is a bit less than that of other
sock yarns. Wind your skein into two equal halves and try on the
sock after every leg pattern repeat to ensure that the sock fits
over the ankle, and that you don’t run out of yarn!
Directions for the Magic Cast On can be found here.
These socks are worked from the toe up on two circular needles. If you are unfamiliar with this technique, instructions may be found here.
If you prefer, the socks may be worked using the "Magic Loop" technique,
or on double-point needles.
M1: Insert left needle, from front to back, under strand of yarn which runs between last stitch on left needle and first stitch on right needle; knit this stitch through its back loop.
M1p: Insert left needle, from front to back, under strand of yarn which runs between last stitch on left needle and first stitch on right needle; purl this stitch through its back loop.
Ssp: Slip next 2 sts knitwise, one at a time, to right needle. Slip them both, purlwise, back to left needle. Purl them together through their back loops.
|
Using the Magic Cast On method, CO 8[10, 12] stitches onto each of 2 circular needles: 16[20, 24] sts. K 1 round.
Note: Throughout this pattern, the first needle of the round will
be referred to as Needle 1; the second needle will be Needle
2.
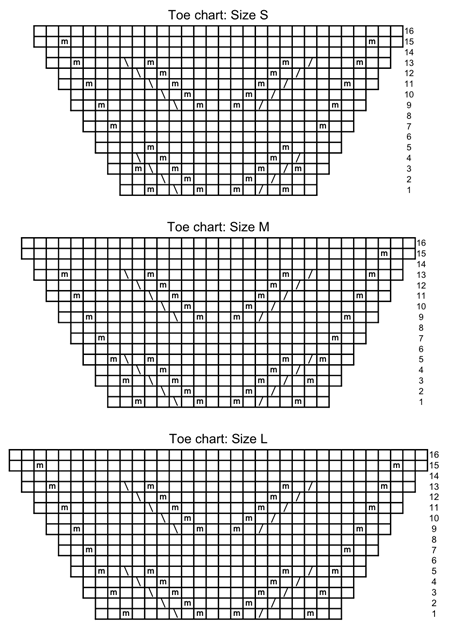
TOE
Toe Increase Round: [K2, m1, k to last 2 sts on needle, m1, k2]
twice. 4 sts increased.
Repeat this round twice more. 28[32, 36] sts.
Work Rounds 1-16 of Toe Chart for your size over sts on Needle
1. For sts on Needle 2, work as follows:
Odd-Numbered Rounds 1-15: K2, m1, k to last 2 sts on needle,
m1, k2.
Even-Numbered Rounds 2-16: K all sts.
When Round 16 is complete, there are 60[64, 68] sts; 30[32, 34]
sts on each needle.
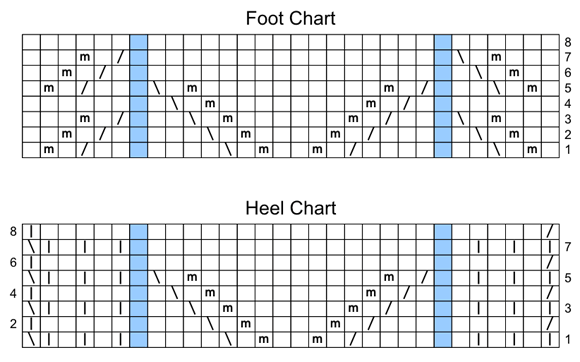
FOOT
Set-up Round: Work Round 1 of Foot Chart for your size over sts
on Needle 1; k all sts on Needle 2. Note that the squares marked
in blue indicate a different number of sts for each size.
Work in pattern as established by this round until foot measures
approx. 3.5 inches less than desired length to back of heel,
ending with Chart Round 7.
GUSSET
Gusset Increase Round: Work sts on Needle 1 in pattern; k1, m1,
k to last st on Needle 2, m1, k1.
Work 1 round in pattern.
Repeat these 2 rounds 10 times more, then work Gusset Increase
Round once more. 84[88, 92] sts: 30[32, 34] sts on Needle 1,
54[56, 58] sts on Needle 2.
You will have just completed Chart Round 6.
HEEL
Heel is worked back and forth over the 54[56, 58] sts on Needle
2.
Row 1 [RS]: Work sts on Needle 1 in pattern (Chart Round 7);
k first 36[38, 40] sts of Needle 2. Turn work.
Even-numbered Rows 2-12 [WS]: Sl 1, p17[19, 21]. Turn work.
Odd-numbered Rows 3-11 [RS]: Sl 1, k17[19, 21]. Turn work.
Row 13 [RS]: Sl 1, k15[17, 19], w&t.
Row 14 [WS]: Sl 1, p13[15, 17], w&t.
Row 15 [RS]: Sl 1, k11[13, 15], w&t.
Row 16 [WS]: Sl 1, p9[11, 13], w&t.
Row 17 [RS]: Sl 1, k7[9, 11], w&t.
Row 18 [WS]: Sl 1, p5[7, 9], w&t.
Sizes M, L Only:
Row 19 [RS]: Sl 1, k-[5, 7], w&t.
Row 20 [WS]: Sl 1, p-[3, 5], w&t.
All Sizes:
Next Row [RS]: Sl 1, k5[3, 5], [k next st together with its wrap,
k1] 3[4, 4] times, pick up and k 6 sts (1 st in each slipped
st) along edge of flap. Turn work.
Next Row [WS]: Sl 1, p17[17, 19], [p next st together with its
wrap, p1] 3[4, 4] times, pick up and p 6 sts (1 st in each slipped
st) along edge of flap. Turn work.
You will now have 66[68, 70] sts on Needle 2: 30[32, 34] heel
flap sts, with 18 gusset sts at each side of the flap sts.
HEEL FLAP
Set-up Row 1 [RS]: [Sl1, k1] 3 times, p1[2, 3], k16, p1[2, 3],
[sl1, k1] twice, sl1, ssk. Turn work.
Set-up Row 2 [WS]: Sl 1, p5, k1[2, 3], p16, k1[2, 3], p5, p2tog.
Turn work.
Repeat Set-up Rows 1 and 2 once more. 62[64, 66] sts: 16 gusset
sts remain at each side of the flap.
Work Rows 1-8 of Heel Chart 3 times, then work Rows 1-7; do not
turn work at end of last row. 31[33, 35] sts on Needle 2; 1 gusset
st remains at right of flap.
Resume working in the round as follows:
Next Round: Work Round 8 of Foot Chart over sts on Needle 1;
k2tog, k5, p1[2, 3], k16, p1[2, 3], k6. 60[64, 68] sts.
LEG
Work Foot Chart over sts on both needles until leg measures 1.5
inches less than desired length, ending with Round 8.
Next Round: [K1, p1] to end.
Repeat this round for 1.5 inches.
BO all sts loosely in pattern.
|