Grandma Knitty Home
Knitty®: little purls of wisdom
what's the editor up to lately?feature articlesKnitty's generous selection of patternsKnittyspinşarchive of previous issuesMeet other Knitty readers and chat in our coffeeshop!sign up for the free Knitty newsletterLooking for an ad fromone of our advertisers? Click here!Our tiny, perfect online shopping mallGet yourself a little Knitty treat!read the behind-the-scenes news at Knitty


Find exactly what you're looking for

The answer to your question about Knitty is probably here!

Take home something Knitty today

Advertise with Knitty

Get your cool stuff reviewed in Knitty

Full information about how  to get published in Knitty

Read exactly what FREE PATTERNS really means...respect our designers and authors rights [and thank you]

Knitty is produced in a pro-rabbit environment

© Knitty 2002-2008. All rights reserved. Unauthorized reproduction prohibited. This means you.


<click for more!
 
Loop Yarn

When the winter cold is unbearable and the days short and devoid of color, I like to knit something colorful to remind myself that in a few short months the world will come to life again.  As I knit I dream of melting snow, mud season, fiddlehead ferns, and the first blossoms of spring.

To pay homage to the coming spring, this bag is embellished on both sides with vines, leaves, and flower. 

The muted texture of the felted wool makes a perfect canvas for the brilliant colors and unrefined texture of the recycled silk yarn. 

The base of the bag allows it to sit open, making it ideal for a knitting bag, oversized handbag, or diaper bag.


photos:Stephanie Shiman/Konstantine Shiman

SIZE
One
 
FINISHED MEASUREMENTS

Width before felting:  23 inches across top, 13 inches across base
Height before felting: 15 inches from base
Width after felting:  20 inches across top, 12 inches across base
Height after felting:  12 inches from base

Finished measurements after felting may vary depending on yarn used, water temperature, and amount of agitation during felting.

 
MATERIALS

[MC] Cascade Yarns Cascade 220 [100% wool; 220yd/201m per 100g skein]; color: #8686 Chocolate Brown; 4 skeins

frabjous fibers’ Hand Picked Hues [100% recycled silk; 100yd/91m per 100g skein]; 1 skein each color
[CC1] Parrot
[CC2] Emerald
[CC3] Fuchsia

Recommended needle size:
1 24-inch US #15/10mm circular needle
1 set US #15/10mm double-point needles (only 2 are needed; used for I-Cord)
1 set US #10.5/6.5mm double-point needles (only 2 are needed; used for I-Cord)
1 set US #7/4.5mm straight needles
[always use a needle size that gives you the gauge listed below -- every knitter's gauge is unique]

1 size K/10.5 / 6.5mm crochet hook
4 stitch markers: one should be different from the others
Safety pins
Sharp tapestry needle
Sewing thread in 3 colors: to match bag color, vine color, and flower color
6yd kite string
4 large buttons with 4-hole design (these will live on the inside of the bag; they can be ugly, mismatched, whatever)
0.5 yd yummy fabric for lining and inside pockets, with matching thread


GAUGE

Bag body: 10 sts/14 rows = 4 inches in stockinette stitch before felting, using largest needles and 2 strands MC held together
Straps: 12 sts/14 rows = 4 inches in stockinette stitch using middle-sized needles and 2 strands CC held together
Leaves & Flowers: 18 sts/40 rows = 4 inches in garter stitch using smallest needles and one strand CC

 
PATTERN NOTES

[Knitty's list of standard abbreviations and techniques can be found here]

The bag body is knit with two strands of MC held together.  The body of the bag is felted, then later embellished.  The vine and leaves require 2 skeins of recycled silk yarn, so I choose to use two shades to add depth to the color. The vine straps and flowers are knit with two strands held together, but the leaves are knit with a single strand.

SKP: Sl 1 knitwise, k2tog, pass slipped st over.

Applied I-Cord:
With RS of work facing and using cable or twisted loop method, CO 3 sts. (Cast these new sts on in addition to sts already on needle.)
Next Row: Using a double-point needle, k2, ssk. (Last I-Cord st has been worked together with first st of bag.) Slide 3 sts just worked to other end of double-point needle and bring yarn around back of work, ready to begin working the next row.
Repeat this row until all sts have been worked.

I-Cord
Next Row: Instead of turning work around to work back on the WS, slide all sts to other end of needle, switch needle back to your left hand, bring yarn around back of work, and start knitting the sts again. I-Cord is worked with the RS facing at all times.
Repeat this row to form I-cord. After a few rows, work will begin to form a tube.

DIRECTIONS

BASE
Using US #15/10mm circular  needle and 2 strands of MC held together, CO 20 sts.
Row 1 [RS]: K all sts.
Even-Numbered Rows 2-8 [WS]: P all sts.
Odd-Numbered Rows 3-9 [RS]: Kfb, k to last st, kfb. 28 sts when Row 9 is complete.
Row 10 [WS]:  Pfb, p to last st, pfb. 30 sts.
Rows 11-12: Work in stockinette st.
Row 13 [RS]: K2tog, k to last 2 sts, k2tog.
Even-Numbered Rows 14-20: P2tog, p to last 2 sts, p2tog. 20 sts when Row 20 is complete.
Odd-Numbered Rows 15-21 [RS]: K all sts.
Row 22 [WS]: P all sts.
Note: When placing markers in the next round, the marker which is different from the others will be the last one placed.

Row 23 [RS]: K to end, place marker; pick up and k 20 sts along adjacent side edge of work, place marker; pick up and k 20 sts (1 st in each CO st) along CO edge of work, place marker; pick up and k 20 sts along remaining side edge of work, place marker to indicate end of round. 80 sts.

BAG BODY
From this point, bag will be worked in the round.
K 5 rounds.
Increase Round: [Kfb, k to 1 st before next marker, kfb] 4 times. 88 sts.

K 9 rounds.
Work Increase Round.
Repeat these 10 rounds 3 times more. 120 sts.

K 3 rounds, removing all markers except end-of-round marker.
Next Round: K15, place marker, k60, place marker, k45. Newly placed markers are at center front and center back of bag.

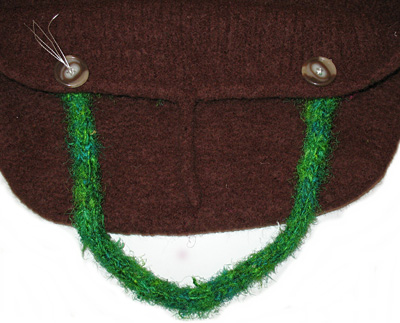
Work Applied I-Cord (see Pattern Notes) to first marker.

Work 9 rows I-Cord (unattached), which will form a loop.

Resume working Applied I-Cord, continuing to next marker.

Work 15 rows I-Cord (unattached). Break yarn, draw through sts of I-Cord and pull tight.

Reattach yarn at base of cord just worked and resume working Applied I-Cord, continuing until all sts of bag have been worked. Graft or invisibly sew sts of I-Cord to CO sts at beginning of I-Cord.

Weave in ends.

FLOWER CENTER (Make 2):
Using crochet hook and a single strand of MC, work a crochet chain 24 inches long. Break yarn and draw through last ch.

Felt Bag and Flower Centers:
Place flower centers in mesh bag or pillowcase. Place knitted bag and flower centers in washer with hot water, soap, and similar colored items for agitation.  Avoid adding any items that might be discolored by leached dye, or items that might leave lint on wool bag. 

Allow washer to run through cycle, periodically checking felting progress.  Once bag has felted to desired size and density, remove from washer and rinse in warm water to remove soap.  Do NOT allow bag to go through spin cycle; this may permanently crease the fabric.

Flower centers may be rinsed and spun in machine if desired.

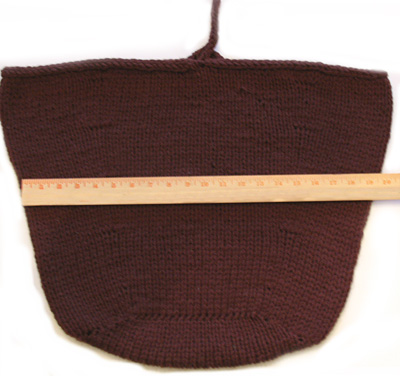
Turn bag inside out so that WS is visible. This will be the outside of the bag. Shape bag and stuff with plastic bags or bubble wrap, to achieve desired shape. 

Much of the success of the finished bag will depend on how well it is shaped and stuffed, so shape and stuff the bag carefully.  Place bag on a towel, sitting it up on its base, and allow to dry completely.

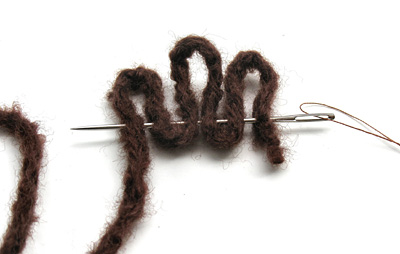
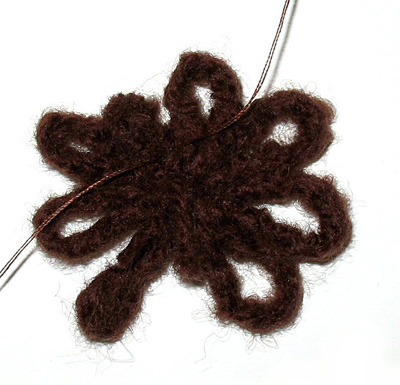
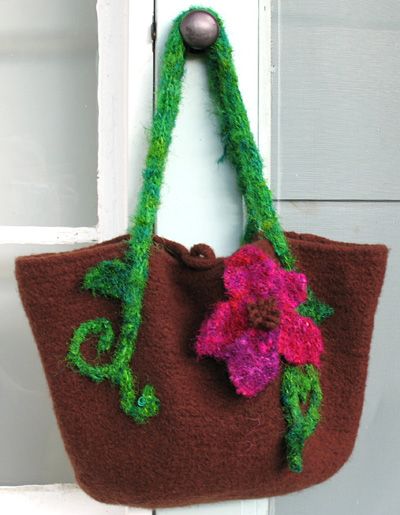
Flower centers may be finished while still damp. Using sewing thread, gather piece as shown in photo. Pull thread tight so that piece forms a small flower shape as shown, then use thread to secure. Allow to dry.
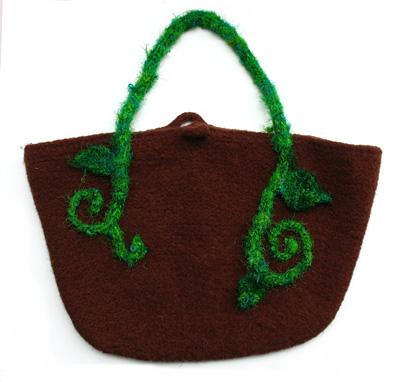
VINES (Make 2)
Using US #10.5/6.5mm double-point needles and one strand each of CC1 and CC2 held together, CO 1 st.

Work 3 inches of I-Cord.

Next Row: Kfb. 2 sts
Work 3 inches of I-Cord.

Next Row: K1, kfb. 3 sts.
Work 5 inches of I-Cord.

Next Row: K1, kfb, k1. 4 sts. Place safety pin in work at this point; this marks beginning of handle section.
Work 21 inches of I-Cord, or until handle section is desired length. Place safety pin in work at this point to mark end of handle.

Next Row: K1, k2tog, k1. 3 sts.
Work 9 inches of I-Cord.

Next Row: K1, k2tog. 2 sts.
Work 3.5 inches of I-Cord.

Next Row: K2tog. 1 st.
Work 8 inches of I-Cord. Break yarn, draw through remaining st and pull tight.

Apply Tendril:
Measure 5 inches from beginning (shorter end) of vine. At this point, pick up and k 2 sts. Work 5 rows I-Cord.
Next Row: K2tog. 1 st.
Work 5 rows I-Cord. Break yarn, draw through remaining st and pull tight.

SMALL LEAVES (Make 4)
Using US #7/4.5mm needles and a single strand of CC2, CO 3 sts.
K 1 row.
Increase Row: Kfb, k to last st, kfb. 5 sts.
K 2 rows.
Repeat Increase Row.
K 7 rows.
Decrease Row: Ssk, k to last 2 sts, k2tog. 5 sts.
K 1 row.
Repeat the last 2 rows once more. 3 sts.
Last Row: SKP. Break yarn, draw through remaining st and pull tight.

LARGE LEAVES (Make 2)
Using US #7/4.5mm needles and a single strand of CC2, CO 3 sts.
K 1 row.
Increase Row: Kfb, k to last st, kfb. 5 sts.
Repeat Increase Row. 7 sts.
K 2 rows.
Repeat Increase Row. 9 sts.
K 3 rows.
Repeat Increase Row. 11 sts.
K 2 rows.
Decrease Row: Ssk, k to last 2 sts, k2tog. 9 sts.
K 1 row.
Repeat the last 2 rows 3 times more. 3 sts.
Last Row: SKP. Break yarn, draw through remaining st and pull tight.

FLOWER (Make 2)

Petal (Make 5):
Using US #7/4.5mm needles and a single strand of CC3, CO 3 sts.
K 1 row.
Increase Row: Kfb, k to last st, kfb. 5 sts.
Repeat Increase Row. 7 sts.
K 1 row.
Repeat the last 2 rows 3 times more. 13 sts.
K 2 more rows.
Decrease Row: Ssk, k to last 2 sts, k2tog. 11 sts.
K 3 rows.
Repeat Decrease Row. 9 sts.
K 2 rows.
Repeat Decrease Row. 7 sts.
K 1 row.
Repeat the last 2 rows once more. 5 sts.
Repeat Decrease Row. 3 sts.
Break yarn. Push petal down to end of needle and disregard it as you knit the next petal. As you continue to knit the petals, they will accumulate at the end of your needle.
Do not break yarn when fifth petal is complete.

Join Petals:
Knit across all sts of all petals. 15 sts.
Next Row: [K2tog] 7 times, k1. 8 sts.
Break yarn, leaving a 12-inch tail. Draw through all sts and pull tight. Use tail to sew first and last petals together near base. Weave in ends.

FINISHING
Handles
Thread sharp tapestry needle with 2 long strands of kite string, doubling each strand after it is threaded so that you have 4 thicknesses.

Thread the string through the handle portion of the vine, trimming so that approx. 12 inches of string emerges at each end.

Position handle on side of bag using photo as guide.

At each end of the handle, approx. 0.5 inch from upper edge of bag, use kite string to attach a button to inside of bag. This will create very strong straps, and will not allow the i-cord to stretch under the weight of the bag.

Vines, Leaves and Flowers:
Form tapered ends of vines into curls on sides of bags, using photos as guides. Use sewing thread to sew in place.
Determine desired locations of leaves and sew in place, sewing securely at base of each leaf and tacking at center of leaf. This will leave the sides and tip of each leaf free, adding to the sculptural quality of the bag.

Sew flowers to bag as shown in photos, sewing center of each flower securely and tacking at center of each petal. Sew flower center to center of each flower.

Toggle:
The I-Cord loop on one side of the bag forms one half of the bag fastening; curl the length of cord on the other side of the bag into a spiral and sew securely, forming a toggle to fit through the loop.

Lining: 
Lining the bag will add a polished look, and will hide the buttons reinforcing the strap. 

Fold the fabric in half with right sides together and lay it flat, with the fold nearest you. Position bag on top of fabric with the bottom of the bag 1 inch above the fold.  Using chalk or water soluble marker, draw bag outline on fabric.  Stretch bag slightly as you draw to be sure you get the full size of the bag.

Draw a second line 1 inch out from the bag outline; this will be the cutting line, and will allow a 1-inch seam allowance. Cut out lining along this cutting line; cut only along side and upper edges, do not cut out along lower edge.
Turn under top edge of lining approx. 1 inch and iron, to set hem.  Place right sides together and sew side edges together. Tuck lining into bag and sew to bag opening, using care so that the stitches will not show on the outside of the bag.

 
ABOUT THE DESIGNER

Stephanie lives in Marlboro, Vermont, with her husband, two little girls, fifteen chickens, and a furry mutt. This is Stephanie's fifth pattern for Knitty.

She imports recycled silk yarn available at her website and in stores.