  by Keri Williams by Keri Williams

I was exceedingly lucky that my mother taught me to knit when I was six years old. My first attempts were pretty simple, but it was not long before I was knitting clothes for my dolls.
Some time around then my mum taught me to knit cables,
and a life-long love affair began. The only thing was I never liked how
they only looked good on one side. So when I heard about reversible cables
I knew I would have to do something with them.
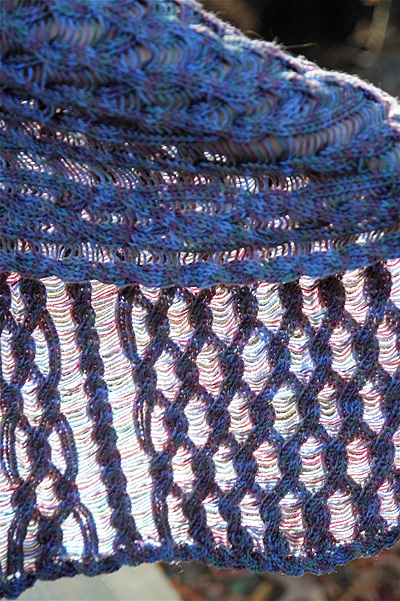
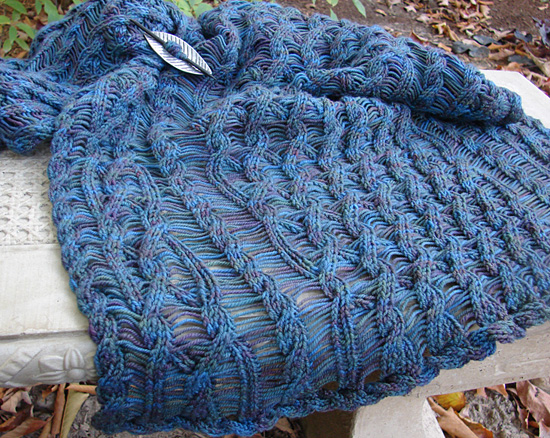
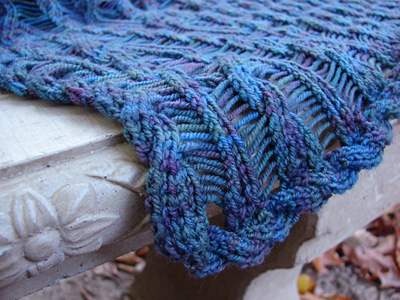
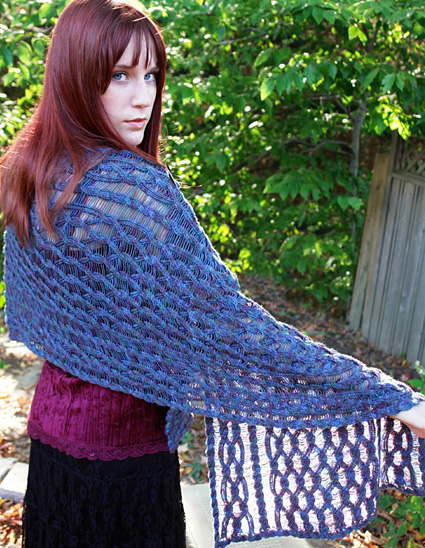
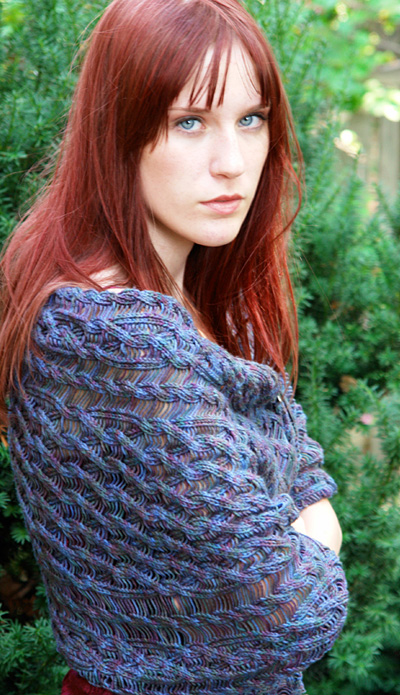
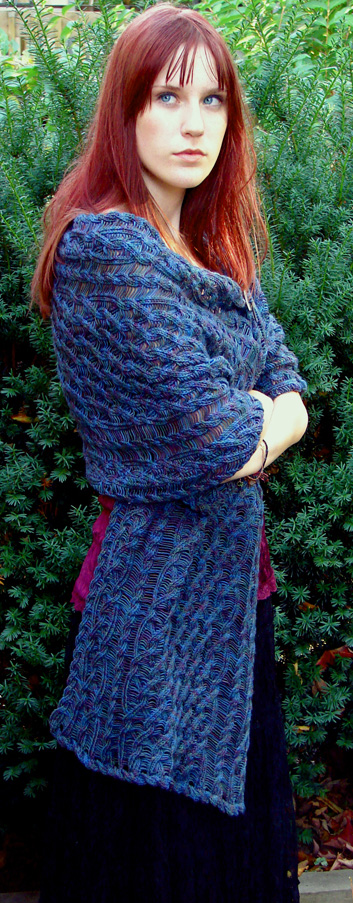
At first I thought a scarf, especially as reversible cables tend to make quite a thick cloth. But when I saw a ’hanging cable,’ made by dropping the stitch on either side of the cable, a host of possibilities opened up. A whole lot of experimentation later, and I had a reversible cable that was still light and lacy.
The mix of blues, greens and purples in this Dream
in Color yarn make me think of the New Zealand seas and paua shells.
And of course, my mom, the New Zealander who first taught me to knit
cables. So mum, this one is named for you. |
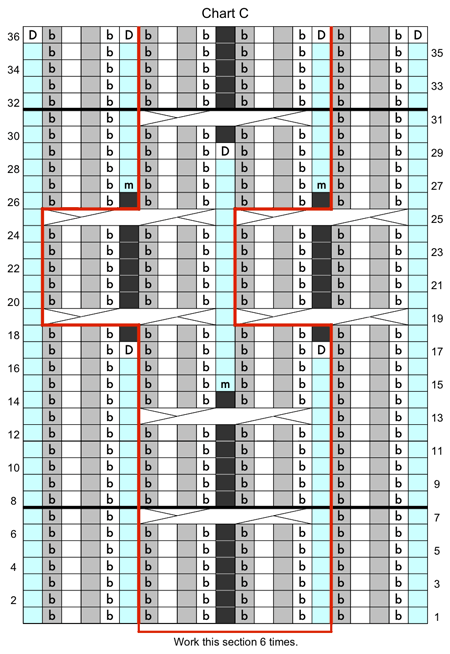
 Using Provisional Cast On, CO 137 sts. Using Provisional Cast On, CO 137 sts.
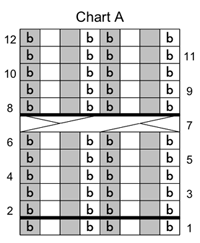
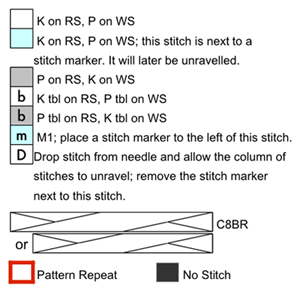
Note: When placing stitch markers between the charts in the Set-up Row, use the type of marker of which you have 6. When placing markers as indicated within each chart, use the type of marker of which you have 13.
Set-up Row [RS]: Work 8 sts
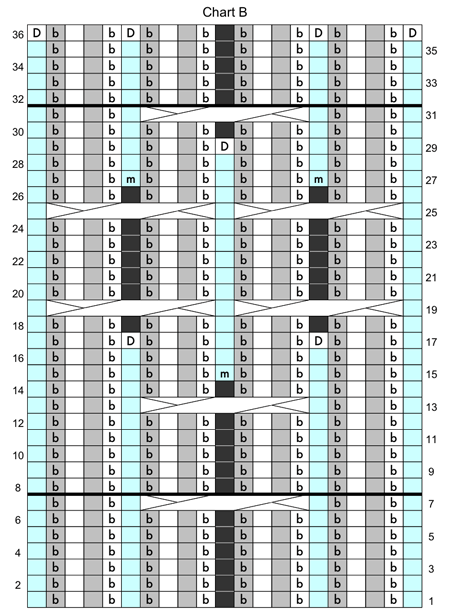
of Chart A, place marker; work 20 sts of Chart B, place marker;
work 8 sts of Chart A, place
marker; work 65 sts of Chart C, working outlined pattern
repeat 6 times, place marker; work 8 sts of Chart A, place
marker; work 20 sts of Chart B, place marker; work 8 sts
of Chart A.
Work in pattern as set, noting the following:- For Chart A, work Rows 1-7, then repeat Rows 2-7 as needed.
- For Charts B and C, work Rows 1-31, then repeat Rows 8-31 as needed.
Continue in pattern until work measures approx. 66 inches,
ending with Row 31 of Charts B and C (Row 7 of Chart
A).
Work 5 more rows in pattern: Rows 8-12 of Chart A, Rows 32-36 of Charts B and C.
Upper Edge:
To bind off the sts of this wrap, the cabled band at the side edge is continued along the end of the piece, and the sts of the wrap are worked together with the sts at the edge of the cabled band. If you’ve ever worked a lace egding on a shawl, attaching it to the live sts of the shawl at the beginning or end of the edging rows, you will be familiar with how this works.
I recommend using two double-point needles to work the sts of the cabled band.
In the first row, you will work short rows to angle the band around the corner of the wrap. After this first row, work these 8 sts following Chart A, beginning with Row 6. Work only Rows 2-7 (the outlined pattern repeat) of Chart A.
 Row
1 [RS]: [K1 tbl, p1, k1, p1 tbl, turn work] twice,
[k1 tbl, p1, k1, p1 tbl] twice. Row
1 [RS]: [K1 tbl, p1, k1, p1 tbl, turn work] twice,
[k1 tbl, p1, k1, p1 tbl] twice.
Rows 2-9: Work the 8 sts of the edging in pattern, beginning with Row 6
of Chart A. When Row 9 is complete, you will have just completed a C8BR.
Row 10 (Joining Row) [WS]: Sl next st of wrap to beginning
of double-point needle which holds sts of cabled band,
[k2tog tbl] first st of band together with st of wrap;
work in pattern to end.
Row 11 (Joining Row) [RS]: Work in pattern to last st
of band, slip next st of wrap to end of double-point
needle, [p2tog tbl] last st of band together with st
of wrap.
Rows 12-13: Work as for Rows
10-11. You will have just
joined the cabled band to the first column of sts of
the Chart B cable.
Rows 14-21: Work in pattern. When Row
21 is complete,
you will have just completed a C8BR.
Row 22 [WS]: Work as for Row 10.
Row 23 [RS]: Work as for Row 11.
Row 24 [WS]: Sl next 2 sts of wrap to beginning
of double-point needle which holds sts of cabled band,
[k3tog tbl] first st of band together with 2 sts of wrap;
work in pattern to end.
Row 25 [RS]: Work in pattern to last st of band, slip
next 2 sts of wrap to end of double-point needle, [p3tog
tbl] last st of band together with 2 sts of wrap.
Row 26 [WS]: Work as for Row 10.
Row 27 [RS]: Slip next 4 sts to cable needle and hold
to back of work, k1 tbl, p1, k1, p1 tbl; then work [k1
tbl, p1, k1] over first 3 sts from cable needle; slip
next st of wrap to end of double-point needle, [p2tog
tbl] last st of band together with st of wrap.
Rows 28-33: Work in pattern. When Row
33 is complete,
you will have just completed a C8BR.
Continue working edging as established by Rows
10-33,
as follows:
When the next set of sts to be joined is a column of
4 sts, work Rows 10-21.
When the next set of sts to be joined is a column of
8 sts, work Rows 22-33.
When all sts have been joined, you will have just worked
Rows 10-21.
Next Row [WS]: [K1 tbl, p1, k1, p1 tbl, turn
work] twice, [k1 tbl, p1, k1, p1 tbl] twice.
Graft the 8 sts of the band to the remaining 8 sts of
the wrap.
Lower Edge:
Remove the waste yarn from the CO edge and place the
resulting live sts on the straight needle.
Place the first 7 sts (all sts of cabled band along one
side) on the double-point needle with the WS facing,
and join the yarn.
Set-Up Row [WS]: K1 tbl, p1, k1, p1 tbl, k1
tbl, p1, kfb. 8 sts.
Work as
for Upper Edge.
|