|
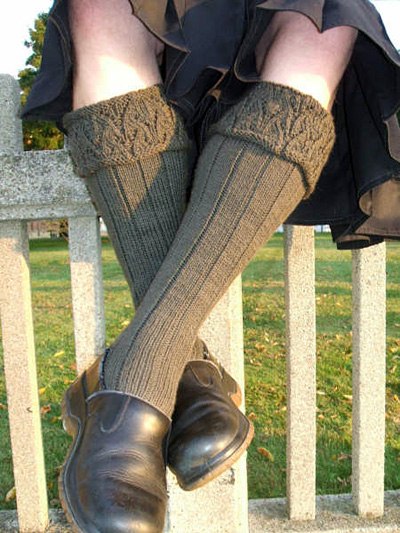
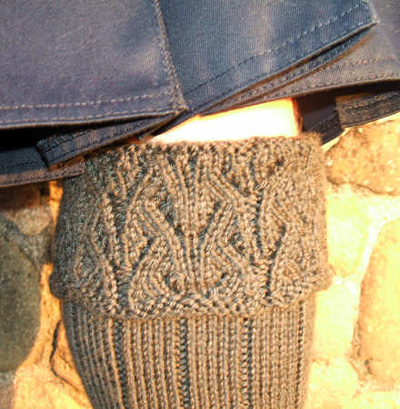  CUFF CUFF
Using
US #4/3.5mm double-point needles, CO 84 sts.
Divide sts between needles and join to begin
working in the round, being careful not to
twist.
P 4 rounds.
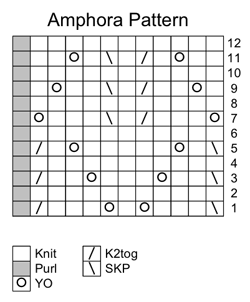
Work 24 rounds in Amphora Pattern.
P 3 rounds.
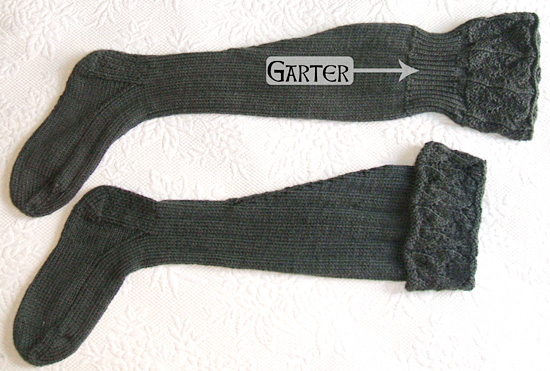
GARTER
Next Round: [P5, p2tog] 12 times. 72
sts.
Using US #2/2.75mm double-point needles, work
2 inches in 1x1 Rib.
Next Round: Using US #4/3.5mm double-point
needles, [p6, m1] 12 times. 84 sts.
LEG
Before continuing, turn the work inside
out, so that the WS of the cuff is facing you
as you work the RS of the leg. This is very
important! If you do not do this, the cuff
will be inside out when the sock is worn.
Work 2.5 inches in 5x1 Rib.
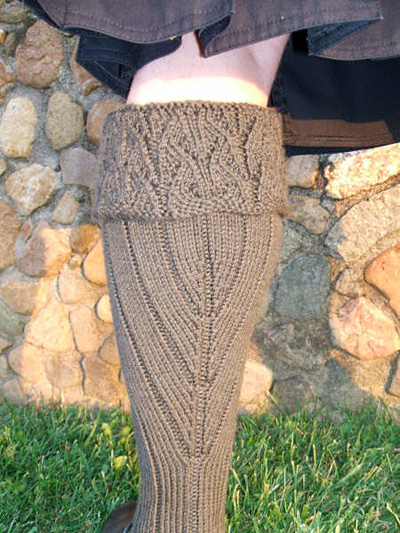 Shape Calves: Shape Calves:
Next Round: K2tog, work in pattern to last
3 sts, ssk, p1.
Work 2 rounds in pattern as set.
Repeat these 3 rounds 17 times more. 48 sts.
Continue in 5x1 Rib as set until work measures
13.5 inches from top of garter, or desired
length to top of heel flap.
HEEL FLAP
Work first 36 sts of round in pattern;
slip last 12 sts of round to same needle as
first 12 sts. Heel flap will be worked back
and forth over these 24 sts; calf decreases
are centered directly above heel flap. Divide
remaining 24 sts between 2 needles and leave
them on hold for instep.
Row 1 [RS]: [Sl 1, k1] 12 times.
Row 2 [WS]: Sl 1, p to end.
Repeat these 2 rows 12 times more.
TURN HEEL
Row 1 [RS]: Sl 1, k13, ssk, k1. Turn
work.
Row 2 [WS]: Sl 1, p5, p2tog, p1. Turn work.
Row 3 [RS]: Sl 1, k6, ssk, k1. Turn work.
Row 4 [WS]: Sl 1, p7, p2tog, p1. Turn work.
Row 5 [RS]: Sl 1, k8, ssk, k1. Turn work.
Row 6 [WS]: Sl 1, p9, p2tog, p1. Turn work.
Row 7 [RS]: Sl 1, k10, ssk, k1. Turn work.
Row 8 [WS]: Sl 1, p11, p2tog, p1. Turn work.
Row 9 [RS]: Sl 1, k12, ssk. Turn work.
Row 10 [WS]: Sl 1, p12, p2tog. Turn work. 14
heel sts remain.
 GUSSET GUSSET
K the 14 sts of the heel, then using
same needle, pick up and k 13 sts (1 st in
each slipped st) along edge of heel flap. This
needle will be designated Needle 1.
Work the held instep sts on the next 2 needles
in 5x1 Rib as set. These needles will be Needles
2 and 3.
Using the remaining needle, pick up and k 13
sts along remaining edge of heel flap, then
k first 7 sts of heel from Needle 1. This needle
is Needle 4; this point (center of heel) will
be beginning of round.
There are 64 sts: 20 sts each on Needles 1
and 4, 12 sts each on Needles 2 and 3.
Gusset Round 1: K to last 3 sts on Needle
1, k2tog, p1; work sts on Needles 2 and 3 in
pattern; k1, ssk, k to end of Needle 4.
Gusset Round 2: K to last st of Needle 1, p1;
work sts on Needles 2 and 3 in pattern; k to
end of Needle 4.
Repeat these 2 rounds 7 times more. 48 sts:
12 sts on each needle.
FOOT
Work all sts in pattern as set (as per
Gusset Round 2) until foot measures 2 inches
less than desired length to end of toe.
TOE
Toe Round 1: K to last 3 sts on Needle
1, k2tog, k1; k 1, ssk, k to end of Needle
2; k to last 3 sts on Needle 3, k2tog, k1;
k 1, ssk, k to end of Needle 4.
Toe Round 2: K all sts.
Repeat these 2 rounds 5 times more. 24 sts.
Work Toe Round 1 twice. 16 sts.
K sts of Needle 1 onto Needle 4, and slip sts
from Needle 3 to Needle 2. Remaining 2 needles
each hold 8 sts.
Graft sts from one needle to sts of other needle.
|