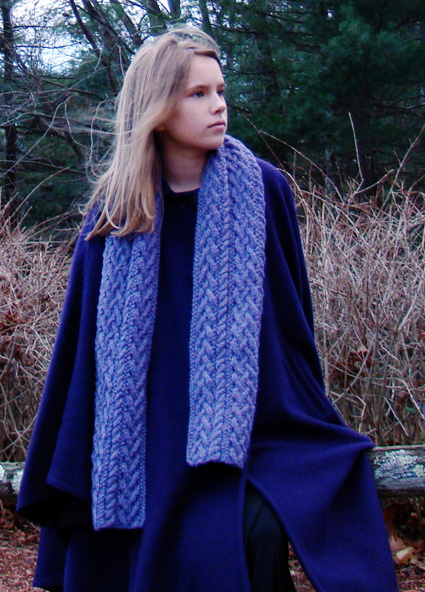
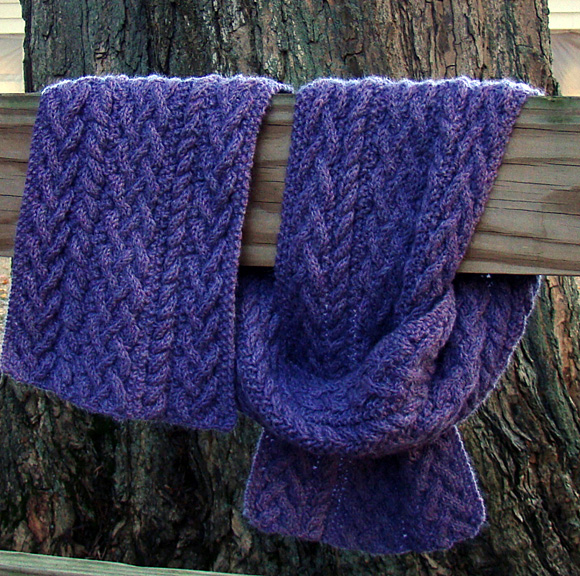
The cables in this pattern are
not difficult, but there
are a lot of them. It
was reversible braided
cables that finally drove
me to learn cabling without
a cable needle. While
it's by no means required,
I highly recommend it.
Many excellent online
tutorials are available,
such as Grumperina's, Wendy's,
and
this YouTube video.
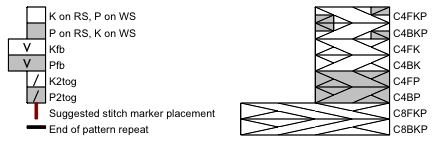
 Pfb: Purl into front, then back, of next st. 1 st increased. Pfb: Purl into front, then back, of next st. 1 st increased.
C4FKP (Cable 4 front, knit
and purl): Slip 2 sts to cable needle and hold to front
of work; p2 from left needle, k2 from cable needle.
C4BKP (Cable 4 back, knit
and purl): Slip 2 sts to cable needle and hold to back of
work; k2 from left needle, p2 from cable needle.
C4FK (Cable 4 front, knit):
Slip 2 sts to cable needle and hold to front of work; k2
from left needle, k2 from cable needle.
C4BK (Cable 4 back, knit):
Slip 2 sts to cable needle and hold to back of work; k2
from left needle, k2 from cable needle.
C4FP (Cable 4 front, purl):
Slip 2 sts to cable needle and hold to front of work; p2
from left needle, p2 from cable needle.
C4BP (Cable 4 back, purl):
Slip 2 sts to cable needle and hold to back of work; p2
from left needle, p2 from cable needle.
C8FKP (Cable 8 front, knit
and purl): Slip 4 sts to cable needle and hold to front
of work; [k2, p2] from left needle, [k2, p2] from cable
needle.
C8BKP (Cable 8 back, knit
and purl): Slip 4 sts to
cable needle and hold to
back of work; [p2, k2] from
left needle, [p2, k2] from
cable needle.
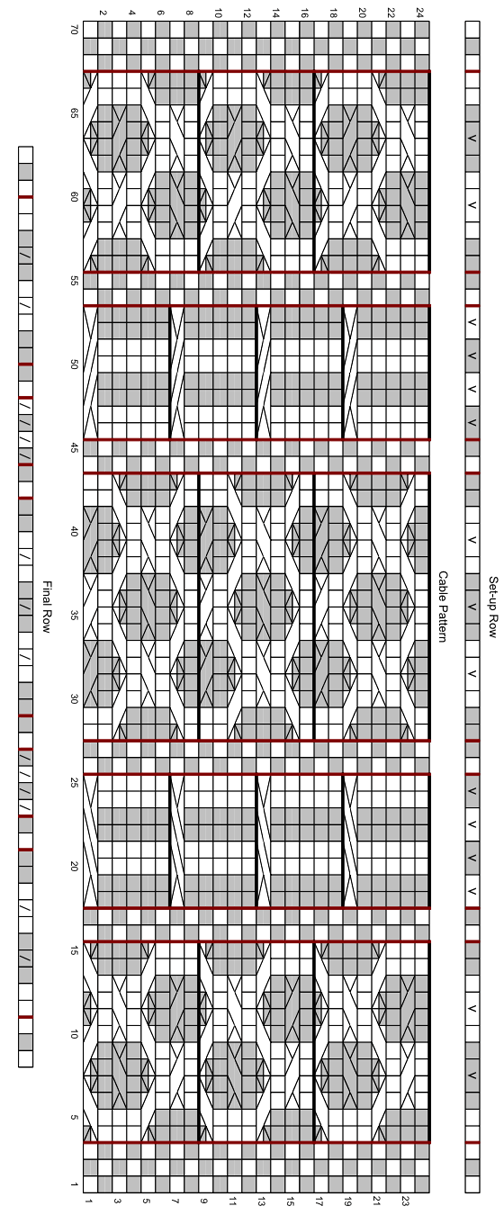
Set-up Row: K1, p1, k1, place marker, k2, p1, pfb, p1,
k1, kfb, k1, p2, place marker, k1, p1, place marker, (kfb,
pfb) twice, place marker, k1, p1, place marker, p2, k1,
kfb, k1, p1, pfb, p1, k1, kfb, k1, p2, place marker, p1,
k1, place marker, (pfb, kfb) twice, place marker, k1, p1,
place marker, p2, k1, kfb, k1, p1, pfb, p1, k2, place marker,
k1, p1, k1.
Cable Pattern:
In the directions that
follow, the abbreviation “M” is used to indicate
marker placement (to
help you keep your place in the directions).
Row 1 [RS]: K1, p1, k1,
M, C4BKP, C4FKP, C4BKP, M, k1, p1, M, C8BKP, M, k1, p1,
M, k2, C4FP, C4FK, C4FP, k2, M, k1, p1, M, C8FKP, M, k1,
p1, M, C4FKP, C4BKP, C4FKP, M, k1, p1, k1.
Row 2 [WS]: K1, p1, k1,
M, p2, k4, p4, k2, M, p1, k1, M, [k2, p2] twice, M, p1,
k1, M, p2, k4, p4, k4, p2, M, p1, k1, M, [p2, k2] twice,
M, p1, k1, M, k2, p4, k4, p2, M, k1, p1, k1.
Row 3 [RS]: K1, p1, k1,
M, k2, C4BP, C4BK, p2, M, k1, p1, M, [p2, k2] twice, M,
k1, p1, M, [C4FKP, C4BKP] twice, M, k1, p1, M, [k2, p2]
twice, M, k1, p1, M, p2, C4FK, C4FP, k2, M, k1, p1, k1.
Row 4 [WS]: K1, p1, k1,
M, p2, k4, p4, k2, M, p1, k1, M, [k2, p2] twice, M, p1,
k1, M, k2, p4, k4, p4, k2, M, p1, k1, M, [p2, k2] twice,
M, p1, k1, M, k2, p4, k4, p2, M, k1, p1, k1.
Row 5 [RS]: K1, p1, k1,
M, C4FKP, C4BKP, C4FKP, M, k1, p1, M, [p2, k2] twice, M,
k1, p1, M, p2, C4BK, C4BP, C4BK, p2, M, k1, p1, M, [k2,
p2] twice, M, k1, p1, M, C4BKP, C4FKP, C4BKP, M, k1, p1,
k1.
Row 6 [WS]: K1, p1, k1,
M, k2, p4, k4, p2, M, p1, k1, M, [k2, p2] twice, M, p1,
k1, M, k2, p4, k4, p4, k2, M, p1, k1, M, [p2, k2] twice,
M, p1, k1, M, p2, k4, p4, k2, M, k1, p1, k1.
Row 7 [RS]: K1, p1, k1,
M, p2, C4FK, C4FP, k2, M, k1, p1, M, C8BKP, M, k1, p1, M,
[C4BKP, C4FKP] twice, M, k1, p1, M, C8FKP, M, k1, p1, M,
k2, C4BP, C4BK, p2, M, k1, p1, k1.
Row 8 [WS]: K1, p1, k1, M, k2, p4, k4, p2, M,
p1, k1, M, [k2, p2] twice,
M, p1, k1, M, p2, k4, p4, k4, p2, M, p1, k1, M, [p2,
k2] twice, M, p1, k1, M, p2, k4, p4, k2, M, k1, p1, k1.
Repeat Rows 1-8 for Cable
Pattern.
Important Note: The cables between the
third and fourth markers and between the seventh and eighth
markers, are twisted every six rows. The other cables in
this pattern have an eight-row pattern repeat. Only eight
rows of the pattern are written out; the six-row repeat
of the ribbed cables and the eight-row pattern repeat of
the other cables will synch up every 24 rows. (See chart.)
Final Row [BO Row]: K1, p1, k1,
M, k2, p1, p2tog, p1, k1,
k2tog, k1, p2, M, k1, p1,
M, [k2tog, p2tog] twice,
M, k1, p1, M, p2, k1, k2tog,
k1, p1, p2tog, p1, k1,
k2tog, k1, p2, M, p1, k1,
M, [p2tog, k2tog] twice,
M, k1, p1, M, p2, k1, k2tog,
k1, p1, p2tog, p1, k2,
M, k1, p1, k1. |