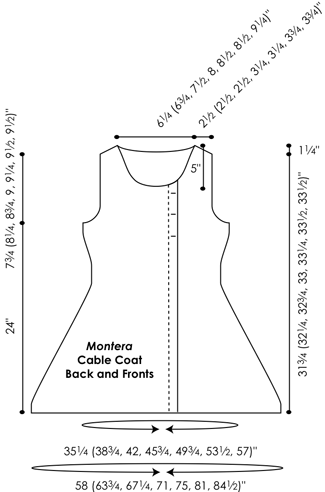
|
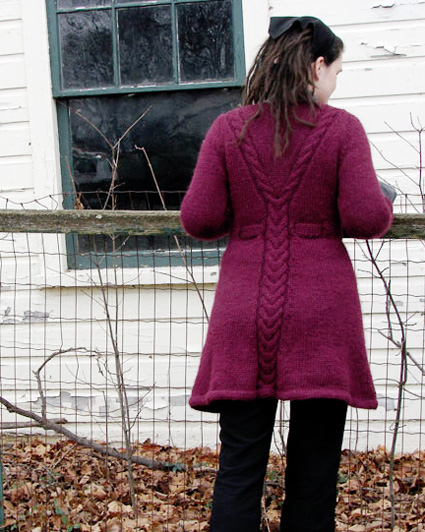
LOWER BODY
Hem Facing:
Note: Crochet cast on
and provisional cast on method linked in Pattern Notes
are two options for provisional cast on methods; use any
provisional method you like.
Using smaller circular needle and provisional cast on method,
CO 200[220, 232, 245, 259, 280, 292] sts. Do not join; piece
is worked back and forth in rows.
Beginning with a RS row,
work 5 rows in stockinette st.
Turning Ridge [WS]: K all sts.
Hem:
Next Row [RS]: Switching to larger needle,
k20[22, 24, 27, 30, 32,
34], place marker, p2,
k4, ***p2***, place marker,
k28[32, 34, 35, 37, 41,
43], place marker to
indicate side seam, k42[47,
50, 53, 56, 61, 64],
place marker, p2, k8,
p2, place marker, k42[47,
50, 53, 56, 61, 64], place marker to indicate side seam,
k28[32, 34, 35, 37, 41, 43], place marker, p2, k4, p2, place
marker, k12[12, 12, 14, 15, 16, 16].
Next Row [WS]: P to first marker, k2, p4, k2, p to fourth
marker, k2, p8, k2, p to seventh marker, k2, p4, k2, p to
end.
These two rows set pattern
for hem. Work four more rows in pattern, ending with a WS
row.
Carefully remove waste yarn from CO edge, placing resulting
live sts on smaller needle. Fold work along turning ridge,
so that WS of hem facing meets WS of hem, and sts of CO edge
sit directly behind sts on working needle.
Joining Row [RS]: Working
in pattern as set, [work next st on left needle together
with next st of CO edge] until all sts have been worked.
Skirt of Coat:
Set-up Row [WS]: P1, [(k1, p1) in next
st] three times, p to
first marker, ***k2, kfbf, p3, k2,*** p to fourth marker,
***k2, kfbf, p6, kfbf, k2,*** p to seventh marker, ***k2,
p3, kfbf, k2, p to last 3 sts, [(k1, p1) in next st] three
times. 214[234, 246, 259, 273, 294, 306] sts.
Row 1 [RS]: Sl 1 purlwise with yarn held to back of work,
[p1, k1] three times, k to first marker, work first row of
Small Right Cable Panel, k to fourth marker, work first
row of Large Cable Panel, k to seventh marker, work first
row of Small Left Cable Panel, k to last 6 sts, [p1, k1]
three times.
Row 2 [WS]: Sl 1 purlwise
with yarn held to front of work, [k1, p1] three times, p
to first marker, work next row of Small Right Cable Panel,
p to fourth marker, work next row of Large Cable Panel,
p to seventh marker, work next row of Small Left Cable Panel,
p to last 6 sts, [k1, p1] three times.
These two rows set pattern.
Continue in pattern until work measures 2 inches form turning
ridge, ending with a WS row.
Decrease for Waist:
Continuing in pattern
as set, shape skirt as follows. After blocking, skirt as
written will measure approx. 16.5 inches below belt holes.
If more or less length is desired, work more or fewer rows
between decrease rows.
Decrease Row [RS]: Work in pattern to second marker, k2tog,
k to 6 sts before third marker (side seam marker), ssk, k4,
slip marker, k4, k2tog, k to 2 sts before fourth marker,
ssk, work in pattern to fifth marker, k2tog, k to 6 sts before
sixth marker (side seam marker), ssk, k4, slip marker, k4,
k2tog, k to 2 sts before seventh marker, ssk, work in pattern
to end. 8 sts decreased.
Repeat Decrease Row every
fourth row 2[4, 4, 4,
4, 6, 6] times. 190[194,
206, 219, 233, 238, 250] sts.
Repeat Decrease Row every
sixth row four times. 158[162, 174, 187, 201, 206, 218] sts.
Repeat Decrease Row every eighth row 5[4,
4, 4, 4, 3, 3] times. 118[130, 142, 155, 169, 182, 194] sts.
Work 3 rows in pattern,
ending with a WS row.
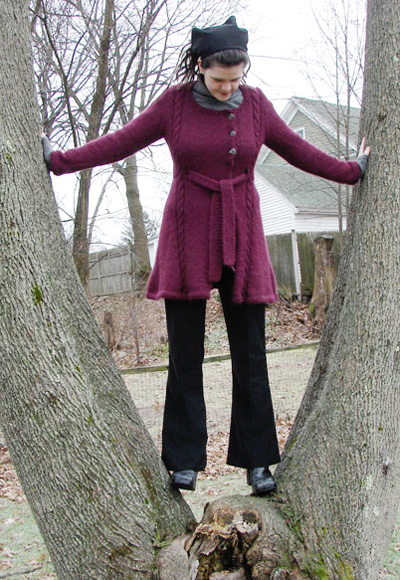
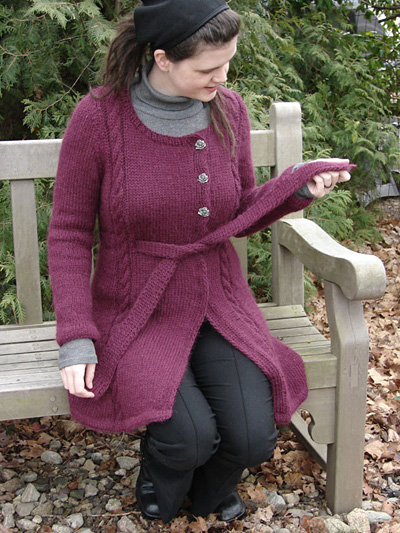
Belt Holes:
To form belt holes, sections
of the coat are worked back and forth, while the sts not
being worked are held on the needle. Yarn is broken at
end of each section, and rejoined at beginning of next
section. Slip first st of each row of each section. Each
section begins and ends with RS row.
Work 7 rows over first 21[23, 25, 28, 31, 33, 35] sts. Break
yarn.
Rejoin yarn and work
7 rows over next 14 sts. Break yarn.
Rejoin yarn and work
7 rows over next 6[8, 9, 11, 12, 14, 16] sts. Break yarn.
Rejoin yarn and work
7 rows over next 6[7, 10, 10, 13, 14, 15] sts. Break yarn.
Rejoin yarn and work
7 rows over next 6[8, 9, 11, 12, 14, 16] sts. Break yarn.
Rejoin yarn and work
7 rows over next 20 sts. Break yarn.
Rejoin yarn and work
7 rows over next 6[8, 9, 11, 12, 14, 16] sts. Break yarn.
Rejoin yarn and work
7 rows over next 6[7, 10, 10, 13, 14, 15] sts. Break yarn.
Rejoin yarn and work
7 rows over next 6[8, 9, 11, 12, 14, 16] sts. Break yarn.
Rejoin yarn and work
7 rows over next 14 sts. Break yarn.
Rejoin yarn and work
7 rows over remaining 13[13, 13, 15, 16, 17, 17] sts. Do
not break yarn.
Work 1 row over all sts, rejoining sections to close tops
of belt holes.
Work 2 more rows in pattern,
ending with a WS row.
Note: Read ahead! Bust/armhole shaping, back cable
shaping and buttonhole placement are all worked at the
same time.
Shape Bust:
Increase Row [RS]: Work
in pattern to second marker, k1, m1, work in pattern to
4 sts before third marker, m1, k4, slip marker, k4, m1,
k to 1 st before fourth marker, m1, k1, work in pattern
to fifth marker, k1, m1, k to 4 sts before sixth marker,
m1, k4, slip marker, k4, m1, k to 1 st before seventh marker,
m1, k1, work in pattern to end. 8 sts increased.
Work 13 rows in pattern.
Work Increase Row once more. 134[146, 158, 171, 185, 198,
210] sts.
AT THE SAME TIME: When work measures approx.
3 inches from top of belt holes, ending with Row 6 of Cable
Panels, begin dividing and shifting back cable pattern as
follows. After cable has been divided and additional markers
placed, Small Right and Left Cable Panels will be worked
as indicated.
Note that the shaping
worked in this section does not change the total number of
sts.
Row 1 [RS]: Work in pattern to 2 sts before fourth marker,
ssk, slip marker, p2, slip 3 sts to cable needle and hold
to back of work, k3 from left needle, [k2, kfb] from cable
needle, slip 3 sts to cable needle and hold to front of work,
[kfb, k2] from left needle, k3 from cable needle, p2, slip
marker, k2tog, work in pattern to end.
Row 2 [WS]: Work in pattern
to fourth marker, [k2, p6] twice, k2, work in pattern to
end.
Row 3 [RS]: Work in pattern to 2 sts before fourth
marker, ssk, slip marker, p2, k6, m1p, p2, m1p, k6, p2, slip
marker, k2tog, work in pattern to end.
Row 4 [WS]: Work in pattern
to fourth marker, k2, p6, k4, p6, k2, work in pattern to
end.
Row 5 [RS]: Work in pattern
to 2 sts before fourth marker, ssk, slip marker, p2, k6,
p1, m1p, place marker, k2, place marker, m1p, p1, k6, p2,
slip marker, k2tog, work in pattern to end.
IMPORTANT: There are now 10 markers in place. They are arranged
as follows (when counted with RS facing):
First and second markers
are at each side of Small Right Cable Panel on right front.
Third and eighth markers
indicate side 'seam' placement.
Fourth and fifth markers
are at each side of Small Right Cable Panel on right back.
Sixth and seventh markers
are at each side of Small Left Cable Panel on left back.
Ninth and tenth markers
are at each side of Small Left Cable Panel on left front.
Row 6 [WS]: Work all sts in pattern, purling the 2 sts between
the newly placed fifth and sixth markers. Work the sts between
these two markers in stockinette st from this point on. This
row is Row 6 of all cable panels.
Cable Shift Row [RS]: Work in pattern to 2 sts before fourth
marker, ssk, slip marker, work next row of Small Right Cable
Panel, slip marker, m1, k to sixth marker, m1, slip marker,
work next row of Small Left Cable Panel, slip marker, k2tog,
work in pattern to end.
Work Cable Shift Row every second row 2[2, 3, 7, 8, 9, 11] times.
Work Cable Shift Row every fourth row 8[9, 9, 7, 7, 7, 6] times.
Important Note: Shifting
of cables as indicated will continue into Upper Back shaping,
after armhole shaping has begun.
AT THE SAME TIME: When work measures 21.5[22,
22.5, 22.75, 23, 23.25, 23.5] inches from turning row, ending
with a WS row, begin placing buttonholes as follows. Note
that buttonhole placement will continue into shaping of Right
Front.
Buttonhole Row [RS]: Sl 1, p1, ssk, [yo] twice, ssp, work
in pattern to end.
Next Row [WS]: Work in
pattern to last 6 sts, k1, [p1, k1] in double yo, p1, k1,
p1.
Repeat these two rows
every 3 inches, twice more. Three buttonholes have been formed.
AT THE SAME TIME: When work measures 24
inches from turning ridge, ending with a WS row, divide and
form armholes as follows.
Dividing Row [RS]: Work in pattern to third marker (side
seam marker) and place 41[45, 49, 53, 58, 62, 66] sts
just worked on st holder for right front; BO 2[2, 3, 3, 3,
4, 4] sts, work in pattern to eighth marker (side seam marker);
place last 33[35, 37, 40, 43, 46, 48] sts on st holder for
left front. Upper back will be worked back and forth over
58[64, 69, 75, 81, 86, 92] sts remaining on needle.
UPPER BACK
Note: Remember to continue shifting cables as
set while shaping back.
Next Row [WS]: BO 2[2,
3, 3, 3, 4, 4] sts, work in pattern to end. 56[62, 66, 72,
78, 82, 88] sts.
Decrease Row [RS]: K1, k2tog, work in pattern to last 3
sts, ssk, k1.
Repeat Decrease Row every
second row 3[4, 3, 3, 5, 5, 7] times. 48[52, 58, 64, 66,
70, 72] sts.
Sizes S, M, L, 1X, 2X, 3X Only:
Repeat Decrease Row every
fourth row -[1, 3, 4, 4, 4, 4] times. -[50, 52, 56, 58,
62, 64] sts.
Sizes XS, S, M Only:
Work 1[3, 3, -, -, -,
-] rows in pattern (ending with a WS row).
Next Row [RS]: Ssk, work
in pattern to last 2 sts, k2tog. 46[48, 50, -, -, -, -] sts.
All Sizes:
Continue in pattern until
work measures 7.75[8.25, 8.75, 9, 9.25, 9.5, 9.5] inches
from Dividing Row (31.75[32.25, 32.75, 33, 33.25, 33.5,
33.5] inches from Turning Ridge), ending with a WS row.
Shape Back Neckline and Shoulders:
Row 1 [RS]: Work 16[16,
16, 18, 18, 20, 20] sts in pattern; join another ball of
yarn and BO next 14[16, 18, 20, 22, 22, 24] sts, work in
pattern to end. Two sets of 16[16, 16, 18, 18, 20,
20] sts remain, each with an attached ball of yarn.
Both shoulders are worked
at the same time, using attached balls of yarn.
Rows 2 and 3: BO 4[4,
4, 5, 5, 6, 6] sts, work in pattern to end of first shoulder;
BO 4 sts (at neckline edge), work in pattern to end of second
shoulder.
Rows 4 and 5: BO 4[4,
4, 5, 5, 5, 5] sts, work in pattern to end of first shoulder;
work all sts of second shoulder in pattern.
BO remaining 4[4, 4,
4, 4, 5, 5] sts of each shoulder.
UPPER RIGHT FRONT
Note: Remember to continue working buttonholes
as set while shaping right front.
Place 41[45, 49, 53,
58, 62, 66] held sts of right front on needle and join yarn
with WS facing.
Next Row [WS]: BO 2[2,
3, 3, 3, 4, 4] sts, work in pattern to end. 39[43, 46, 50,
55, 58, 62] sts.
Decrease Row [RS]: Work in pattern to last 3 sts, ssk, k1.
Repeat Decrease Row every
second row 3[4, 3, 3, 5, 5, 7] times. 35[38, 42, 46, 49,
52, 54] sts.
Sizes S, M, L, 1X, 2X, 3X Only:
Repeat Decrease Row every
fourth row -[1, 3, 4, 4, 4, 4] times. -[37, 39, 42, 45,
48, 50] sts.
Sizes XS, S, M Only:
Work 1[3, 3, -, -, -,
-] rows in pattern (ending with a WS row).
Next Row [RS]: Work in
pattern to last 2 sts, k2tog. 34[36, 38, -, -, -, -] sts.
All Sizes:
Continue in pattern until
work measures 4[4.5, 5, 5.25, 5.5, 5.75, 5.75] inches from
Dividing Row (28[28.5, 29, 29.25, 29.5, 29.75, 29.75] inches
from turning ridge), ending with a WS row.
Shape Neckline:
Row 1 [RS]: Work 6 sts
in pattern, then slip these sts to small st holder; BO
10[12, 14, 16, 18, 19, 21] sts, work in pattern to end.
18[18, 18, 20, 21, 23, 23] sts.
Even-numbered Rows 2-8 [WS]: Work all sts in pattern.
Row 3 [RS]: BO 3[3, 3,
3, 4, 4, 4] sts, work in pattern to end. 15[15, 15, 17, 17,
19, 19] sts.
Row 5 [RS]: K1, k2tog,
work in pattern to end. 14[14, 14, 16, 16, 18, 18] sts.
Rows 7 and 9 [RS]: Work
as for Row 5. 12[12, 12, 14, 14, 16, 16] sts.
Continue in pattern until work measures same as back to
beginning of shoulder shaping, ending with a RS row.
Shape Shoulder:
Row 1 [WS]: BO 4[4, 4,
5, 5, 6, 6] sts, work in pattern to end.
Rows 2 and 4 [RS]: Work
all sts in pattern.
Row 3 [WS]: BO 4[4, 4, 5, 5, 5, 5] sts, work in pattern
to end.
Row 5 [WS]: BO remaining
4[4, 4, 4, 4, 5, 5] sts.
UPPER LEFT FRONT
Place 33[35, 37, 40, 43, 46, 48] held sts of
left front on needle and join yarn with RS facing.
Next Row [RS]: BO 2[2, 3, 3, 3, 4, 4] sts, work in pattern
to end. 31[33, 34, 37, 40, 42, 44] sts.
Work 1 row in pattern.
Decrease Row [RS]: K1, k2tog, work in pattern to end.
Repeat Decrease Row every
second row 3[4, 3, 3, 5, 5, 7] times. 27[28, 30, 33, 34,
36, 36] sts.
Sizes S, M, L, 1X, 2X, 3X Only:
Repeat Decrease Row every
fourth row -[1, 3, 4, 4, 4, 4] times. -[27, 27, 29, 30,
32, 32] sts.
Sizes XS, S, M Only:
Work 1[3, 3, -, -, -,
-] rows in pattern (ending with a WS row).
Next Row [RS]: Ssk, work
in pattern to end. 26 sts.
All Sizes:
Continue in pattern until
work measures same as right front to beginning of neckline
shaping, ending with a RS row.
Shape Neckline:
Row 1 [WS]: Work 6 sts
in pattern, then slip these sts to small st holder; BO
2[2, 2, 3, 3, 3, 3] sts, work in pattern to end. 18[18,
18, 20, 21, 23, 23] sts.
Row 2 [RS]: Work all
sts in pattern.
Row 3 [WS]: BO 3[3, 3,
3, 4, 4, 4] sts, work in pattern to end. 15[15, 15, 17, 17,
19, 19] sts.
Row 4 [RS]: Work in pattern
to last 3 sts, ssk, k1. 14[14, 14, 16, 16, 18, 18] sts.
Even-numbered Rows 5
and 7 [WS]: Work all sts in pattern.
Rows 6 and 8 [RS]: Work
as for Row 4. 12[12, 12, 14, 14, 16, 16] sts.
Continue in pattern until work measures same as back to
beginning of shoulder shaping, ending with a WS row.
Shape Shoulder:
Row 1 [RS]: BO 4[4, 4,
5, 5, 6, 6] sts, work in pattern to end.
Rows 2 and 4 [WS]: Work
all sts in pattern.
Row 3 [RS]: BO 4[4, 4, 5, 5, 5, 5] sts, work in pattern
to end.
Row 5 [RS]: BO remaining
4[4, 4, 4, 4, 5, 5] sts.
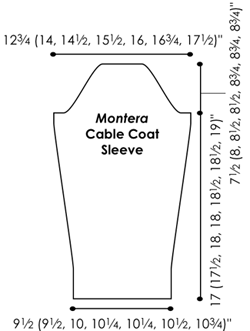
SLEEVES (Make 2)
Hem Facing:
Using smaller circular
needle and provisional cast on method, CO 33[33, 35, 36,
36, 37, 37] sts.
Beginning with a RS row,
work 5 rows in stockinette st.
Turning Ridge [WS]: K all sts.
Hem:
Switching to larger needle,
work 6 rows in stockinette st, ending with a WS row.
Carefully remove waste yarn from CO edge, placing resulting
live sts on smaller needle. Fold work along turning ridge,
so that WS of hem facing meets WS of hem, and sts of CO edge
sit directly behind sts on working needle.
Joining Row [RS]: [K
next st on left needle together with next st of CO edge]
until all sts have been worked.
Continue in stockinette st until work measures 2 inches
from turning ridge, ending with a WS row.
Shape Sleeve:
Increase Row [RS]: K4,
m1, k to last 4 sts, m1, k4.
Repeat Increase Row every
16[14, 14, 14, 14, 10, 10] rows 2[2, 3, 2, 1, 3, 2] times.
39[39, 43, 42, 40, 45, 43] sts.
Repeat Increase Row every
14[10, 10, 10, 10, 8, 8] rows 2[3, 2, 2, 3, 4, 4] times.
43[45, 47, 46, 46, 53, 51] sts.
Repeat Increase Row every
10[8, 8, 8, 8, 6, 6] rows 1[2, 2, 3, 3, 3, 5] times. 45[49,
51, 52, 52, 59, 61] sts
Sizes L, 1X Only:
Repeat Increase Row every
6 rows -[-, -, 1, 2, -, -] times. -[-, -, 54, 56, -, -]
sts.
All Sizes:
Continue in stockinette
st until work measures 17[17.5, 18, 18, 18.5, 18.5, 19]
inches from turning ridge or desired length to underarm,
ending with a WS row.
Shape Sleeve Cap:
BO 3[3, 4, 4, 4, 5, 5]
sts at beginning of next 2 rows. 39[43, 43, 46, 48, 49,
51] sts.
Decrease Row [RS]: K2, k2tog, k to last 4 sts, ssk, k2.
Repeat Decrease Row every
second row 5[6, 6, 7, 7, 7, 7] times. 27[29, 29, 30, 32,
33, 35] sts.
Repeat Decrease Row every
fourth row 2[1, 2, 1, 1, 1, 1] times. 23[27, 25, 28, 30,
31, 33] sts.
Repeat Decrease Row every
second row 4[6, 5, 6, 7, 7, 6] times. 15[15, 15, 16, 16,
17, 21] sts.
Next Row [WS]: P2, ssp, p to last 4 sts, p2tog, p2.
Work Decrease Row.
Repeat these 2 rows 0[0,
0, 0, 0, 0, 1] time more. 11[11, 11, 12, 12, 13, 13] sts.
P 1 row.
BO 2 sts at beginning
of next 4 rows. BO remaining 3[3, 3, 4, 4, 5, 5] sts.
BELT
Using US #10.5/6.5mm needle (or straight needles if desired),
CO 11 sts.
Row 1 [RS]: Sl 1 purlwise
with yarn held to back of work, [p1, k1] to end.
Row 2 [WS]: Sl 1 purlwise
with yarn held to front of work, [k1, p1] to end.
Repeat these 2 rows until
work measures 58[62, 66, 70, 74, 78, 82] inches or desired
length. BO all sts in pattern.
|