Knitty�: little purls of wisdomKnitty�: little purls of wisdom
sponsor
Elann

Find exactly what you're looking for

spacer

The answer to your question about Knitty is probably here!

spacer

Take home something Knitty today

spacer

Advertise with Knitty

spacer

Get your cool stuff reviewed in Knitty

spacer

Full information about how to get published in Knitty

spacer

Read exactly what FREE PATTERNS really means...respect our designers and authors rights [and thank you]

spacer

Read exactly what FREE PATTERNS really means...respect our designers and authors rights [and thank you]

sidebarwhiterule

Knitty is produced in a pro-rabbit environment

spacer

© Knitty 2002-2008. All rights reserved. Unauthorized reproduction prohibited. This means you.spacer
 

Patterns<click for more!
Print With Images Print Without Images
upperLeft upperRight
lowerLeft lowerRight
Pink Needles
ul
ml
Simply Sock Yarns
ur
b
Title
spacer model: Emily Kizer spacer photos: Gail Marracci

Tangy

Designed for my mom's 60th birthday, these socks were inspired by the colors and shapes of the rustic Naniboujou Lodge on the North Shore of Lake Superior. I spent many happy weekends at this lodge as a child, marveling at the expansive, brightly-painted dining room and huge stone fireplace.

Naniboujou, aka "Nanabozho", is the Anishinaabe spirit who is said to have dug Lake Superior, brought humans fire and taught them to fish and make maple syrup. He is known as a trickster, appearing most often in the shape of a rabbit.

This color pattern is equally tricky, appearing complicated but working up quite easily with a two-stitch repeat of knits and purls forming the pattern. Purl stitches are used liberally to create texture and movement along the color transitions. The two-stitch repeat means there are no long floats on the back of the work. A short-row heel allows the band of color across the instep to continue uninterrupted, and it is sized for a wide range of feet for maximum usability.


SIZE

XS[S, M, L, 1X, 2X, 3X] (shown in size L)

 
FINISHED MEASUREMENTS

Foot Circumference: 4.75 [6.25, 7, 8, 9.25, 10.25, 11] inches
Foot Length: Measure the recipient's foot from the back of the heel to the tip of the longest toe to determine your finished foot length.
Cuff Length: 5 inches

 
MATERIALS

spacer [MC] Brown Sheep Wildfoote [75% washable wool, 25% nylon; 215 yd/197m per 50g skein]; color: SY-12 Bark Cloth; 1[1, 1, 2, 2, 2] skeins
spacer [CC1] Brown Sheep Wildfoote [75% washable wool, 25% nylon; 215 yd/197m per 50g skein]; color: SY-41 Dark Caramel; 1[1, 1, 1, 1, 2] skeins
[spacer CC2] Brown Sheep Wildfoote [75% washable wool, 25% nylon; 215 yd/197m per 50g skein]; color: SY-10 Vanilla; 1  skein

Recommended needle size:
spacer1 set US #0/2mm double-point needles OR 2 24-inch US #0/2mm circular needles
[always use a needle size that gives you the gauge listed below -- every knitter's gauge is unique]

spacer Tapestry needle

 
GAUGE

36 sts/48 rows = 4 inches in stockinette stitch (be sure to check your gauge in the colorwork pattern as well - if it is significantly different, you may need to change needle size for the colorwork sections vs the plain toe & heel).

 
PATTERN NOTES
[Knitty's list of standard abbreviations and techniques can be found here.]
blank
The colorwork stitch used on this sock will make it less stretchy than an unstranded sock.

When determining which size to make, measure the circumference of the recipient's foot at the ball (the wide part just ankle-ward of the toes). Choose the sock size with the foot circumference closest to the actual foot measurement for the best fit.

Unlike most socks, this sock will fit best with zero or positive ease (meaning that if you are between sizes, you should go to the next larger size rather than the next smaller size).

Additionally, if the recipient has a very high instep, you may want to knit the next larger size so that the sock will not be too tight in the heel area.

If your gauge is correct, the fabric of this sock should be firm enough that bagginess will not be a problem, even if there is some positive ease.

DIRECTIONS
blank
Toe
Using Judy's Magic Cast On and MC, CO 4[8, 8, 8, 10, 12, 12] sts on each of two needles. 8[16, 16, 16, 20, 24, 24] sts in total.

Rnd 1: Knit.
If using dpns, divide sts evenly across four dpns after this rnd. The sts on the first circular or first two dpns are the instep (front of leg) sts.  The sts on the second circular or last two dpns are the heel (back of leg) sts.
Rnd 2: Kfb, knit to last 2 instep sts, kfb, k1;  kfb, knit to last 2 heel sts, kfb, k1. 12[20, 20, 20, 24, 28, 28] sts. 
Rep Rnd 2  an additional 2[2, 3, 4, 5, 5, 6] times, to 20[28, 32, 36, 44, 48, 52] sts.
Then, work Rnds 1-2 an additional 6[7, 8, 9, 10, 11, 12] times, to 44[56, 64, 72, 84, 92, 100] sts.
Knit one rnd even.

Foot
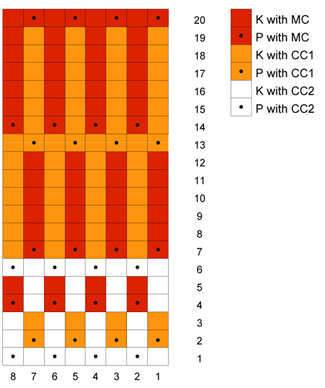
Beg working color pattern from chart over all sts.

Work Rnds 1-20, breaking CC2 after Rnd 6, then rep Rnds 8-20 until foot is approx 2.25[2.5, 3, 3.25, 3.5, 3.75, 4] inches less than desired finished length from tip of toe, ending with either Rnd 12 or Rnd 19. 

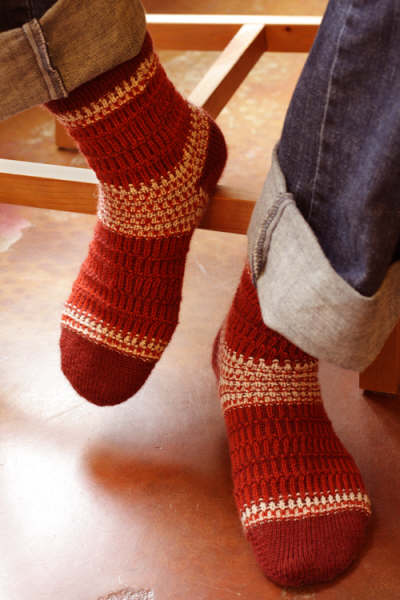
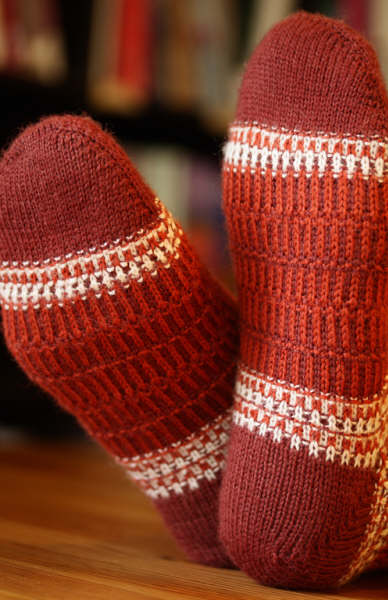
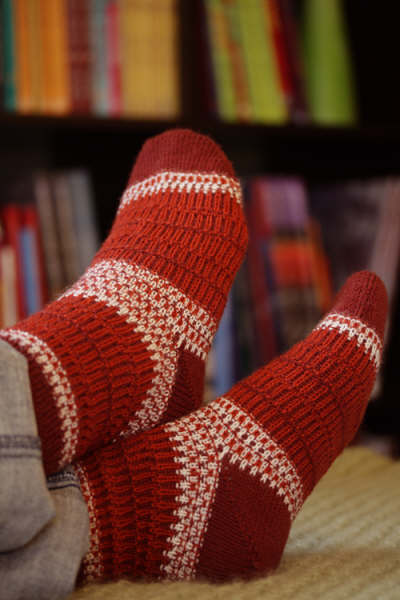
The sample sock shown in the photos reps Rnds 8-20 twice and Rnds 8-12 once more for a finished total foot length from tip of toe to back of heel of 8.75 inches.

Rejoin CC2 and work Rnds 1-6 from chart, then work Rnds 1-4 once more.

Heel
Work instep sts in color pattern Rnd 5. The heel will now be worked back-and-forth over the 22[28, 32, 36, 42, 46, 50] heel sts.

Shape Bottom of Heel:
Row 1 [RS]: Work color pattern Rnd 5 to last st on heel needle and with MC, instead of knitting the last st, W&T. The rest of the heel will be worked using MC. Don't break either of the CCs if you don't want extra ends to weave in!
Row 2 [WS]: Purl to last st on heel needle, W&T.
Row 3 [RS]: Knit to the st before the first wrapped st you come to, W&T.
Row 4 [WS]: Purl to the st before the first wrapped st you come to, W&T.
Rep Rows 3-4 an additional 5[7, 9, 10, 12, 13, 15] times until there are 7[9, 11, 12, 14, 15, 17]  wrapped sts on either side of 8[10, 10, 12, 14, 16, 16] unwrapped center sts.

Shape Top of Heel:
Row 1 [RS]: Knit to first wrapped st (do not knit across any wrapped sts), lift wrap and knit it tog with the corresponding st, turn.
Row 2 [WS]: Sl1, purl to first wrapped st (do not purl across any wrapped sts), lift wrap and purl it tog with the corresponding st, turn.
Row 3 [RS]: Sl1, knit to next wrapped st (just past the st unwrapped on the previous RS row), lift wrap and knit it tog with the corresponding st, turn.
Row 4 [WS]: Sl1, purl to next wrapped st (just past the st unwrapped on the previous WS row), lift wrap and purl it tog with the corresponding st, turn.
Rep Rows 3-4 an additional 4[6, 8, 9, 11, 12, 14] times until a single wrapped st remains on either side.

Last Heel Row [RS]: Sl1, knit to last wrapped st, lift wrap and knit it tog with the corresponding st but do not turn.
First Leg Rnd: Work instep sts in Rnd 6 of charted pattern. Lift the final wrap (which is at beg of heel sts) and knit it tog with the corresponding st, then work across the rest of the heel sts in Rnd 6 of charted pattern.

Note: Unwrapping the last sts in this manner should help to eliminate those pesky holes that can form at the sides of your heel.  You can also try knitting the last two wraps tog with their st tbl to tighten them up even more.

blank
Leg
Work Rnds 1-6 from chart, then work Rnds 1-20, breaking CC2 after the 2nd rep of Rnd 6.

Work Rnds 8-19 once more.
Rejoin CC2 and work Rnds 1-6 from chart. Break CC1 and CC2.

Cuff
With MC, work ribbing as foll for 1 inch:
Rnd 1: [P1, k1] to end of rnd.
Rep Rnd 1 for ribbing until cuff measures approx 1 inch.
Break MC leaving a 24-36 inch tail (leave a longer tail for the larger sizes).

BO all sts using sewn BO as foll:
Thread tail onto yarn needle. *Insert yarn needle into first two sts on left needle from right to left as if to purl. Pull yarn through, leaving sts on left needle. Then, insert yarn needle into first st on left needle from left to right as if to knit. Pull yarn through, slipping st off left needle. Rep from * until all sts are bound off.

Note: On the very first st, instead of dropping it off the left needle once it is sewn, instead slip it to the end of the live sts. It will then be the very last st dropped off the needle and will complete the circle nicely.

FINISHING
Weave in all ends and block socks lightly.
 
ABOUT THE DESIGNER
designernameBlank
Chrissy Gardiner designs and teaches knitting in and around her home base of Portland, Oregon.  You can see more of her work at her website.

She is working furiously to finish her first book, "The Little Book of Toe-Up Socks," for release in fall of 2009.


Grandma Knitty Home