
|
|
 |
|
|
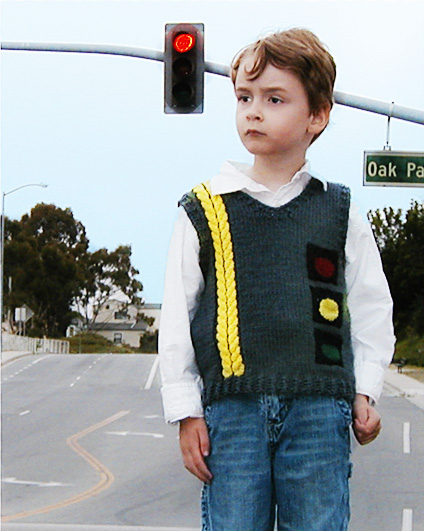 |
“Make me a vest that looks like a road!” said my
4-year-old, and out of that brainstorm
this vest was born. |
|
|
|
|
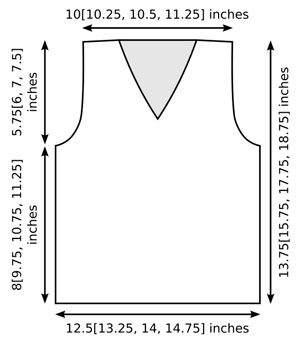
SIZE |
|
FINISHED MEASUREMENTS |
|
MATERIALS Notions |
|
GAUGE |
|
PATTERN NOTES |
|
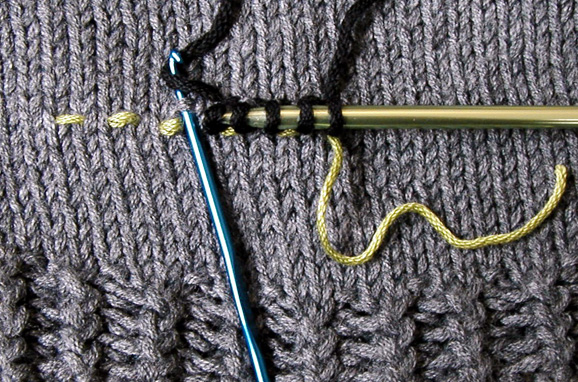
C4F: Slip next 2 sts to cable needle and hold to front of work; k2 from left needle, k2 from cable needle. LT: (Left Twist) Reach right needle around back of first st on left needle and k into back loop of second st on left needle, without removing st from needle; k into front of first st on left needle, then drop both first and second sts from left needle. RPT: (Right Purl Twist) P into front of second st on left needle, without removing st from left needle; p into front of first st on left needle, then drop both first and second sts from left needle. Tire Track Rib (Worked over a multiple of 3 sts + 2): Double-Yellow Stripe Cable (Worked over 9 sts): Seed Stitch (Worked over an odd number of sts): Intarsia: Instructions for Backstitch can be found here. Instructions for Stem Stitch can be found here. |
|
DIRECTIONS Note: See Pattern Notes above re. the intarsia method
of colorwork. Continue in pattern until work measures 8[9.75, 10.75, 11.25] inches or desired length to underarm, ending with a WS row. Continuing in pattern as set, shape armholes as follows: Next Row [RS]: Ssk, work in pattern to last 2 sts, k2tog. Continue in pattern until work measures 5.75[6, 7, 7.5] inches from beginning of armhole (13.75[15.75, 17.75, 18.75] inches from lower edge), ending with a WS row. BO all sts using appropriate color for each section. FRONT Set-up Row [RS]: Using ball of MC attached, k34[36, 38,
41], p1; attach CC1 and work [k1, m1] twice, p1, [k1, m1]
twice; attach second ball of MC and work p1, k9[10, 11,
11]. 54[57, 60, 63] sts. Continue in pattern until work measures same as back to
underarm, ending with a WS row. When work measures 1.25[1.5, 2, 2.5] inches from beginning
of armhole (9.25[11.25, 12.75, 13.75] inches from lower
edge) ending with a WS row, shape neckline as follows: Work 1 row in pattern. Place held sts of left front on needle and join MC with
WS facing. Continue in pattern until work measures same as back to shoulder, ending with a WS row. BO all sts. POCKETS
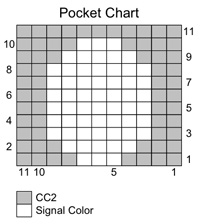
Green Signal Pocket: Set-up Row [WS]: P11. Using CC2, work a line of stem stitch embroidery around
circle design (see Pattern Notes). Weave in ends. Yellow Signal Pocket: Red Signal Pocket: |
|
FINISHING
Armhole Edging: Sew side seams and armhole edging seams. Weave in remaining ends and block as desired. |
| ABOUT THE DESIGNER |
|
Valerie Beard is a civil engineer living in Pismo Beach, CA with her son and husband. They are very patient with the lady of the house rambling on and on about cables, lace, yarn, and dropped stitches. |
|
Pattern & images © 2009 Valerie Beard. Contact Valerie |
 Neckband: