|
or : One pound of fiber, two fiber artists,
three yarns, and four colors.
In this article we
plan on demonstrating how your dyeing is akin
to your 'signature' or your fingerprint. Two
fiber artists, given the same tools, using the
same method, can wind up with very different
results.
|
Materials used
by Symeon and Amy for dyeing
- Safety gear
- Fiber -- one pound
of domestic wool top
- Jacquard dyes
- Acid mordant --
white vinegar
- Dye mixing containers
and utensils
- Synthrapol
- Roasting pan --
enameled turkey-type roaster with lid
- Oven
- Sink for rinsing
|
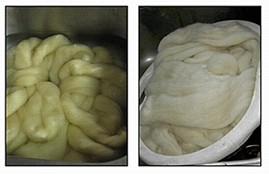
Here's an overview of
our dye process.
We start out by soaking our fibers for about
a half an hour in enough warm water to completely
cover them. Then gently strain the excess water
out. (Try to handle your wet fibers as little
as possible, to avoid neps or other damage like
felting.)
We both used the same 4 colors
of Jacquard acid dyes, purchased from Dharma
Trading.
yellow #601
emerald #629
navy #626
purple #613
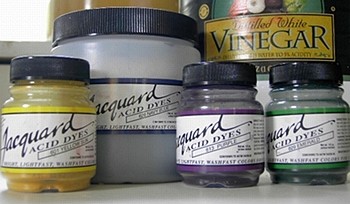
Although, the name "acid
dyes" sounds pretty ominous, the only time
they pose a danger are when they are in powder
form.
|
Dyeing Safety Tips
- Use tools for dyeing
only, do not use any tools (pots, utensils
etc) that will be used for food later.
The oven and sink don't count
- use dyes in a well
ventilated area,
- wear a dust mask
when mixing dyes
- keep pets and children
out of the room
- use rubber gloves
- protect the surfaces
that you'll be dyeing on (newspapers
are good)
- wear old clothes
and shoes
|
Employing some simple
precautions, such as using dyes in a well ventilated
area, keeping pets and children out of the room,
wearing a dust mask and rubber gloves, are strongly
suggested.
It's also a good idea to not use the dye pot or
utensils used for mixing or applying dyes for
food.
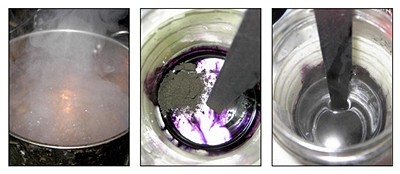
We begin mixing our dyes by creating a slurry
out of very hot water and our dye powder, by adding
adding just enough hot water to create a paste
and dissolve all the powder.
How Hot is Very Hot Water?
Since each color has
its individual 'strike point', or temperature
that it must reach to grab on to the fiber,
in our experience, anything with red or yellow
in it will take more heat to strike. For example,
blue will dissolve to its even color at a lower
temperature than green. So, bring your dye-mixing
water to a boil.
Once completely dissolved,
we can finish making our dye mixture by adding
more water and our acid. We use white vinegar,
approximately one part vinegar to three parts
water.. White vinegar or citric acid crystals
are preferred mordants. If you are using citric
acid crystals, dissolve them before adding them
to your dye mixture.
Hard Water?
If you have hard water,
it will affect your dyes. There are dyeing-specific
water softeners out there, some of which are
toxic and require more precautions. Sodium
hexameataphosphate is sold by many suppliers,
including Dharma Trading. (You can use this
in your soak and/or dye mixture.) Please follow
the directions on the label.
The amounts of dye powder
that you use will affect the outcome of your
product. You can use very little for a light
effect or quite a bit for more intense color.
However, there is a point where your wool cannot
take any more dye. It will use what it can and
the rest will be wasted. The goal is to not
waste dye and to have what you use be fully
exhausted [that means it's absorbed by the yarn,
leaving clear water behind].
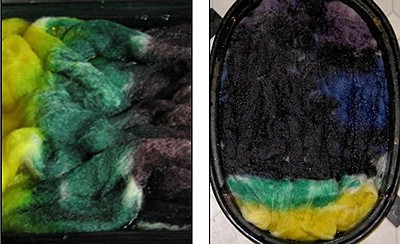
Gently placing our damp wool
in our enamel roasting pans, we apply color.
You can either transfer your dye into a squirt
bottle, or pour on your dyes directly from the
containers you mixed them in.
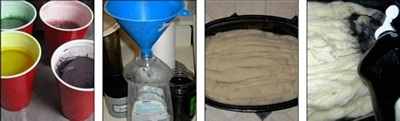
When satisfied, we set the
dye with heat.
Place in the oven at 250F.
for about 30 minutes. (This time and temperature
was a compromise, as one of us sets our dyes
at 300F for 20 minutes while the other sets
at 200 for 45 minutes.) Most dye manufacturers
claim that most of the color should be absorbed
within the first 20 minutes.
Remove roasting pan from
oven and let cool completely (back to room temperature).
Then remove it from the roasting
pan, and gently place it in a colander to strain
out excess liquids. Rinse gently to remove any
dye and mordant that remains. A dash or two
of Synthrapol will ensure that any unfixed dye
will come out. But be very careful during this
step -- this is when most people accidentally
felt the roving. (Always remember that the key
ingredients for felting are soap, warm/hot water,
and agitation.)
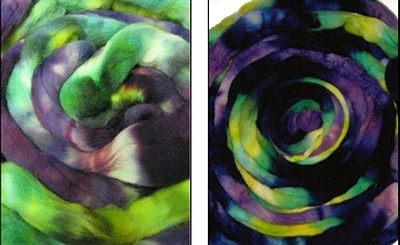
Now that the dyeing is done,
the rovings don't seem to be dramatically different.
The divergence in overall tone is spectacular,
as one appears to be more "green"
and the other more "blue" (or one
is lighter and one is darker).
While both samples take advantage
of controlled color bleeding, one incorporates
the principles of negative space in its scheme
(Amy), while the other is fully dyed (Symeon).
But let's look at what happens
when we start spinning. The contrasting values
are highlighted when the wool is spun into yarn,
and altered even more when the wool is spun
to various weights and particular styles.
With this, we also hope to
demonstrate how to change the characteristics
of a dyed top to suit your wants and needs.
(If you haven't heard it, or experienced it
for yourself, we'll repeat it here.... the most
'eh' dyed fiber, can turn into the most jaw-dropping
yarn if spun into what it wants to be. Sadly
this can also work in the reverse.)
First up, our bulky thick-and-thin
single.
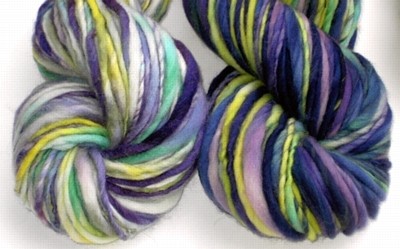
Both spinners took slightly
pre drafted fibers (about pencil sized strips)
and spun them at a low TPI/twist angle, with
regular intervals of slubs. These yarns don't
stray too far from the individual roving much,
and the color changes remain intact. Although,
with the yarns sitting side by side, the deviations
start to pop out at us. The use of negative
space in the yarn on the left is now in sharp
contrast with the fully dyed yarn on the right.
Next, our 'high-low' 2 ply.
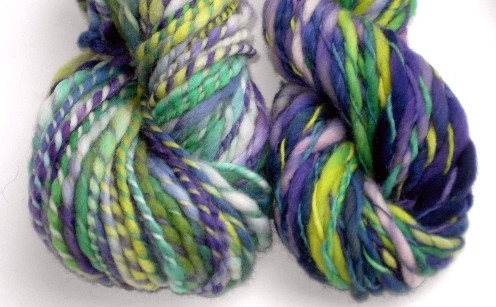
Here, both yarns are composed
of one high-twist smaller single and a low-twist
larger single. This application manipulates
the color properties by distributing the colors
to bring more balance to the overall tone of
the yarn. It also adds a new dimension of texture.
(The alteration of the textural landscape will
be more apparent when worked into a fabric --
but that's another story.) This method is good
to use when you are after accents, rather than
a complete departure from your bulky single.
Last, but not least, our
balanced 2-ply DK wt.
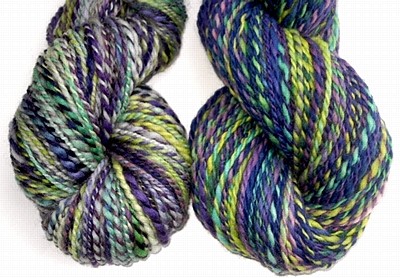
For these yarns, two (relatively)
higher twist, evenly spun singles are plied
together. This traditional plying method ensures
a more thorough distribution of color. The tones
of both yarns have changed radically. The orientation
of the colors works with (and against) themselves
to create a new layer of color. (A simple example
of this principle is to ply a solid red single
with a pink or white single. It will considerably
'lighten' your yarn & subsequent fabric.)
This arrangement often gives a very nice "tweed"
effect.
We hope that we provided
some food for thought with this brief examination.
Not only does an individual fiber artist have
their own distinct way with colors, applied
and articulated in a style as unique as their
fingerprint, but, there are many ways to utilize
a small palate, including incorporation of negative
space, color bleeding, the size of one's drafting
zone, and the distribution of color through
plying techniques. |