|


![Read exactly what FREE PATTERNS really means...respect our designers and authors rights [and thank you]](../images/OFFnavLEGAL.gif)


|
 |
 <click
for more! <click
for more!
 
|

  by Deb Barnhill by Deb Barnhill

Lately, I've been all about intricately patterned
socks that occupy both my fingers and my brain. These provide the added
bonus of slowing my mad consumption of sock yarn, which has peaked
at upwards of 50 grams per day.
It seems we
may not all agree about that. My recent scan of the blogosphere revealed
that a mighty proportion of knitters have no interest in changing
up their sock knitting practices. Their prevailing opinion? Hand-knitted
socks shall have a stockinette foot and a ribbed leg. Period. Point
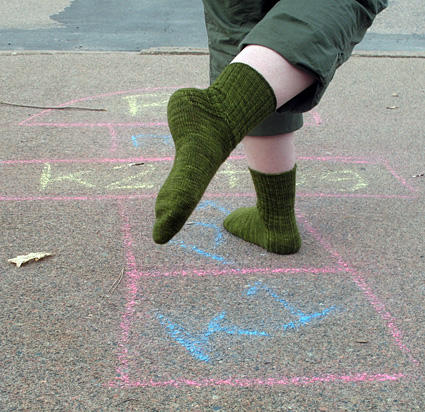
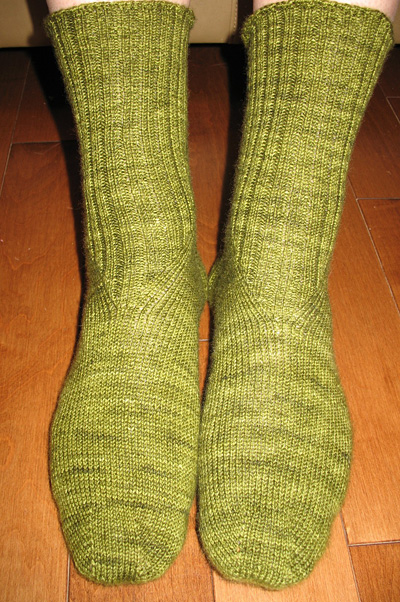
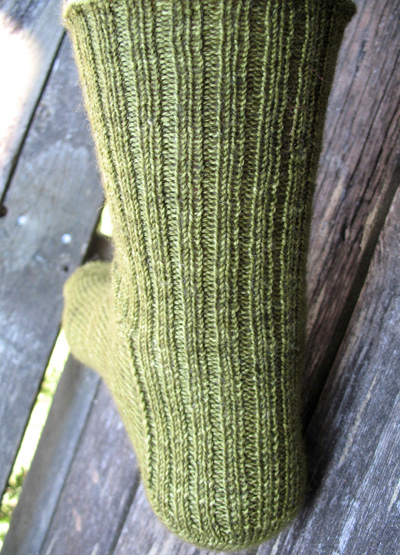
taken, but does this group not deserve to have their own fun? This toe-up pattern features a stockinette foot and ribbed leg, with the rib starting in some unlikely places for visual interest. The gussets are moved to the front, where the rib starts from a point at center front. On the back, the rib pattern starts on the heel flap. A small change to the usual toe increases gives an additional bit of geometric appeal. As an added bonus, when I accidentally donned the sample socks inside out, I loved the look! Weave your ends in neatly for an excellent second wearing option. Measure carefully against a favorite sock so as not to overshoot the beginning of the gusset increases. They are larger than in your usual sock pattern, to prevent wear at the turning point between the foot and the leg. What may seem like an enormous number of stitches before the heel turn will be cinched in nicely by the rib pattern.
The idea of tinkering with a sock's structure is not
mine. Cat Bordhi has
been exploring alternate forms of sockitecture (her term, not mine) for
several years now, and will soon have multiple books to show for it.
Mix it up while you go back to basics. |  photos: Deb
Barnhill, Todd Barnhill, Lesley Neily photos: Deb
Barnhill, Todd Barnhill, Lesley Neily
| | | |
One size will fit an average adult foot.
Alternate directions are given for a larger leg (see Finished Measurements below). | |
|
Foot Circumference: Will comfortably stretch to fit up to 10 inches
Leg Circumference: Will comfortably stretch to fit up to 11.5 inches
With option for larger leg, will comfortably stretch to fit 12.5 inches. | |
|
 Fleece Artist Merino 2/6 [100% superwash merino wool; 360yd/325m per 115g skein]; color: Moss; 1 skein Fleece Artist Merino 2/6 [100% superwash merino wool; 360yd/325m per 115g skein]; color: Moss; 1 skein
 2 US #1/2.5mm circular needles, 20 inches or longer 2 US #1/2.5mm circular needles, 20 inches or longer
 Stitch markers Stitch markers
 Split ring marker or safety pin (optional) Split ring marker or safety pin (optional)
 Tapestry needle Tapestry needle | |
|
| 33 sts / 46 rows = 4 inches in stockinette stitch | |
|
[Knitty's list of standard abbreviations and techniques can be found here] | These socks are worked from the toe up on two circular needles. If you are unfamiliar with this technique, instructions may be found here. If you prefer, the socks may be worked using the Magic Loop technique, or on double-point needles.
Information on the Magic Cast-on can be found here.
M1L (left-leaning increase): Insert left needle, from front to back, under strand of yarn which runs between last stitch on left needle and first stitch on right needle; knit this stitch through back loop. 1 stitch increased.
M1R (right-leaning increase): Insert left needle, from back to front, under strand of yarn which runs between last stitch on left needle and first stitch on right needle; knit this stitch through front loop. 1 stitch increased.
M1P (purl increase): Insert left needle, from front to back, under strand of yarn which runs between last stitch on left needle and first stitch on right needle; purl this stitch through back loop. 1 stitch increased.
2x1 Rib (Worked over a multiple of 3 sts):
Round
1: K1, [p1, k2] to last 2 sts, p1, k1.
Repeat this round for 2x1 Rib. | |
|
  TOE TOE
Using the Magic
Cast-On, CO 8 sts onto each of 2 circular needles.
Set-up Round 1: [Kfb, k3, place marker, k3, kfb] twice. 20 sts.
If desired, place a split ring marker or safety pin in work to indicate beginning of round.
K 1 round.
Toe Increase Round: [K to 4 sts before marker, M1R, k8, M1L, k to end of needle] twice. 4 sts increased.
Repeat these 2 rounds 9 times more. 60 sts: 30 sts on each needle.
FOOT
Work in stockinette until work measures approx. 4.25 inches less than desired foot length.
GUSSET
Round 1: K12, k2 tbl, k2, k2 tbl, k to end of Needle 1; k1, M1R, k to last st on Needle 2, M1L, k1. 62 sts.
Rounds 2-3: K12, k2 tbl, k2, k2 tbl, k to end of round.
Round 4: K12, k2 tbl, [kfb] twice, k2 tbl, k to end of Needle 1; k1, M1R, k to last st on Needle 2, M1L, k1. 66 sts.
Rounds 5-6: K12, k2 tbl, k4, k2 tbl, k to end of round.
Round 7: K12, k2 tbl, kfb, k2, kfb, k2 tbl, k to end of Needle 1; k1, M1R, k to last st on Needle 2, M1L, k1. 70 sts.
Rounds 8-9: K12, k2 tbl, k1, p1, k2, p1, k1, k2 tbl, k to end of round.
Round 10: K12, k2 tbl, kfb, p1, k2, p1, kfb, k2 tbl, k to end of Needle 1; k1, M1R, k to last st on Needle 2, M1L, k1. 74 sts.
Rounds 11-12: K12, k2 tbl, [k2, p1] twice, k2, k2 tbl, k to end of round.
Round 13: K12, k2 tbl, place marker, kfb, k1, p1, k2, p1, k1, kfb, place maker, k2 tbl, k to end of Needle 1; k1, M1R, k to last st on Needle 2, M1L, k1. 78 sts.
Rounds 14-15: K12, k2 tbl, k3, p1, k2, p1, k3, k2 tbl, k to end of round.
2x1 Rib is now established over sts between markers.
From this point, increases on Needle 1 will be worked every second round (instead of every third). Increases on Needle 2 are complete.
Next Round: K to 2 sts before first marker, k2 tbl, kfb, work in 2x1 Rib as set to 1 st before next marker, kfb, k2 tbl, k to end of Needle 1; k all sts on Needle 2. 2 sts increased.
Work 1 round in pattern as set.
Repeat these 2 rounds 8 times more.
96 sts: 56 sts
on Needle 1 and 40 sts on Needle 2. 28 sts between markers.
Next Round: K to 2 sts before first marker, k2 tbl, kfb, work in 2x1 Rib as set to 1 st before next marker, kfb; remove marker and sl remaining 14 sts from Needle 1 to Needle 2; k2 tbl, k to end of Needle 2, k first 14 sts from Needle 1 onto Needle 2, removing marker. 30 sts on Needle 1 and 68 sts on Needle 2.
  HEEL HEEL
Work in 2x1 Rib as set to end of Needle 1.
Heel will be worked back and forth over sts on Needle 2 only, as follows:
Row
1 [RS]: K48, W&T.
Row 2 [WS]: P28, W&T.
Row
3 [RS]: K27, W&T.
Row 4 [WS]: P26, W&T.
Rows 5-22: Continue in stockinette st, working each short row 1 st shorter than the last. Row 22 is 8 sts long.
Row 23 [RS]: K19, working wraps together with wrapped sts. Turn work (do not wrap st).
Row 24 [WS]: Sl 1, p29, working wraps together with wrapped sts. Turn work.
The 30 sts at the center of Needle 2 will form the heel flap.
There are 19 gusset sts on each side of these heel flap sts.
Row 25 [RS]: Sl 1 with yarn held to back of work, p1, [k2, p1] 9 times, ssk. Turn work.
Row 26 [WS]: Sl 1 with yarn held to front of work, k1, [p2, k1] 9 times, p2tog. Turn work.
Repeat these 2 rows 17 times more. 32 sts on Needle 2.
Work Row
25 once more, but do not turn work. 31 sts on Needle 2.
LEG
Next Round: Work all sts on Needle 1 in 2x1 Rib as set; k2tog, work to end of Needle 2 in 2x1 Rib as set. 60 sts: 30 sts on each needle.
If larger leg is desired, proceed to optional directions below.
Work in 2x1 Rib as set until leg is desired length. Loosely BO all sts in pattern.
Optional Directions for Larger Leg:
Next
Round: [Kfb, p1, work in 2x1 Rib as set to last st on needle, kfb] twice. 64 sts.
Next
Round: [K1, work in 2x1 Rib as set to last st on needle, k1, M1P] twice. 66 sts.
Work in 2x1 Rib as set until leg is desired length. Loosely BO all sts in pattern. | |
| Weave in ends. | |
If
you hear a gentle clicking from the East, its just Deb Barnhill,
chipping away at the 52
pair plunge while raising the worlds cutest toddlers
with the world's cutest husband.
Read all about her adventures here. |
| Pattern & images © 2007 by
Deb Barnhill. Contact Deb |
|
|
|
|
|

