Grandma Knitty Home
Knitty®: little purls of wisdom
what's the editor up to lately?feature articlesKnitty's generous selection of patternsKnittyspin³archive of previous issuesMeet other Knitty readers and chat in our coffeeshop!sign up for the free Knitty newsletterLooking for an ad fromone of our advertisers? Click here!Our tiny, perfect online shopping mallGet yourself a little Knitty treat!read the behind-the-scenes news at Knitty


Find exactly what you're looking for

The answer to your question about Knitty is probably here!

Take home something Knitty today

Advertise with Knitty

Get your cool stuff reviewed in Knitty

Full information about how  to get published in Knitty

Read exactly what FREE PATTERNS really means...respect our designers and authors rights [and thank you]

Knitty is produced in a pro-rabbit environment

© Knitty 2002-2007. All rights reserved. Unauthorized reproduction prohibited. This means you.


<click for more!
 
kPixie

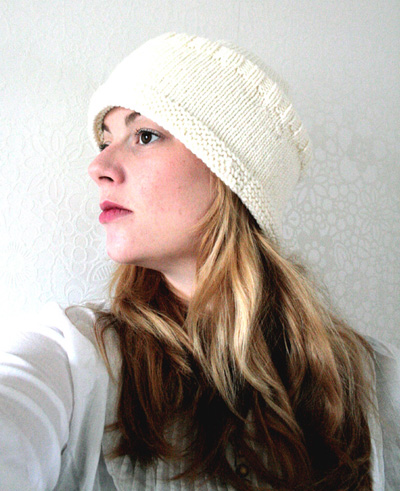
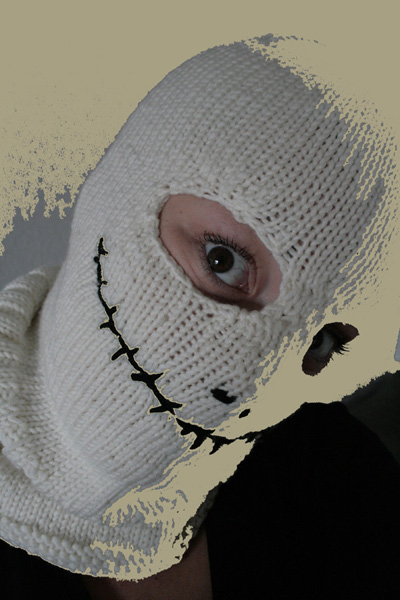
It's not what it seems.This hat that looks quite angelic folded up, but once pulled down not only turns into warm and comfortable snow protection, but also doubles as a pretty mean hideaway. It's a great hat for skiers and snowboarders, adjustable to all kinds of winter weather. And it makes for a rather original Halloween accessory.

The design is mostly inspired by the character Jack Skellington from the animated movie 'The Nightmare before Christmas’ by director Tim Burton.

model & photos: Saskia de Feijter

SIZE
Stretches to comfortably fit up to 22 inches
 
FINISHED MEASUREMENTS

Length: 19 inches
Neck/Brim Circumference: 22 inches
Face/Head Circumference: 16.75 inches

 
MATERIALS
Lana Grossa Bingo [100% Merino wool; 88yd/80m per 50g ball]; color: #5 Cream; 4 balls

Small amount of black yarn, used for embroidery only.

1 set of 5 US #8/5mm double-point needles

1 16-inch US #8/5mm circular needle (optional)

Stitch markers

Stitch holder

Tapestry needle (for weaving in ends)

Pins

Sharp needle with large eye (for working embroidery)


GAUGE

18 sts/29 rows = 4 inches in stockinette st

 
PATTERN NOTES

[Knitty's list of standard abbreviations and techniques can be found here]

2x2 Rib (Worked in the round over a multiple of 4 sts):
Round 1: [K2, p2] to end.
Repeat this round for 2x2 Rib.

Ssp: Slip next 2 sts knitwise, one at a time, to right needle. Slip them both, purlwise, back to left needle. Purl them together through their back loops.

Split Stitch:
Instructions for Split Stitch embroidery can be found here.

DIRECTIONS

NECK/BRIM
Using circular or double-point needles, CO 100 sts.

If using double-point needles, divide sts evenly between needles.

Place marker and join to begin working in the round, being careful not to twist

Work 8 rounds in garter st.

Work 3 inches in stockinette st.

Work 4 inches in 2x2 Rib. Work measures 8 inches.

FACE/HEAD
Next Round: [K2, k2tog] to last 4 sts, k4. 76 sts.

Work 4 inches in stockinette st. Work measures 12 inches.

Shape Eyeholes:
Next Round: BO 2 sts, k11 (12 sts on right needle after bound-off sts) and place these sts on st holder; BO 2 sts, k to end. 60 sts.

Row 1 [WS]: P2tog, p to last 2 sts, ssp.
Row 2 [RS]: Ssk, k to last 2 sts, k2tog.
Row 3 [WS]: P all sts.
Row 4 [RS]: Work as for Row 2. 56 sts.
Rows 5-6: Work in stockinette st.
Row 7 [WS]: P1, m1, p to last st, m1, p1.
Row 8 [RS]: K all sts.
Row 9 [WS]: Work as for Row 7.
Row 10 [RS]: K1, m1, k to last st, m1, k1. 62 sts. Break yarn. If you are using double-point needles, divide these sts between 3 needles so that you have 2 free needles. If using circular needle, leave sts on needle.
Place held sts on a double-point needle and rejoin yarn with WS facing.

Work Rows 1-9 as above. At the end of Row 4, there will be 6 sts.

Row 10 [RS]: K1, m1, k to last st, m1, k1, CO 2 sts, k the 61 sts on the circular needle or other double-point needles, CO 2 sts; join to resume working in the round, k6. 76 sts.

This point will now be beginning of round. If using double-point needles, place 19 sts on each needle.

Work 3 inches in stockinette st.

CROWN
If using circular needle, switch to double-point needles, placing 19 sts on each needle.

Decrease Round: [K2tog, k to last 2 sts on needle, k2tog] 4 times. 8 sts decreased.

K 1 round.

Repeat these 2 rounds 3 times more. 44 sts.

Work Decrease Round 5 times.
Break yarn, draw through remaining 4 sts and pull tight.

FINISHING

Weave in ends.

Put on balaclava and use pins to mark location of mouth.
Work horizontal line of mouth using Split Stitch. Using this stitch will constrict the fabric slightly, preventing it from stretching when worn and defining the mouth more clearly.
Using photo as guide, embroider lines for teeth and nostrils.

To wear as a hat, fold the brim up so that the lower edge is level with the top of the crown, then fold the lower half of the brim back down so that the lower edge is slightly below the first fold.

ABOUT THE DESIGNER

Saskia started a knitting circle at the ripe old age of 10, knitting underwear for her teddy bear, and lots of pillows. When puberty hit boys seemed much more important. But after a few years of Art School, after finding her true prince, finding herself in a not-so-creative-job she started to crave the sound of ticking needles and then let out the creative tigress inside her once again. The last 5 years, Saskia has been an obsessed knitter and blogger.

She and her man are now expecting their first child* and Saskia can’t wait to teach the sprout some ass-kicking knit skills to pass the magic on!

*Editor's note: Any second now!