

|
|
|
“Some days,” my grandfather used to tell me, “you eat the bear. And some days, the bear eats you.” It was an oddly rural choice of imagery for a man born and raised in Detroit, but the point was well taken: your place in the great food chain of life is subject to change without notice. Though I remain uneaten, three months in the arena with Frances Lambert’s 1847 take on a lady’s knitted traveling cap have left me feeling distinctly nibbled upon. 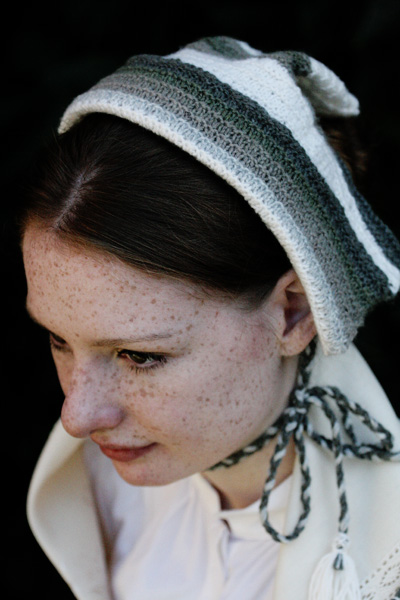 If you are a woman who spends her weekends lolling around a living history museum, you are thinking, “My goodness, isn’t that just the very thing!” If you are not such a woman, you are asking, “Why on earth would anybody make this?” I’m so happy you asked.*** An enigmatic aura surrounds most historic knitting patterns, particularly those that – like this cap – were published without even a sketch of the finished product. This makes casting on a sort of casting off: you plow into uncharted waters with at best a vague notion of where you’ll end up. The destination reveals itself gradually, by stages. Those of you who have participated in mystery knit-alongs will understand the appeal. The danger, of course, lies in sailing up a blind inlet while thinking you’re heading for the Northwest Passage. It’s not necessarily that there are errors in the pattern, though often there are. It’s more a matter of ambiguity in how maneuvers are described. Miss Lambert might intend for you to Do This, or she might intend for you to Do That. You have no choice but to guess which she means, and if you choose wrong you may not find out for quite some time. An average pattern will offer you one or two such forks in the path. Usually I like them. They add spice. This pattern, however, was a conga line of ambiguities, including uncertainty at several key junctions whether Miss Lambert truly meant “knit” when she wrote “knit,” or whether she meant “purl.” While it’s unfair to get to angry with the dear lady – she was, after all, attempting to convey in words what had for centuries been taught by direct demonstration – I confess that by the fourth time I ripped out and re-calculated the decreases in the crown, I began to hope she had died a painful death and gone to a circle of Hell in which she is forever poked with double-pointed needles and peppered with insoluble pattern support questions. 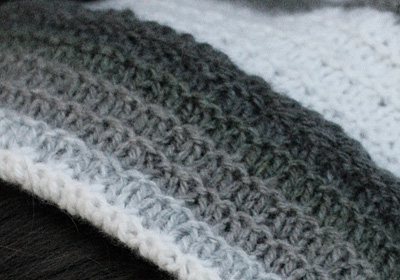 At first glance, it looks like stockinette with an occasional ridge of garter – but it’s not. It uses radical decreases and increases to create a stockinette-like fabric that lies flat and does not curl. I kid you not. What’s more, Miss Lambert’s clever practice of changing to a new color on fourth row of her stitch pattern causes the shades to blend gently from one to the next like watercolors. Enchanting. It’s almost enough to make me to hope she’s not actually in Hell. Almost. *I know this for certain because after finishing it I wore it around the house for several hours on my very bald head. There are few borders, gentle reader, which your humble correspondent will not cross to make you happy.** ** No, there are no pictures of this. That would be one of the few borders I will not cross. ***Because this would otherwise be a dreadfully short column and the editor would yell at me. |
 |
translated by Franklin Habit from My
Knitting Book (Second Series)
|
|
FINISHED MEASUREMENTS |
Length from front edge of roll to tip of
peak: 8 inches |
|
MATERIALS Notions |
| GAUGE |
| 20 sts/28 rows = 4" in texture pattern |
|
PATTERN NOTES |
The cap is worked in one piece from the outer “roll” or brim to the “frill” at the back. p3tog: Purl next 3 sts together. 2 sts decreased. p4tog: Purl next 4 sts together. 3 sts decreased. Texture Pattern (Worked over an even number of sts): It is a good idea to swatch the texture pattern before beginning, to ensure that you are familiar with it. Directions for making a tassel can be found here. |
|
DIRECTIONS |
 Using CC1, CO 102 sts. K 1 row (a WS row). Work Rows 1-3 of Texture Pattern. Continue in Texture Pattern as follows, beginning with Row
4. When changing colors, always leave
a tail approx. 6 inches long of both
the color you have just finished working
with, and the new color. Using MC, p 1 row. This row marks the point where the front
roll will fold back. CROWN Crown is shaped using short rows, as follows: Note: The following pair of short rows is worked at a different
interval than the rows that preceded it. Shape back of crown as follows. Note that decreases used will
create holes in fabric; this effect is intentional. Row 5 [RS]: K1, [k2tog] 3 times, k3tog. Turn work. 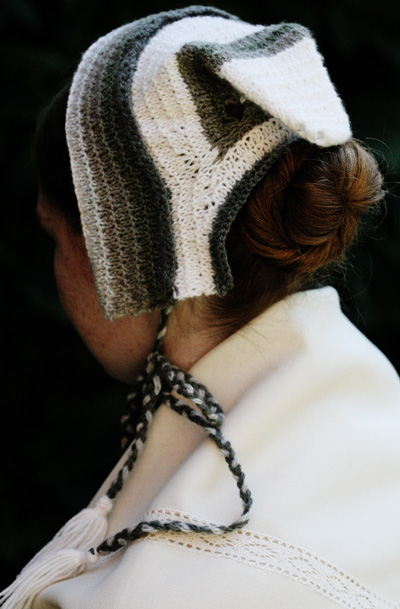 Using CC3, continue as follows: Row 1 [WS]: K1, p6, p4tog. Turn work. Row 2 [RS]: K1, [k2tog] 3 times, k4tog, k1, [k2tog] 2 times. Turn work. Row 3 [WS]: K3, [k1, m1] 3 times, k2. Turn work. Row 4 [RS]: K11. Turn work. Row 5 [WS]: K1, p9, p4tog, p3. Turn work. Row 6 [RS]: K1, [k2tog] 6 times, k4tog, k1, [k2tog] twice. Turn work. Row 7 [WS]: K3, [k1, m1] 6 times, k2. Turn work. Row 8 [RS]: K17. Turn work. Row 9 [WS]: Using MC, k1, p15, p4tog, p3. Turn work. 48 sts: 20 sts at center, 14 sts at each side. Row 10 [RS]: [K2tog, k1] 6 times, [k2tog] twice, k2. Turn work. Row 11 [WS]: [K1, m1] 14 times, k2. Turn work. Row 12 [RS]: K30. Turn work. Row 13 [WS]: K1, p32. Turn work. Row 14 [RS]: *[K2tog] 3 times, k1; repeat from * 4 times more. Turn work. Row 15 [WS]: [K1, m1] 19 times, k4. Turn work. Row 16 [RS]: K42. 58 sts: 42 sts at center, 8 sts at each side. Row 17 [WS]: Using CC1, k1, p48, k1. Short row shaping is complete. Continuing with CC1, work Rows 1-3 of Texture Pattern. TIES (Make 2) Take one CC1 bundle and two CC5 bundles and tie them together
with an overhand knot approx. 1 inch from the end. Fasten the
knot end to a blocking mat or the arm of an upholstered chair
with a T-pin or safety pin, and braid the three bundles together.
When approx. 3 inches of yarn remain, fasten with another firm
overhand knot. Using MC, create two three-inch long tassels. Attach one tassel to each tie. Historic note: As an alternative to the braided cords, Miss Lambert recommends using lengths of matching ribbon without tassels. She says these are “prettier,” and they also happen to be less of a pain in the neck to make.
|
|
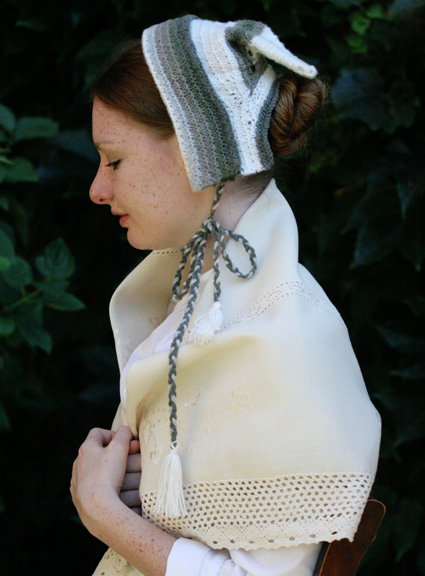
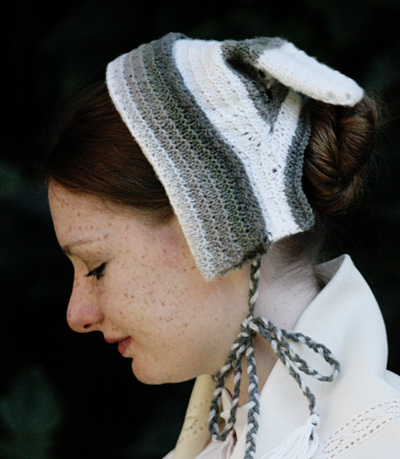
FINISHING When dry, fold back front roll along the MC stripe and use a length of CC1 to sew CO edge to foremost edge of crown. Using MC, firmly sew non-tasseled end of each tie to right and left inside of cap, where front roll and back shaping come together at a point. This cap is worn very high, exposing most of the top of the head. It should be tipped backwards slightly so that the sides of the front roll cover the ears. Tie the cords just under the right or left ear, whichever is preferred. When rough travel is expected, for example by coach or on Mr. Cunard’s new ocean-going paddle wheeler, a few judiciously-placed hair pins may be employed. |
| ABOUT THE DESIGNER |
 He doesn't loll about living history museums all days, since men in living history museums don't get to knit. |
| Pattern & images © 2010. Franklin Habit. |