 |
|
|
 |
“You gotta convince me that you know what this is all about, that you aren't just fiddling around hoping it'll all... come out right in the end!”- Sam Spade, The Maltese Falcon Thursday. 8:27am. The train is late and the fall air is crisp, but he is immune to the cold wearing that Humphrey vest she gave him. She’d turned up at his office late
last night. Vest or no vest, he would have some rotten nights after he’d thrown her over, but that'd pass.
|
The resultant yarn is 8 wraps to the inch, although 8ish is probably more accurate. The Broken rib stitch pattern gives a nice hard boiled '50s geometric feel to the vest, while cleverly disguising most of the more extreme variations in yarn thickness and twist. *with apologies to Dashiell Hammett. |
|
|
|
|
|
SIZE |
|
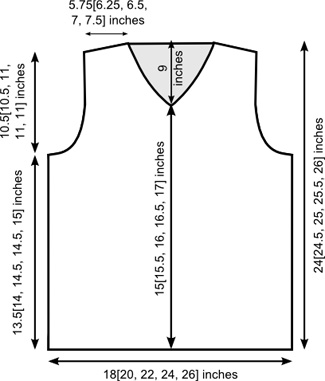
FINISHED MEASUREMENTS |
|
MATERIALS Finished Yarn Fiber Preparation Drafting Method
Recommended needle size [always use a needle size that gives you the gauge listed below -- every knitter's gauge is unique] Tools GAUGE |
|||||
|
PATTERN NOTES |
|
Broken Rib (in the round) Broken Rib (worked flat) When working the waist, arm hole and v neck shaping, maintain the alignment of the broken rib. If in doubt at the edges, work a stitch as a knit...you won’t see it when you pick up the edgings or it will be in the seam under the arm. Wrap & Turn [W&T]: Working Wraps Together with Wrapped Stitches: |
|
DIRECTIONS Change to larger needle. Set up round: Place marker for start of round, work 60[68, 76, 88, 96] stitches as per Round 1 of Broken Rib pattern, place marker for middle of round, work 60[68, 76, 88, 96] stitches as per Round 1 of Broken Rib pattern. The markers denote the “side seam”. Increase round: K1, m1, work in pattern to 1 st before next
marker, m1, k1; slip marker, k1, m1, knit to 1 st before
end of round, m1, k1. 4 sts increased. Divide for Front and Back: Front: Row 1 [RS]: K24[27, 30, 30, 36] sts, slip next 2 sts to a holder, turn. Continue only on these sts for left front. Row 2 [WS]: P2tog, work to end in pattern. 1
st decreased. Repeat Rows 2-7 3[4, 5, 5, 6] more times, and Rows 2-4 1[0, 0, 1, 0] more time. 15[17,18,20,22] sts rem Work even in pattern until piece measures 22.5[23, 23.5, 23.5, 24] inches from cast-on edge, ending with a RS row. Work short row shoulder shaping as follows: Right Front: Repeat Rows 2-7 3[4, 5, 5, 6] times, and Rows 2-4 1[0, 0, 1, 0] more time. 15[17,18,20,22] sts rem. Work even in pattern until piece measures 22.5[23, 23.5, 23.5, 24] inches from cast-on edge, ending with a WS row. Work short row shoulder shaping as follows: With WS facing, rejoin yarn to back stitches. Row 1 [WS]: Cast off 3[4, 4, 4, 5] stitches, work to end in pattern. Row 2 [RS]: Cast off 3[4, 4, 4, 5] stitches, work to end in pattern. Row 3 [WS]: Cast off 3[4, 4, 4, 5] stitches, work to end in pattern. Row 4 [RS]: SSK, work in pattern
to last 2 sts, k2tog. Work 1 more row even in pattern. Work Row 4 0[1, 0, 1, 0] more times. Work even in pattern until piece measures 24[24.5, 25, 25.5, 26] inches from cast-on edge, ending with a WS row. Shoulder Shaping Beginning on a RS row, Shoulder seams: Neck: Round 1: K to 3 sts before center front marker,
k2tog, k2, ssk, k to end of round. 2 sts decreased. Setup for ribbing: Ribbing round 1: [K2, p2] to 2 sts before center
front marker, k2tog, ssk, [k2, p2] to end of round. Cast off loosely in pattern. Armhole edging Round 1: Knit. Ribbing round: [K2, P2] to end. Repeat for second armhole. |

|
|
FINISHING |
| ABOUT THE DESIGNER |
|
Astrid Kauffman lives in Melbourne, Australia where she is an engineer by day and spends her evenings prizing “Mummy’s special string” out of the fur kids’ mouths. She only slightly objects to the fact that her staff in her day job said her knitting looked like Humphrey B Bear when she was clearly paying homage to Humphrey Bogart. Astrid goes undercover on Ravelry as triddles. |
|
Pattern & images © 2010 Astrid Kauffman. Contact Astrid |