Knitty: little purls of wisdom
Lorna’s Laces
Title
beauty shot

Tangy

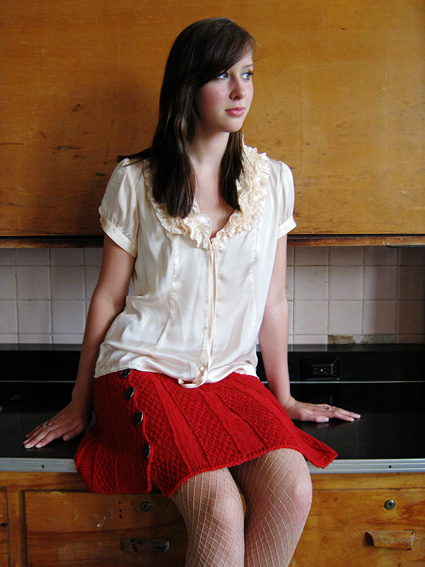
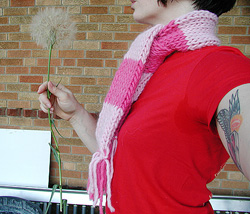
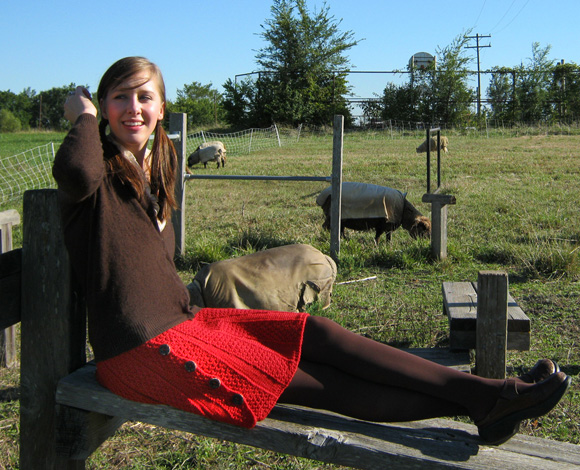
Inspired by Twiggy’s tweedy London miniskirts, this nubby-textured wool A-line is cute as a button and making it is easy peasy lemon squeezy.

It's knit sideways to size and flared with short rows until it's long enough to wrap around your hips, then finished with a buttonhole section and firm waistband for a good fit. And because it’s thickly textured, any pills that form from wear (always a problem with bottoms) will be generously obscured.

spacer model: Autumn Howe (red skirt), Caitlin Haggard (green skirt) spacer photos: Nikol Lohr

SIZE
Custom size (knit to fit)

spacer

FINISHED MEASUREMENTS
Length: 17 inches
See Pattern Notes re. changing skirt length.

spacer

MATERIALS
Yarn

Red Skirt:
spacer Lorna’s Laces Shepherd Worsted [100% superwash merino wool; 225yd/205m per113g skein]; color: Chagrin; 2-4 skeins, depending on size
Note: Purchase approx. 1 skein for every 15 inches of hip circumference (ie. for 35 inch hips, purchase 3 skeins).

Green Skirt:
spacer Lion Brand Lion Wool [100% wool; 158yd/144m per 85g skein]; color: #132 Lemongrass; 3-6 skeins, depending on size
Note: Purchase approx. 1 skein for every 10 inches of hip circumference (ie. for 35 inch hips, purchase 4 skeins).

Recommended needle size
[always use a needle size that gives you the gauge listed below -- every knitter's gauge is unique]
spacer 1 US #6/4mm circular needle, 24 inches or longer, or set of long straight needles
spacer 1 US #F/5 / 3.75mm crochet hook

Notions
spacer Yarn needle
spacer 6 buttons, approx. 0.75-1.125 inch diameter
Note: Buy buttons after skirt is complete to ensure correct size.

GAUGE
19 sts/24 rows = 4" in stockinette st
19 sts/30 rows = 4" in Box Stitch
Note: Gauges measured after blocking.


PATTERN NOTES
[Knitty's list of standard abbreviations and techniques can be found here.]

spacer
Box Stitch
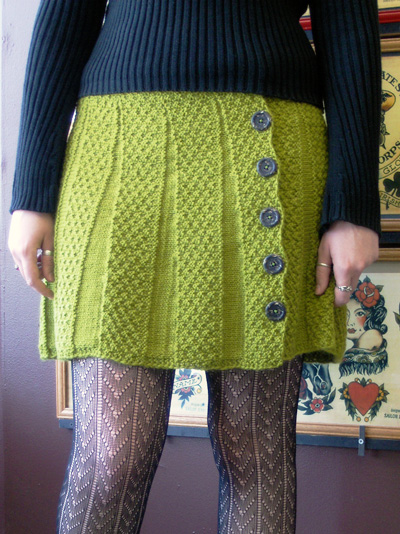
(Worked over a multiple of 4 sts):
Row 1 [RS]: Sl 1, [k2, p2] to last 3 sts, k3.
Row 2 [WS]: Sl 1, [p2, k2] to last 3 sts, p2, k1.
Row 3 [RS]: Work as for Row 2.
Row 4 [WS]: Work as for Row 1.
Repeat Rows 1-4 for Box Stitch.

Changing Skirt Length:
As written, this skirt is 17 inches long. To make it longer or shorter, cast on more or fewer stitches. Be sure to work in multiples of four stitches, so that the box pattern will work out correctly. A difference of 4 stitches will yield a change in length of approx. 7/8 inch.

When working the short row flare sections, increase or decrease the stitch numbers on all odd-numbered (RS) short rows by the same number of sts you added to or subtracted from the cast on.

Instructions for the Backward Loop Cast On can be found here.

Instructions for working a crochet slip stitch can be found here.

Information about blocking can be found here and here.


SHORT ROW TUTORIAL

W&T (Wrap and Turn):

Work to point specified in pattern. Slip next stitch purlwise from left needle to right needle.

Bring yarn between needles to front of work if you're knitting, or to back of work if you're purling.

Slip stitch back to left needle. Yarn is now positioned between the stitch you slipped, and next stitch on left needle.

Bring yarn between needles again, to back of work if you were knitting, or to front of work if you were purling. The stitch is now wraped. Turn work around, to begin working next short row.

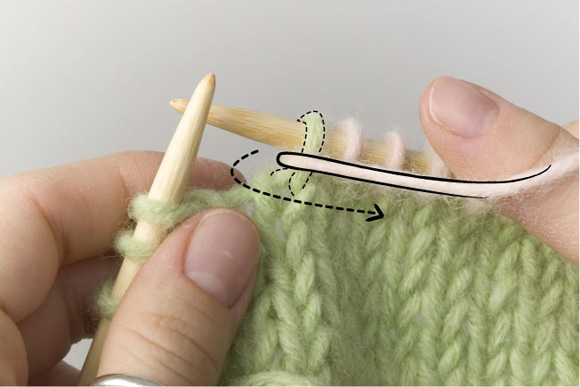
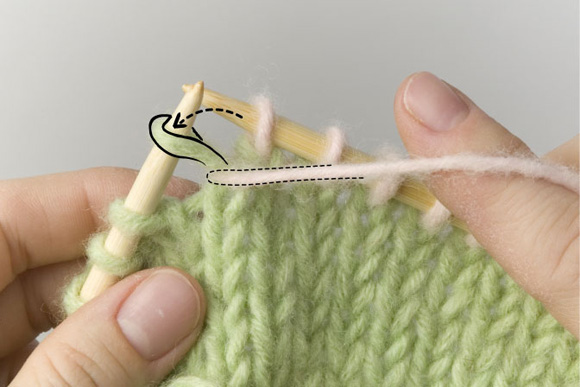
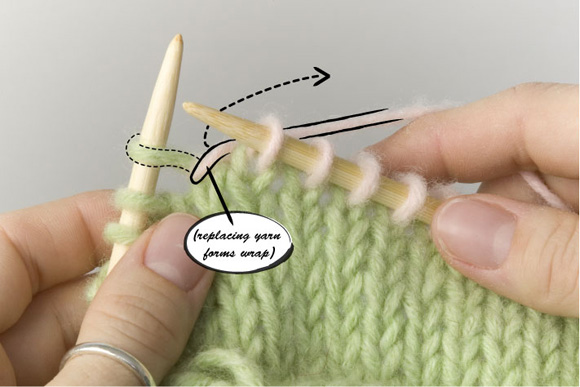
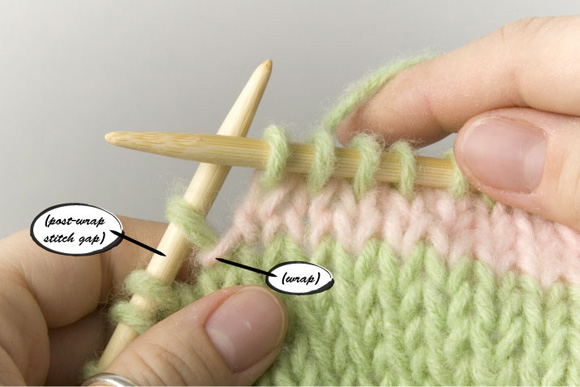
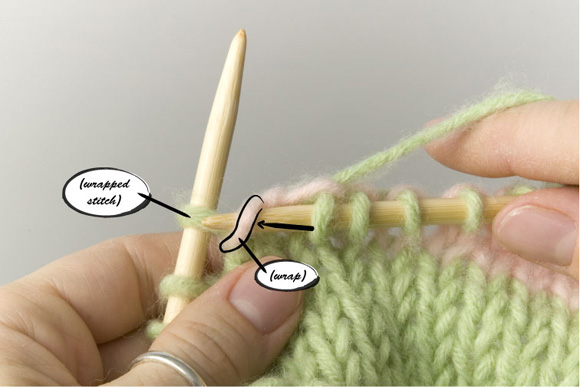
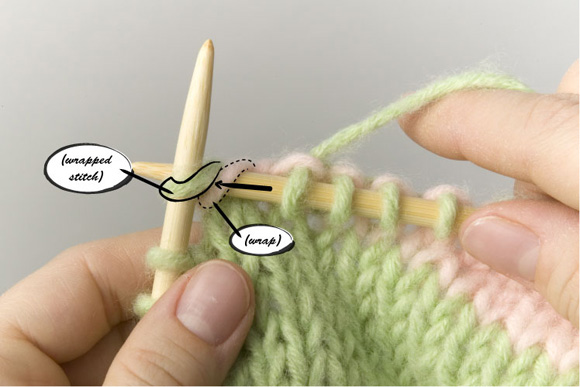
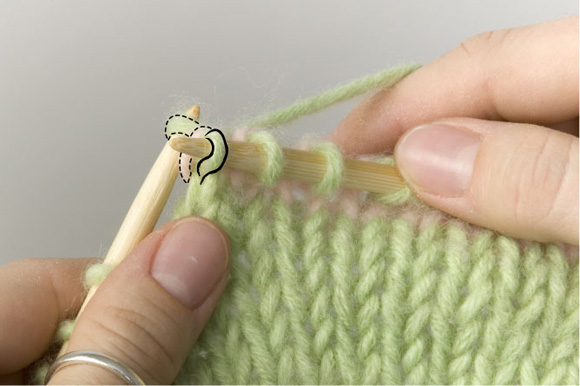
Knitting wraps together with wrapped stitches:

Wrapped stitches are often easy to spot because the wrap holds the wrapped stitch close to the adjacent stitch, forming a gap on the other side of the wrapped stitch. The wrap itself looks a little like a purl bump. The wrap will be hidden by working it together with the wrapped stitch, as follows.

Insert the tip of the right needle into the wrap from below, lifting it.

Still lifting the wrap, insert the needle knitwise into the wrapped stitch. It will look like you have 2 stitches on the needle--almost like working a decrease.

Knit the stitch and the wrap together as one stitch.

DIRECTIONS

spacer
BUTTON BAND
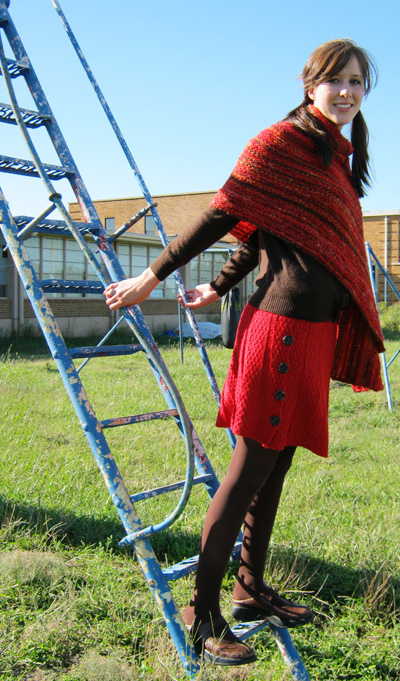
CO 80 sts.
Work 8 rows Box Stitch, beginning with a RS row.

SKIRT PANEL
Work 16 rows Box Stitch.

Work flared short row section:
Row 1 [RS]: Sl 1, p70, W&T.

Row 2 [WS]: P to last st, k1.

Row 3 [RS]: Sl 1, k60, W&T.

Even-Numbered Rows 4-12 [WS]: P to last 3 sts, k3.

Row 5 [RS]: Sl 1, k50, W&T.

Row 7 [RS]: Sl 1, k40, W&T.

Row 9 [RS]: Sl 1, k30, W&T.

Row 11 [RS]: Sl 1, k20, W&T.

Row 13 [RS]: Sl 1, k71, knitting wraps together with wrapped stitches; W&T.

Row 14 [WS]: K to end.

Repeat Skirt Panel until work is long enough to wrap around hips when lightly stretched.

BUTTONHOLE BAND
Work 9 rows Box Stitch, ending with a RS row.

Buttonhole Row 1 [WS]: Sl 1, work 4 sts in pattern, *BO 2 sts, work 9 sts in pattern (10 sts on right needle after bound off sts); repeat from * five times more, work in pattern to end.

Buttonhole Row 2 [RS]: Sl 1, *work in pattern to bound off sts, CO 2 sts onto right needle using backward loop method; repeat from * five times more, work in pattern to end.

Work 3 rows in pattern, ending with a WS row.

BO 79 sts in pattern, working sts as for next row of Box Stitch. 1 st remains; this st is at upper corner of skirt.

WAIST
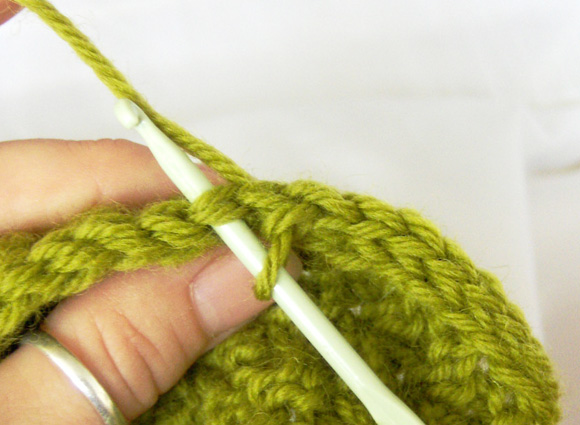
Two rows of crocheted slip stitch are worked to stabilize the waist edge. If you prefer, it is possible to achieve the same effect by knitting, though it is quite a bit slower than crocheting. Knitting directions follow the crochet directions below.

Crocheted Waist Edging:
Insert hook into remaining st. With RS facing, work 1 sl st into each slipped st along waist edge.

Turn work.

With WS facing, work 1 sl st into each sl st of the row just worked.

Bind off.

The first row is worked into the slipped-stitch edge.

The second row is worked into the stitches of the previous row.

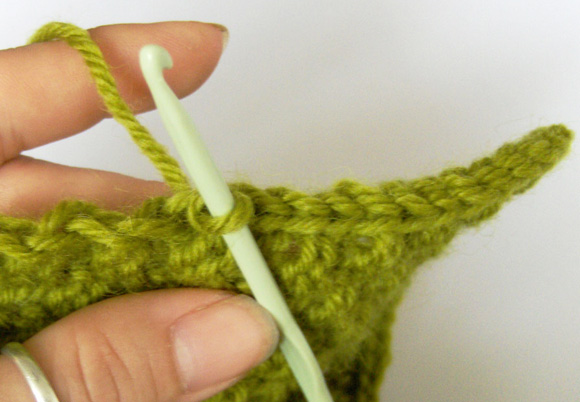
Knitted Waist Edging:
With RS facing, pick up and immediately BO 1 st in each slipped st along waist edge. Turn work.

Work a second row in the same way, picking up and binding off 1 st in each st of the row just worked.


FINISHING
Weave in ends and wet block, ensuring that edges and short-row panels are straight and smooth.

Once skirt is dry, try on and pin to determine best placement of buttons. Sew buttons to button band, opposite buttonholes.
spacer
ABOUT THE DESIGNER

designernamespacer Nikol Lohr lives and works at The Harveyville Project with her partner, 2 cats, 7 sheep, and 6 hens.

She’s the author of Naughty Needles, the founder of Yarn School. She blogs at The Thrifty Knitter, and is cupcake on ravelry and QueenieVonSugarpants on flickr.

spacer