
|
 |
|
|
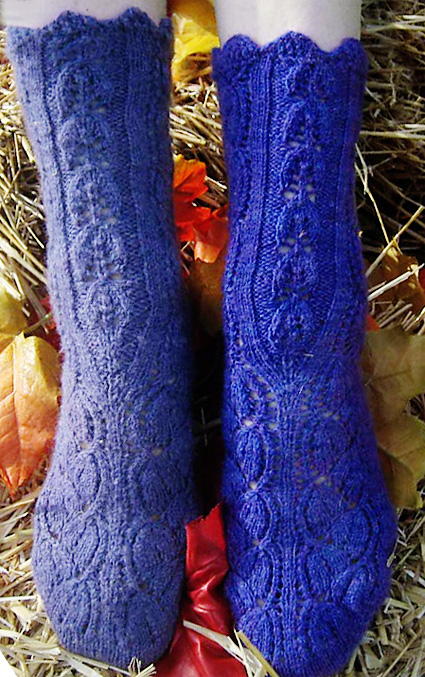
It all began with a series of converging obsessions. There was the braid of violet-blue Cheviot that kept following me from festival to festival, daring me to buy and spin it; there was my perpetual quest for the perfect sock yarn; there was the constant interest in experimenting with construction angles and examining how they affect ease and stretch; there was the growing desire to play with ever more saturated colors. And at last what began as Platycodon now emerges as Glomerata. There's some thematic consistency in that the design is all bellflower all the time, but it isn't packed as chock-full of subtext as some of my more "out-there" work - I suppose you could call it an etude rather than a tone poem. The sock is worked toe-up from a toe-tip cast-on. It features two classic floral lace patterns and a short-row heel set amid plenty of extra ease at the instep; it's topped with a row of gently-curved garter stitch petals. I wanted the Dayflower panels to mirror each other on top of the foot and then diverge above the heel to climb up the sides of the ankle - and so they do, after being pushed apart over the instep by another form of bellflower patterning that finds an echo up the back. Side effects: the Dayflower pattern appears prim and strait-laced on the top of the foot, the contrary motion keeping its natural waviness in check; then as it veers away from center each panel recovers its normal undulating momentum; it also makes a sweeping angled curve over the ankle bone, biasing the fabric and giving it a snug yet stretchy fit. Don't let the laciness fool you: this is a cozy-warm sock. And if the floral shapes and the touch of deep rich color remind you of spring just as you're starting to batten down your hatches for winter... well, how terrible is that? |
||

|
Tweet
 |
|
|
SIZE |
|
|
FINISHED MEASUREMENTS |
|
MATERIALS Finished Yarn:
Drafting Method: Tools |
|||||
|
GAUGE |
32 sts/48 rows = 4 inches
in stockinette stitch (darker version as photographed) |
|
PATTERN NOTES |
|
Gauge, Ease, and Sizing At 8 sts per inch, working the first set of numbers gives a sock 7 inches in circumference, the second set gives a sock 8 inches in circumference, and the third set gives a sock 9 inches in circumference. At 7 sts per inch, working the first set of numbers gives a sock 8 inches in circumference, the second set gives a sock 9 inches in circumference, and the third set gives a sock 10.25 inches in circumference. Note that I intend my socks to be worn with about 10% negative ease, so that a foot with a 9 inch circumference should wear a sock 8 inches in circumference. Spinning Sock Yarn; A Mini-Manifesto Let’s be clear on this from the outset: Where socks are concerned, I am the Anti-Merino. It's my considered opinion that Merino is just about the least appropriate fiber possible for sock purposes. Granted, it's very soft; but that is really its only virtue, and I find that in some 95% of cases the importance of softness in socks is vastly overrated. Overly soft socks tend to be short-lived socks; they sacrifice staying power for dubious comfort. Use a soft fiber like Merino, spin it into a soft yarn, and knit it into a soft fabric, and what do you get? Insufficient twist and density. A sock meeting those criteria will not hold its shape, will not stand up to friction, will not cushion your foot. The best socks are perfectly fitted; they're constructed at a tight gauge, from a high-twist yarn that has plenty of inherent strength and spring - those are the attributes that will give you both comfort and lasting wear. This is why I love to begin with downs breeds, such as Cheviot and Dorset, with their strong spiral crimp; this is why my own custom millspun uses a blend of several wools ranging from Targhee to Southdown, with silk for added strength and smoothness and shine. What I love best is a crisp round yarn with plenty of strong plying twist and high stitch definition; I'm still working toward the perfect balance of spring and strength, but my most tried and true formula so far is a four-ply: Fine lofty singles spun point-of-twist from a woollen prep (roving, typically - or a batt if I've done the blending myself), plied together hard - I suggest an angle of twist not less than 40 degrees. If four-ply seems a little crazy to you, spin a three-ply. (But don’t settle for two-ply. The loss of roundness and substance is exponential; I have yet to see a two-ply that makes good socks.) Don't be afraid to underspin the singles just a touch, then compensate with apparent overplying. The result may not meet the standard definition of a "balanced" yarn - at least not until after you've set the twist - but it will be strong and bouncy and stretchy enough to make a beautiful cushy sock; one that will last and last. There; that's my two cents' worth on how it should be done. Now go forth and spin the sock yarn YOU like best!
M1L: Insert left needle, from front to back,
under strand of yarn which runs between last stitch on left needle
and first stitch on right needle; knit this stitch through back
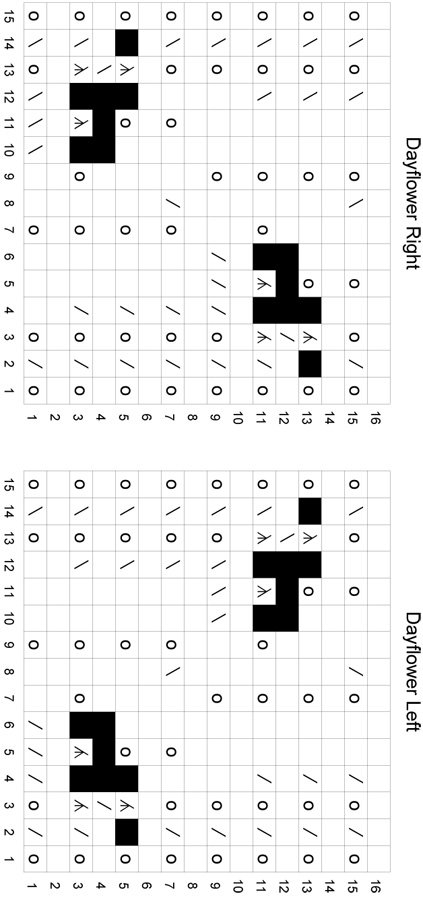
loop. 1 stitch increased. Low-torque k3tog Toe Patterning Dayflower Pattern - Left Side of Sock Reverse Dayflower Pattern - Right Side of Sock Campanula Pattern Setup Row 1 (once only): P2[3, 4], yo, k1, yo, p2[3,
4]. Worked flat on 7[9, 11] sts; stitch count changes from row to row but is restored in R11: Row 1 [RS]: P2[3, 4], k1, yo, k1, yo, k1, p2[3, 4]. Petal Edging Notes: Decrease at end of WS rows is worked on last st of edging
and next st of sock. Sizes S & L only: Size M only: |
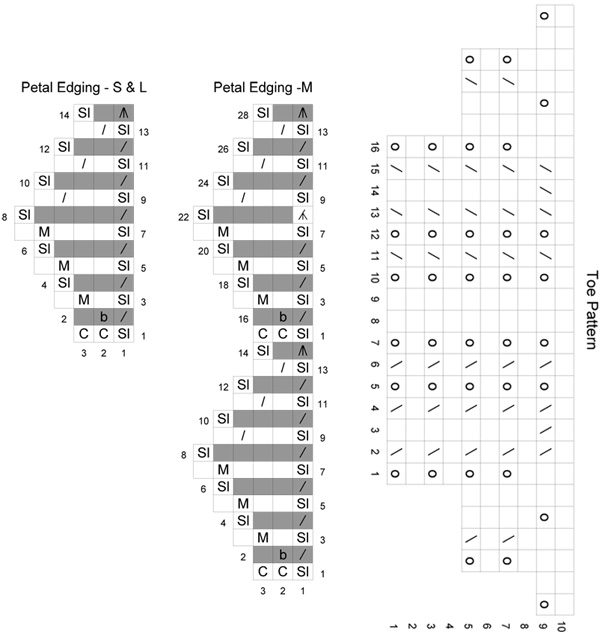
 Charts ChartsThe charts for this pattern are very large. Each fits on a letter-sized page. Click below and print each resulting page. |
|
DIRECTIONS TOE Using the Turkish Cast-On, CO 24[28, 32] sts. The first 12[14, 16] stitches will become the sole; the remaining stitches the instep; distribute stitches on needles accordingly. Setup: K6[7,8] to center of sole, place removable stitch marker to indicate start of round. Round 1: K to last st of sole, m1L, k2, m1R, k to last
st of instep, m1L, k2, m1R, k to end of round. 4 sts increased. Size S only: Size M only: Size L only:
Foot round 1: K1[1, 2], work Row 11 of Dayflower Left
pattern, k2, work Row 11 of Dayflower Right pattern, k to end
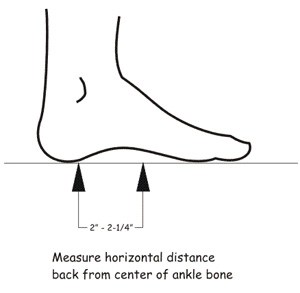
of round. Continue in pattern as set until sock hits a point on your foot 2[2, 2.25] inches before the ankle bone, ending with an even-numbered chart round. See diagram at right for a guide. Increase for Instep Shaping Sizes S & M only: Size L only: Heel Turn Step 1 Row 1 [RS]: K25[31 , 35], w&t. Row 2 [WS]: P24[30, 34], w&t. Row 3 [RS]: K23[29, 33], w&t. Row 4 [WS]: P22[28, 32], w&t. Row 5 [RS]: K21[27, 31], w&t. Row 6 [WS]: P20[26, 30], w&t. Row 7 [RS]: K19[25, 29], w&t. Row 8 [WS]: P18[24, 28], w&t. Row 9 [RS]: K17[23, 27], w&t. Row 10 [WS]: P16[22, 26], w&t. Row 11 [RS]: K15[21, 25], w&t. Row 12 [WS]: P14[20, 24], w&t. Row 13 [RS]: K13[19, 23], w&t. Row 14 [WS]: P12[18, 22], w&t. Size S only: Proceed to Heel Turn Step 2. Sizes M & L only: Size L only: Heel Turn Step 2: Size S only: Size M only: Size L only: Round 1: Insert needle upward through the wraps on the st you just worked and place them on left needle, k3tog (the first stitch of the round and the two wrap loops), work in pattern as set to marker, p2[2,3], k5, p2[2,3], k to 1 st before end of instep, insert needle from below into the wraps of the sole st; sl these loops to left needle and k3tog tbl (the last stitch of the instep and the two wrap loops). Round 2: K1[1, 2], work in pattern as set to marker, p2[2,3], k2,
yo, k1, yo, k2, p2[2, 3], work in pattern as set to end of round. At this point the two Dayflower panels which formed the instep have shifted part way around toward the sides of the ankle; as you work the ease decreases they will begin to climb straight up the sides. After a few decrease rows you may want to redistribute stitches on the needles for ease of working. ANKLE EASE DECREASES Sizes M and L only: Note: Setup for front Campanula panel is now complete; start
at Row 6 of appropriate size Campanula pattern in next round. Leg round: Work Dayflower Left, k3, work appropriate size of Campanula pattern, k3, work Dayflower Right, k3, work appropriate size of Campanula pattern, k3. Work even in pattern up the ankle for another 3 inches or until desired height; ending after a row 4 or 12 of the Dayflower pattern. CUFF SETUP 1) If you have just worked Row 2 of the Campanula pattern: 2) If you have just worked Row 4 of the Campanula Pattern: 3) If you have just worked Row 6 of the Campanula Pattern: 4) If you have just worked Row 8 of the Campanula Pattern: 5) If you have just worked Row 10 of the Campanula Pattern: 6) If you have just worked Row 12 of the Campanula Pattern: 56[60,64] sts. CUFF |
|
FINISHING |
| ABOUT THE DESIGNER |
|
Having survived several overlapping careers
in the performing arts, a stint as a computer
consultant and another as a culinary historian,
Lisa Grossman has returned to her early
passion for textiles and been reborn as
the Tsarina of Tsocks. She brings all of
the above - plus the kitchen sink and a
huge pile of knitted leaves - to her crazy-making
creations, which can be found here, as
well as on the feet and needles of many notable
knitting cognoscenti. Taught by her mother
and inspired by the independence of Elizabeth
Zimmermann, Lisa has been knitting for nearly half a century; she
vaguely remembers following a pattern once, before striking out
into her own road-less-traveled-by. She teaches her “Art
for your Feet” brand of inspired
lunacy, most recently at Sock Summit 2011.
She is the surviving co-author of Lobscouse & Spotted
Dog (which
one critic called "the only cookbook that will ever find a
place on my nightstand"), and has written for Tin House Literary
Quarterly, Napoleon Journal, the New York
Times, and Spindlicity. |
|
Pattern & images © 2011 Lisa Grossman. Contact Lisa |
 FOOT
FOOT