Knitty: little purls of wisdom
EarthFaire
Title
beauty shot

Tangy

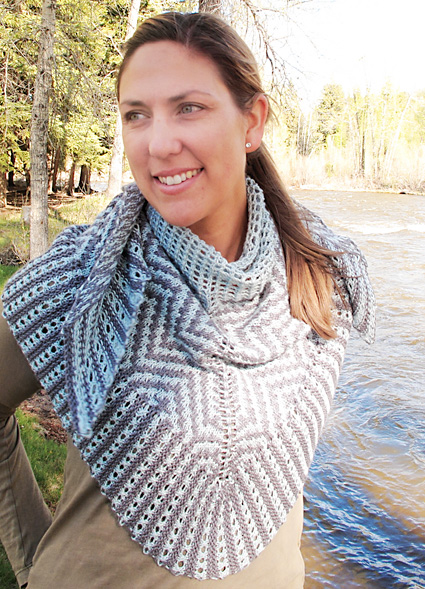
My visit to Cambridge last spring began with a walk across a small bridge over the River Cam. During the following days, as I wandered the walks, alleys and lanes of the colleges touring the buildings and gardens, I learned that this small bridge is popularly known as the Mathematical Bridge, a reference to its lines and angles. Though it may be small, the bridge is a wonder of construction that feeds the prevalent folklore of Cambridge.  Rumors hold that is put together without bolts or screws, that it was once taken apart and reassembled by prankster students, and that its design references Newton’s mathematical principles. 

Though I wasn’t taken in by its stories, the bridge enchanted me. As I worked through the design for this shawl, I chose patterns containing similar lines and angles. 

Constructed in an alpaca and silk blend, the shawl begins with a simple lace that drapes easily over the shoulders or under the chin. These eyelets first shift direction and then flow into the angles of the body of the shawl, which uses two contrasting colors in a chevron slipstitch pattern. Slipped stitches create a firm fabric that first clings to the shoulders and then resolves into the vertical stripes of a lace and garter border.

spacer model: Emily March
spacer photos: Susan Luni


SIZE
One

FINISHED MEASUREMENTS
Wingspan: 60 inches
Length of each outer edge: 38 inches
Depth at center of triangular section: 24 inches

spacer

MATERIALS
Yarn

Blue Sky Alpacas Alpaca Silk [50% alpaca/50% silk; 146 yd/133 m per 50g skein]
spacer [MC] 103 plume; 3 skeins
spacer [CC] 100 slate; 3 skeins

Recommended needle size
[always use a needle size that gives you the gauge listed below -- every knitter's gauge is unique]
spacer 1 36-inch US #5/3.75 mm circular needle
spacer 1 set US #4/3.5 mm straight needles or 1 short #4/3.5 mm circular needle

Notions
spacer Yarn needle
spacer Stitch markers

spacer

GAUGE

16 sts/24 rows = 4 inches in eyelet pattern with larger needle
24 sts/32 rows = 4 inches in slipstitch pattern with larger needle
16 sts/48 rows = 4 inches in garter stitch with smaller needle
22 sts/30 rows = 4 inches in stockinette with larger needle


PATTERN NOTES
[Knitty's list of standard abbreviations and techniques can be found here.]

M1L: Insert left needle, from front to back, under strand of yarn which runs between last stitch on left needle and first stitch on right needle; knit this stitch through back loop. 1 stitch increased.

M1R: Insert left needle, from back to front, under strand of yarn which runs between last stitch on left needle and first stitch on right needle; knit this stitch through front loop. 1 stitch increased.

Sl wyib: Slip the next st purlwise with the yarn held at the back.

Sl wyif: Slip the next st purlwise with the yarn held at the front.

spacerCharts
The charts for this pattern are very large. Each fits on a letter-sized page.
Click below and print each resulting page.

Slip stitch patternTransition pattern Both charts revised Nov 12, '11


DIRECTIONS
Section 1 
With MC using larger needle, cast on 5 sts
Row 1 [RS]:  K1, yo, k1, yo, pm, k1, yo, k1, yo, k1. 9 sts.

Rows 2 + 4 [WS]: Purl.

Row 3 [RS]:  K1, yo, k2tog, yo, k1, yo, sl marker, k1, yo, k1, yo, ssk, yo, k1.  13 sts.

Begin Eyelet Pattern;
Row 1 [RS]: K1, yo, [k2tog, yo] until 1 st rem before marker, k1, yo, sl marker, k1, yo, k1, [yo, ssk] to 1 st before end, yo, k1. 4 sts increased.

Row 2 [WS]: Purl.

Repeat the last 2 rows until there are 49 sts total, 24 each side with 1 in middle, ending with a RS row.  Knit the next WS row.

Begin Reverse Eyelet Pattern:
Row 1 [RS]: K1, yo, k1, [yo, ssk] to marker, yo, sl marker, k1, yo, [k2tog yo] to 2 sts before end, k1, yo, k1. 4 sts increased.

Row 2 [WS]: Purl.

Repeat the last 2 rows until there are 97 sts total, 48 each side with 1 in middle, ending with a WS row.

Transition between Section 1 and Section 2
The next two rows add 23 sts to each side (in addition to the 4 shaping increases) to compensate for the smaller gauge of the sl st pattern.

Row 1 [RS]:  With CC, k1, yo, k1, [sl1 wyib, M1L, k1] to marker, yo, slip  marker, k1, yo, [k1, M1R, sl1 wyib] to 2 sts before end,  k1, yo, k1. 147 sts.
Row 2 [WS]:  P3, [Sl 1 wyif, p2] to 2 sts before marker, p2, slip marker, p1, [p2, Sl 1 wyif] to last 3 sts, p3.  2 edge sts, 1 center st, 71 sts on each side.

Section 2
Note:
The slip stitch pattern only requires you work with 1 color at a time across a pair of rows – the stitches of the other color are slipped.  The working color changes every 2 rows. You may find it helpful to use markers to divide up the 24 sts of the repeat.  

Row 1 [RS]: Work Slip Stitch Pattern Right Side Row 1 to marker, work Slip Stitch Pattern Left Side Row 1 to end of row.
Row 2 [WS]: Work Slip Stitch Pattern Left Side Row 2 to marker, work Slip Stitch Pattern Right Side Row 2 to end of row.
Continue as set until all 12 rows of Charts are complete.

Work another 7 repeats of the Charts.

96 sts increased on each side. 339 sts total; 2 edge sts, 1 center st, 167 sts each side.

Transition to Border
Row 1 [RS]: Work Transition Pattern Right Side to marker, work Transition PatternLeft Side to end of row.
Row 2 [WS]: Work Transition Pattern Left Side to marker, work Transition PatternRight Side to end of row.

Work as set to end of Row 6 of chart.  Break MC.

After Row 8, work to end of row, using CC and backwards loop method, cast on 16 sts.
8 sts increased on each side. 355 sts total; 2 edge sts, 1 center st, 175 sts each side.

Border
Change to smaller needle for working. Shawl stitches remain on larger needle.

Note: Color in border should line up with color in Chart C.  The last st of an odd-numbered border row is worked together with same color st of shawl edge as an ssk to join the border to the shawl as it is knitted. 

Begin the first repeat with Row 3. On this row of the first repeat, the ssk is worked over 2 sts of the shawl border.  In subsequent rows and repeats, the ssk is worked over 1 st of the border and 1 st of the shawl.  Reattach MC at start of row 5 of first repeat.  Carry the color not in use along the edge of the border by twisting the colors at the beginning of all odd-numbered rows.

Edging Pattern
Row 1 [RS]: With CC, k16, ssk last st with next shawl st.

Row 2 [WS]: With CC, k.

Rows 3 and 4, repeat Rows 1 and 2.

Row 5 [RS]: With MC, k16, ssk last st with next shawl st.

Row 6 [WS] With MC, sl 1, p16.

Row 7 [RS]: With MC, [yo, ssk] 8 times, ssk last st with next shawl st.

Row 8 [WS]: With MC, p.

Repeat 8-row Edging Pattern to 1 st before marker.

Turn the corner:
Removing center marker as you go, work as follows:
Row 1 [RS]: With CC, k16, ssk last st with next shawl st.

Row 2 [WS]: With CC, k.

Row 3 [RS]: With CC, k17.

Turn so that WS is facing and pick up (but don’t knit) one loop of MC and place it on the right needle.

Row 4 [WS]: With CC, k.

Row 5 [RS]: With MC, k16, ssk last st with picked-up st.

Row 6 [WS] With MC, sl 1, p16.

Row 7 [RS]: With MC, [yo, ssk] 8 times, k1.

Row 8 [WS]: With MC, p.

Row 9 [RS]: With CC, k16, ssk last st with next shawl st.
Row 10 [WS]: With CC, k.
Row 11 [RS]: With CC, k17.

Turn so that WS is facing and pick up (but don’t knit) one loop of MC and place it on the right needle.

Row 12 [WS]: With CC, k.
Row 13 [RS]: With MC, k16, ssk last st with picked-up st.
Row 14 [WS] With MC, sl 1, p16.
Row 15 [RS]: With MC, [yo, ssk] 8 times, k1.
Row 16 [WS]: With MC, p.
Row 17 [RS]: With CC, k16, ssk last st with next shawl st.
Row 18 [WS]: With CC, k.
Row 19 [RS]: With CC, k17.
Row 20 [WS]: With CC, k.

You have completed the center turn of the border, 20 rows total.  Work Rows 5-8 of Edging Pattern, then continue, repeating Rows 1-8 across until 2 sts rem in shawl, ending with Row 4. 18 sts rem, 16 on border, 2 on shawl.

BO as follows: BO normally across first 15 sts, work ssk last border st with next shawl st, lift first st on right needle over this stitch to BO, and finish BO as normal.

spacer

FINISHING
Weave in ends.

Block to even out the slipstitch pattern, stretching aggressively, rounding the edging at the point of the shawl.  Use the YO at the edge of each MC stripe in the edging to anchor blocking wires or pins, picking up both the MC strand and the CC strand. 

spacer
ABOUT THE DESIGNER

After 25 years wrestling computers and other opponents, Susan Luni retired 15 years too early and lost her mind.  A year later, she found it under an unfinished afghan.  While finishing the afghan, she typed “yarn” in a search box and found forums about crochet, blogs about knitting and a whole new purpose for her computer. 

She can be found online most days, as the Lunitink on Ravelry and at her blog, 3 sleeves to the wind

spacer