

|
|
|

In my design life, I create sweaters for many different figures and moods. This spring, I knew I wanted to design something just for me. I love a sweater that makes me feel curvy, sexy, and just a touch retro. Vignette, knit in the ultimate "sweater girl" yarn, fits the bill. Constructed in pieces and then seamed for structure, Vignette is a soft and stylish cardigan with a plunging V neckline and vintage details. The three-quarter-length sleeves are decorated with a collection of miniature lace panels splaying out diagonally; the same lace panels decorate the front of the cardigan with the waist decreases worked inline. The hems are begun by knitting a band of 1x1 rib, turning a mitred corner, and then picking up the main body stitches from the side of the ribbing; the cardigan is knit in pieces from the ribbed pieces up and then seamed. The front button-bands are knit inline with the cardigan fronts and then extended past the shoulder bind-offs; they are sewn into the back neckline of the completed sweater. These details may seem a little fiddly, but just take it slowly and you'll have a wardrobe staple for years to come. Valley Yarns Sheffield is a perfect match for this project.
The combination of merino and silk give a smooth, soft hand and
the touch of angora provides a beautiful halo to the finished
piece. You won't be able to stop petting your sweater! If you
should desire to use an alternate yarn, please make sure it is
not excessively drapey at the specified gauge. |
||
|
|

|
Tweet
|
|
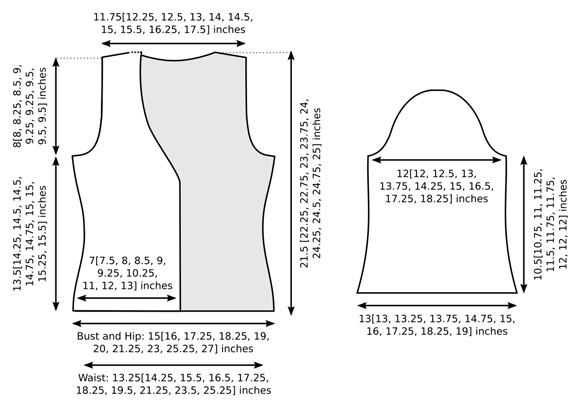
SIZE |
|
|
FINISHED MEASUREMENTS |
|
MATERIALS Notions |
|
GAUGE |
18 sts/26 rows = 4 inches in stockinette st using larger needles |
|
PATTERN NOTES |
|
M1L (left-leaning increase): Insert left needle, from front to back, under horizontal strand of yarn running between last stitch on left needle and first stitch on right needle; knit this stitch through back loop. 1 stitch increased. M1R (right-leaning increase): Insert left needle, from back to front, under horizontal strand of yarn running between last stitch on left needle and first stitch on right needle; knit this stitch through front loop. 1 stitch increased. Instructions for the Backward Loop Cast
On can be found here. Instructions for Mattress Stitch can be found here,
here and here. |
The charts for this pattern are very large and fit on a letter-sized page. Click here and print the resulting page. Note: Charts revised Nov 9/11 |
|
DIRECTIONS 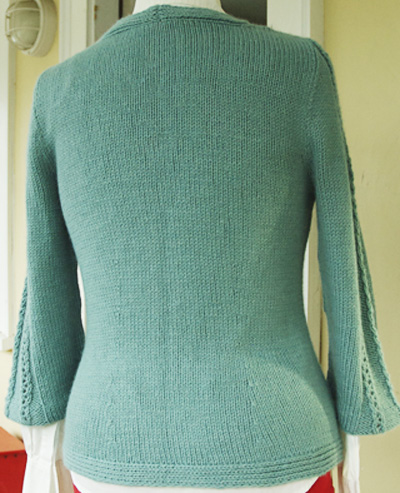
Ribbed Band: Using larger needles, CO 10 sts. Row 1 [WS]: P2, [k1, p1] to end. Row 2 [RS]: Sl 1, [p1, k1] to last st, k1. These 2 rows set 1x1 Rib for band. Continue in pattern until work measures 15[16, 17.25, 18.25, 19, 20, 21.25, 23, 25.25, 27] inches, ending with a WS row. Next Row [RS]: BO 9 sts, leaving last st on right needle. Rotate work 90 degrees clockwise, so that long edge with 2 k sts is facing up; RS is still facing. Pick up and k 67[71, 77, 81, 85, 89, 95, 103, 113, 121] sts along edge of ribbed band (68[72, 78, 82, 86, 90, 96, 104, 114, 122] sts including remaining st from BO). Next Row [WS]: P23[24, 26, 27, 29, 30, 32, 35, 38, 41], place
marker, p22[24, 26, 28, 28, 30, 32, 34, 38, 40], place marker,
p23[24, 26, 27, 29, 30, 32, 35, 38, 41]. Shape Waist: Work 13 rows in stockinette st, ending with a WS row. Work measures approx. 7 inches. Increase Row [RS]: K to marker, m1R, slip marker, k to next
marker, slip marker, m1L, k to end. Continue in stockinette st until work measures 13.5[14.25, 14.5, 14.5, 14.75, 14.75, 15, 15, 15.25, 15.5] inches, ending with a WS row. Shape Armholes: Sizes C, D, E, F, G, H, J, K Only: All Sizes: Continue in stockinette st until work measures 7[7, 7.25, 7.5, 8, 8.25, 8.25, 8.5, 8.5, 8.5] inches from beginning of armhole shaping (20.5[21.25, 21.75, 22, 22.75, 23, 23.25, 23.5, 23.75, 24] inches from lower edge of piece), ending with a WS row. Next Row [RS]: K14[15, 16, 16, 17, 17, 18, 18, 19, 20] and place these sts on st holder for right shoulder; BO next 24[24, 26, 28, 30, 32, 32, 34, 36, 38] sts, k to end. 14[15, 16, 16, 17, 17, 18, 18, 19, 20] sts. Shape Left Shoulder: Work 2 more rows in stockinette st. Work measures 8[8, 8.25,
8.5, 9, 9.25, 9.25, 9.5, 9.5, 9.5] inches from beginning of armhole
shaping (21.5[22.25, 22.75, 23, 23.75, 24, 24.25, 24.5, 24.75,
25] inches from lower edge of piece). Shape Right Shoulder: P 1 row. 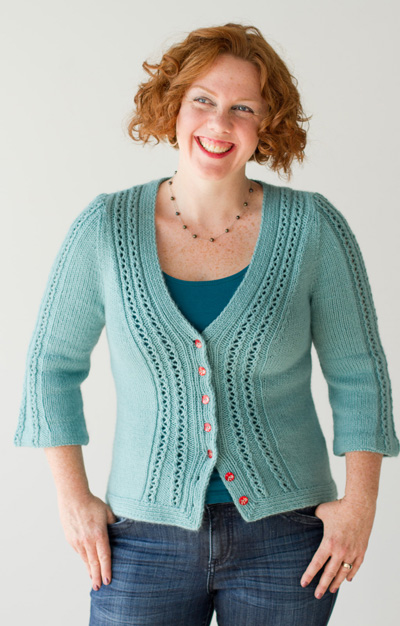 Ribbed Band: Using larger needles, CO 10 sts. Row 1 [WS]: P2, [k1, p1] to end. Row 2 [RS]: Sl 1, [p1, k1] to last st, k1. These 2 rows set 1x1 Rib for band. Continue in pattern until work measures 7[7.5, 8, 8.5, 9, 9.25, 10.25, 11, 12, 13] inches, ending with a WS row. Front corner is shaped using short rows, as follows: With RS facing, continuing from end of last row, pick up and k 32[34, 36, 38, 40, 42, 46, 50, 54, 58] sts along edge of ribbed band; total of 41[43, 45, 47, 49, 51, 55, 59, 63, 67] sts on needle. Set-up Row [WS]: P16[18, 20, 22, 24, 26, 30, 34, 38, 42], place
marker, work Row 1 of Lower Front Chart over next 16 sts, place
marker, work in pattern to end. Buttonhole Row [RS]: [K1, p1] twice, k1, yo, k2tog, continue
in pattern to end of row. Continue in pattern until you have worked all rows of Lower Front Chart. 37[39, 41, 43, 45, 47, 51, 55, 59, 63] sts. From this point on, work sts between markers following Lace
Rib Chart. Increase Row [RS]: Work in pattern to second marker, slip marker,
m1L, k to end. Continue in pattern until work measures 11.5[12.25, 12.5, 12.5, 12.75, 12.75, 13, 13, 13.25, 13.5] inches (2 inches less than back to underarm), ending with a WS row. Note: Read ahead! Neckline shaping and armhole shaping are worked at the same time. Shape Neckline: AT THE SAME TIME: Next Row [WS]: BO 6[6, 6, 6, 6, 6, 6, 8, 8, 10] sts, work in pattern to end. Sizes C, D, E, F, G, H, J, K Only: All Sizes: Continue in pattern, shaping neckline as set, until work measures 8[8, 8.25, 8.5, 9, 9.25, 9.25, 9.5, 9.5, 9.5] inches from beginning of armhole shaping (21.5[22.25, 22.75, 23, 23.75, 24, 24.25, 24.5, 24.75, 25] inches from lower edge of piece), ending with a RS row. When all armhole and neckline shaping has been worked, 21[22, 23, 23, 24, 24, 25, 25, 26, 27] sts remain. 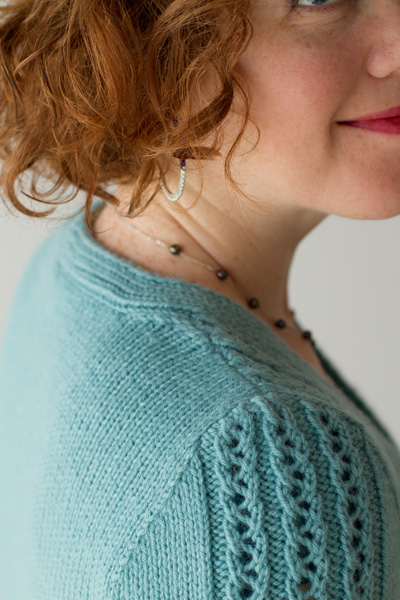 Next Row [WS]: BO 6[7, 7, 7, 8, 8, 8, 8, 9, 9] sts, work in pattern to end. Work 1 row in pattern. Next Row [WS]: BO 6[6, 7, 7, 7, 7, 8, 8, 8, 9] sts, CO 1 st using backward loop method, work in pattern to end. 10 sts. Back Collar Extension: LEFT FRONT Front corner is shaped using short rows, as follows: 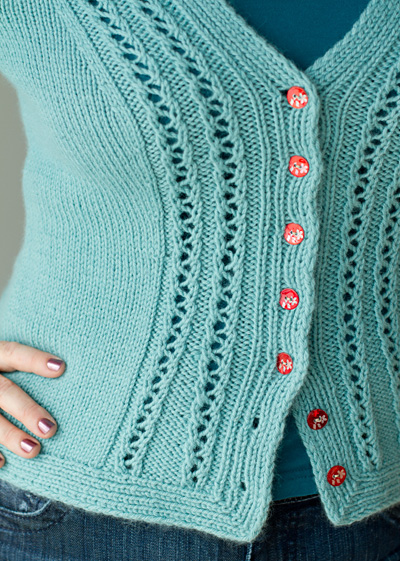 Set-up Row [WS]: Work in pattern to marker, work Row 1 of Lower
Front Chart over next 16 sts, place marker, p16[18, 20, 22, 24,
26, 30, 34, 38, 42]. Continue in pattern until you have worked all rows of Lower Front Chart. 37[39, 41, 43, 45, 47, 51, 55, 59, 63] sts. From this point on, work sts between markers following Lace
Rib Chart. Increase Row [RS]: K to first marker, m1R, slip marker, work
in pattern to end. Continue in pattern until work measures 11.5[12.25, 12.5, 12.5, 12.75, 12.75, 13, 13, 13.25, 13.5] inches (2 inches less than back to underarm), ending with a WS row. Note: Read ahead! Neckline shaping and armhole shaping are worked at the same time. Shape Neckline: AT THE SAME TIME: Next Row [RS]: BO 6[6, 6, 6, 6, 6, 6, 8, 8, 10] sts, work in
pattern to end. Sizes C, D, E, F, G, H, J, K Only: All Sizes: Continue in pattern, shaping neckline as set, until work measures 8[8, 8.25, 8.5, 9, 9.25, 9.25, 9.5, 9.5, 9.5] inches from beginning of armhole shaping (21.5[22.25, 22.75, 23, 23.75, 24, 24.25, 24.5, 24.75, 25] inches from lower edge of piece), ending with a WS row. When all armhole and neckline shaping has been worked, 21[22, 23, 23, 24, 24, 25, 25, 26, 27] sts remain. Shape Shoulder: Work back collar extension as for right front. 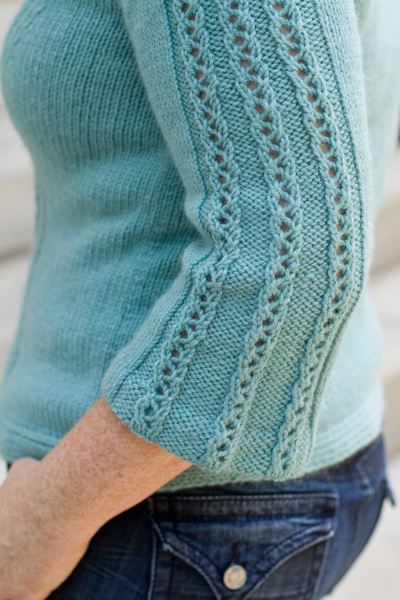 Hem Facing: Using smaller needles, CO 59[59, 61, 63, 67, 69, 73, 79, 83, 87] sts. Work in stockinette st until work measures 1 inch, ending with a WS row. Switching to larger needles, p 1 RS row, forming a turning ridge
for hem. Work in pattern until you have completed Row 15 of Sleeve Chart. 55[55, 57, 59, 63, 65, 69, 75, 79, 83] sts. Shaping Row [RS]: K1, m1R, work in pattern to last st, m1L,
k1. Continue in pattern until work measures 10.5[10.75, 11, 11.25, 11.5, 11.75, 11.75, 12, 12, 12] inches from turning ridge or desired length to underarm, ending with a WS row. When all rows of Sleeve Chart have been completed, work sts between markers following Lace Rib Chart. Shape Sleeve Cap: Sizes C, D, E, F, G, H, J, K Only: All Sizes: Sizes A, B, C, D, E, F, H, J, K Only: Sizes B, C, F, G, H Only: All Sizes: BO 2[2, 2, 2, 2, 2, 2, 3, 3, 3] sts at beginning of next 4 rows. |
|
|
FINISHING Note: Mattress stitch recommended for seams in this pattern
(see Pattern Notes). |
| ABOUT THE DESIGNER |
|
|
|
Pattern & images © 2011 Amy Herzog. Contact Amy |