Knitty: little purls of wisdom
Purl on the Lamb
Title
beauty shot
Tangy

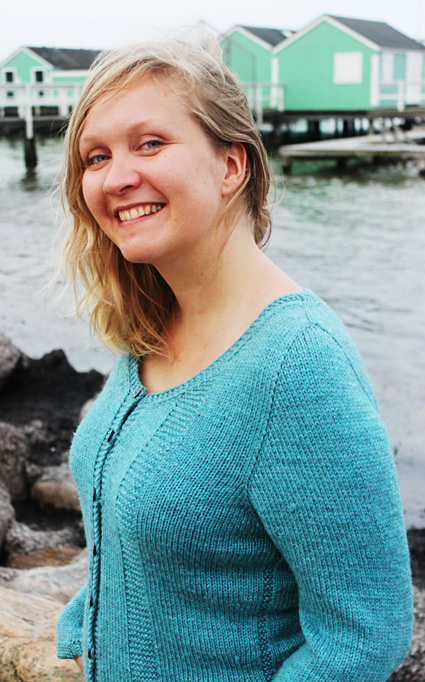
This yarn, in my absolute favorite color, had been in my stash for quite a while. I wanted it to become something perfect! Being a big sweater knitter, I was just waiting for the right pattern to come along. When I discovered the contiguous sleeve method developed by Susie Myers, I couldn't believe my luck -- a top-down sweater, with set in style sleeves, without any picking up of stitches along the armhole edge or even seaming!

I wanted the garment to be simple, yet interesting. In the beginning I didn't really have a plan as such -- I just started knitting, using the contiguous method, and the garment grew in my hands. Dreading the long stretches of stockinette stitch on an adult sweater, I added some garter stitch details. As the garment grew, so grew my expectations to the final result.

The cardigan turned out just like I wanted it. The garter stitch accents make for an interesting knit, while also helping to keep track of where you are. Waist shaping on the back is hidden in the garter stitch panel, which emphasizes the waist. About 2 inches of negative ease is recommended.

spacer model: Dieuwke van Mulligen
spacer photos: Lisbeth
   Pin It!


SIZE
XS [S, M, L, 1X, 2X, 3X]
shown in size M with 2 inches of negative ease

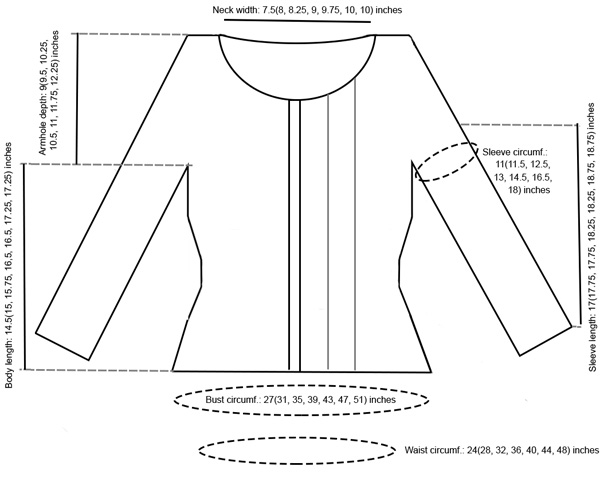
FINISHED MEASUREMENTS
To fit chest: 29[33, 37, 41, 45, 49, 53] inches.
Actual garment measurements: 27[31, 35, 39, 43, 47, 51] inches.

spacer

MATERIALS
Yarn

spacer Cascade Yarns 220 Superwash [100% superwash wool; 220 yards/100g skein], color: Summer Sky Heather/1910, 4[5, 5, 6, 6, 7, 7] skeins

Recommended needle size
[always use a needle size that gives you the gauge listed below -- every knitter's gauge is unique]
spacer 1 set US #2.5/3mm double-point needles (or circular needle of any length)
spacer 32-inch/80 cm US #6/4mm circular needle
spacer 1 set of US #6/4mm double-point needles (or circular needle of any length) to work sleeves

Notions
spacer 8 stitch markers
spacer stitch holders or waste yarn for sleeve sts
spacer a short length of contrasting color waste yarn for provisional cast on (if needed)
spacer yarn needle

spacer

GAUGE

21 sts/28 rows = 4" in stockinette stitch
20 sts/36 rows = 4" in garter stitch
 

PATTERN NOTES
[Knitty's list of standard abbreviations and techniques can be found here.]

Figure eight cast on: Holding the two needles together, wrap the yarn around them in a figure eight motion. So: lay the yarn over the needle farthest away from you, the working end between the needles. Wrap the yarn under and around the needle closest to you, then bring it up between the needles. Wrap it over and around the needle away from you. Repeat until you have the desired number of stitches.

Provisional cast on: There are tutorials for working a provisional cast on here and here

slpwyf: slip stitch purlwise with yarn in front

Work buttonhole [RS]: Work to last 5 sts, k2, yo, k2tog, k1.

M1LP [Make 1 Left Purl]: Insert left hand needle, from back to front, under strand of yarn which runs between last stitch on left needle and first stitch on right needle; purl this stitch through front loop. 1 stitch increased.

M1RP [Make 1 Right Purl]: Insert left needle, from front to back, under strand of yarn which runs between next stitch on left needle and last stitch on right needle; purl this stitch through back loop.

Magic Loop method: if you are unfamiliar with the Magic Loop method of using circular needles there is a good tutorial here

DIRECTIONS

spacer
BODY
Neck band:
Using US 6/4mm circulars
EITHER: holding the needles together, cast on 8 sts (4 on each needle) using the figure eight cast on. Put 4 sts on hold using a stitch holder or waste yarn.

OR: using your preferred provisional cast on method, cast on 4 sts.

Row 1 [RS]: Slpwyf, k3.
Row 2 [WS]: K4.
Repeat Rows 1 and 2 a total of 60[66, 66, 72, 76, 80, 80] times, ending with a WS row.
You now have 30[33, 33, 36, 38, 40, 40] garter ridges.

Next row [RS]: Slpwyf, k3. Turn the needle around the corner of the work, and with the working yarn, pick up and knit 30[33, 33, 36, 38, 40, 40] sts along the garter edge (one stitch between each garter ridge). Place the 4 held/provisional sts on left needle and knit across them. 38[41, 41, 44, 46, 48, 48] sts on the needles.

Set up and place markers [WS]: Slpwyf, k3, (buttonband sts), pm, pm (left front sts will be between these two markers), p1 (shoulder st), pm, p1 (left back st), pm, (k1, kfb) 12[14, 14, 15, 17, 17, 17] times, k2[1, 1, 2, 0, 2, 2] (back garter panel), pm, p1 (right back st), pm, p1 (shoulder st), pm, pm (right front sts will be between these two markers), k4 (buttonband sts). 4 sts for each buttonband; 1 st for each shoulder, 1 st at each side of back; back garter st panel 38[43, 43, 47, 51, 53, 53] sts; 50[55, 55, 59, 63, 65, 65] sts in total.

Work shoulder increases:
Note: Shoulder sts are indicated in bold.
Shoulders are formed by increasing on both sides of the shoulder st on every row.

Set up row [RS]: Slpwyf, k3, sl first marker, M1R, sm, k1, sm, M1L, k1, sm, k to m, sm, k1, M1R, sm, k1, sl first marker, M1L, sm, k4. 54[59, 59, 63, 67, 69, 69] sts. 4 sts increased.

Row 1 [WS]: Slpwyf, k3, sm, p to m, M1LP, sm, p1, sm, M1RP, p to m, sm, k to m, sm, p to m, M1LP, sm, p1, sm, M1RP, p to m, sm, k4. 58[63, 63, 67, 71, 73, 73] sts. 4 sts increased.

Row 2 [RS]: Slpwyf, k3, sm, k to m, M1R, sm, k1, sm, M1L, k to m, sm, k to m, sm, k to m, M1R, sm, k1, sm, M1L, k to m, k4. 62[67, 67, 71, 75, 77, 77] sts. 4 sts increased.

Repeat Rows 1 and 2 2[2, 4, 5, 5, 5, 6] times more, then Row 1 once more. 82[87, 103, 115, 119, 121, 129] sts. 20[20, 36, 44, 44, 44, 52] sts increased.

Work sleeve increases:
Note: Sleeve sts are indicated in bold; the shoulder stitch is now part of the sleeve sts.
Sleeve increases are made by increasing on the inside of the shoulder st markers on every RS row.

Row 3 [RS]: Slpwyf, k3, sm, k to m, sm, M1L, k to m, M1R, sm, (k to m, sm) 3 times, sm, M1L, k to m, M1R, sm, k to m, sm, k4. 86[91, 107, 119, 123, 125, 133] sts. 4 sts increased.

Row 4 [WS]: Slpwyf, k3, sm, p to m, sm, p to m, sm, p to m, sm, k to m, sm, p to m, sm, p to m, sm, work in pattern to m, sm, k4.

Repeat Rows 3 and 4 2[3, 3, 4, 5, 7, 7] more times.
There should now be 4 sts for each buttonband; 8[8, 12, 14, 14, 14, 16] sts for each front section; 7[9, 9, 11, 13, 17, 17] sts for each sleeve; 56[61, 69, 77, 81, 83, 87] sts across the back. 94[103, 119, 135, 143, 153, 161] total sts. 8[12, 12, 16, 20, 28, 28] sts increased.

spacer
Start front increases:
Note: Front increases are made one st outside the buttonband on every RS row.

Row 5 [RS]: Slpwyf, k3, sm, k1, M1L, k to m, sm, M1L, k to m, M1R, sm, (k to m, sm) 3 times, M1L, k to m, M1R, k to one st before m, M1R, k1, sm, k4. 100[109, 125, 141, 149, 159, 167] sts. 6 sts increased.

Row 6 [WS]: Slpwyf, k3, sm, p to m, sm, p to m, sm, p to m, sm, k to m, sm, p to m, sm, p to m, sm, work in pattern to m, sm, k4.

Repeat Rows 5 and 6 3 more times.

There should now be 4 sts for each buttonband; 12[12, 16, 18, 18, 18, 20] sts for each front section; 15[17, 17, 19, 21, 25, 25] sts for each sleeve; 56[61, 69, 77, 81, 83, 87] sts across the back. 118[127, 143, 159, 167, 177, 185] total sts. 18 sts increased.

Work front garter panel:
Row 7 [RS]: Rep Row 5. 124[133, 149, 165, 173, 183, 191] sts. 6 sts increased.

Row 8 [WS]: Work as Row 6 to 1 st before final marker, k1, sm, k4.
This is the beginning of the front garter panel; from now on the stitch just worked knitwise is worked knitwise on every row.

Rows 9, 11, 13, 15, 17 and 19 [RS]: Rep Row 5.

Row 10 [WS]: Work as Row 6 to 2 sts before final marker, k2, sm, k4.

Row 12 [WS]: Work as Row 6 to 3 sts before final marker, k3, sm, k4.
Row 14 [WS]: Work as Row 6 to 4 sts before final marker, k4, sm, k4.
Row 16 [WS]: Work as Row 6 to 5 sts before final marker, k5, sm, k4.
Row 18 [WS]: Work as Row 6 to 6 sts before final marker, k6, sm, k4.
Row 20 [WS]: Work as Row 6 to 7 sts before final marker, k7, sm, k4.
There should now be 4 sts for each buttonband; 19[19, 23, 25, 25, 25, 27] sts for each front section; 29[31, 31, 33, 35, 39, 39] sts for each sleeve; 56[61, 69, 77, 81, 83, 87] sts across the back. 160[169, 185, 201, 209, 219, 227] total sts. 36 sts increased. Front garter panel is now 7 sts wide.

Row 21 [RS]: Rep Row 5. 166[175, 191, 207, 215, 225, 233] sts. 6 sts increased.
Row 22 [WS]: Slpwyf, k3, sm, p to m, sm, p to m, sm, p to m, sm, k to m, sm, p to m, sm, p to m, sm, work in pattern to 9 sts before last marker, pm, k7, pm, p to last marker, sm, k4.
Front garter panel is now set up between markers. On subsequent rows, remember to work the 7 sts of the front garter panel between markers knitwise on every row.

Repeat Rows 21 and 22 1[3, 3, 5, 7, 8, 10] times more.
There should now be 4 sts for each buttonband; 21[23, 27, 31, 33, 34, 38] sts for each front section; 33[39, 39, 45, 51, 57, 61] sts for each sleeve; 56[61, 69, 77, 81, 83, 87] sts across the back. 172[193, 209, 237, 257, 273, 293] total sts.

Row 23 [RS]: Slpwyf, k3, sm, k1, M1L, k1, M1L, work in pattern (remember sleeve incs!) until 2 sts before buttonband marker, M1R, k1, M1R, k1, k4.
Row 24 [WS]: Rep Row 22.

Rep Rows 21-24 once more.

There are 8[10, 10, 12, 14, 15, 17] sts between the buttonband and the front garter panel. There should now be 4 sts for each buttonband; 26[28, 32, 36, 38, 39, 43] sts for each front section; 39[45, 45, 51, 57, 63, 67] sts for each sleeve; 56[61, 69, 77, 81, 83, 87] sts across the back. 194[215, 231, 259, 279, 295, 315] total sts.

Turn buttonband:
Left side of buttonband (work short rows as follows to create tab):
Row 1 [RS]: Slpwyf, k3, turn.
Row 2 [WS]: K4, turn.
Rep Rows 1 and 2 3 times more. 8 short rows worked in garter st.
Row 3 [RS]: BO 3 sts; turn work 90 degrees and pick up 4 sts along the edge (one between each garter ridge) sm; work in pattern to first sleeve m, *sm, M1L, k to m, M1R, sm*, work in pattern to next sleeve m, repeat from * to *, work in pattern to end. 41[47, 47, 53, 59, 65, 69] sts for each sleeve.

spacer
Right side of buttonband (work short rows as follows to create tab):
Row 1 [WS]: Slpwyf, k3, turn.

Row 2 [RS]: K4, turn.

Rep Rows 1 and 2 once more.

Row 3 [WS]: Slpwyf, k1, yo, k2tog, turn.

Row 4 [RS]: K4, turn.

Repeat Rows 1 and 2 once more. 8 short rows worked in garter st.

Row 5 [WS]: BO 3 sts; turn work 90 degrees and pick up 4 sts along the edge (one between each garter ridge) sm; work in pattern to end.

There should now be 5 sts for each buttonband; 26[28, 32, 36, 38, 39, 43] sts for each front section; 41[47, 47, 53, 59, 65, 69] sts for each sleeve; 56[61, 69, 77, 81, 83, 87] sts across the back. 200[221, 237, 265, 285, 301, 321] total sts.

Buttonhole:
Work buttonhole as instructed in Pattern Notes every 20th row (8 garter ridges between buttonholes).

Sleeve increases only:
Sizes XS, M, XL, 2XL and 3XL only: Row 25 [RS]: Slpwyf, k4, work in pattern to first sleeve m, *sm, M1L, k to m, M1R, sm*, work in pattern to next sleeve m, repeat **, work in pattern to end. 4 sts increased.

Row 26 [WS]: Work in pattern to end.

All Sizes: There should now be 5 sts for each buttonband; 26[28, 32, 36, 38, 39, 43] sts for each front section; 43[47, 49, 53, 61, 67, 71] sts for each sleeve; 56[61, 69, 77, 81, 83, 87] sts across the back. 204[221, 241, 265, 289, 305, 325] total sts.

Body and sleeve increases:
Note: Body increases are worked by increasing on the outside of the sleeve markers on every RS row.

Row 27 [RS]: Slpwyf, k4, work in pattern to one st before first sleeve m, *M1R, k1, sm, M1L, k to m, M1R, sm, k1, M1L*, work in pattern to one st before next sleeve m, repeat from * to *, work in pattern to end. 8 sts increased.
Row 28 [WS]: Work in pattern to end.

Repeat Rows 27 and 28 4[4, 4, 4, 4, 6, 10] more times.
There should now be 5 sts for each buttonband; 31[33, 37, 41, 43, 46, 53] sts for each front section; 53[57, 59, 63, 71, 81, 91] sts for each sleeve; 66[71, 79, 87, 91, 97, 107] sts across the back. 244[261, 281, 305, 329, 361, 405] total sts.

Body increases only:
Row 29 [RS]: Slpwyf, k4, work in pattern to one st before first sleeve m, *M1R, k1, sm, k to m, sm, k1, M1L*, work in pattern to one st before next sleeve m, repeat from * to *, work in pattern to end. 4 sts increased.
Row 30 [WS]: Work in pattern to end.

Repeat Rows 29 and 30 1[3, 4, 5, 8, 10, 10] more times.
There should now be 5 sts for each buttonband; 33[37, 42, 47, 52, 57, 64] sts for each front section; 53[57, 59, 63, 71, 81, 91] sts for each sleeve; 70[79, 89, 99, 109, 119, 129] sts across the back. 252[277, 301, 329, 365, 405, 449] total sts.

Separate sleeves and body:
Next row [RS]: *Work in pattern to sleeve marker, put sleeve sts on waste yarn; CO 2 sts using backwards loop cast on, pm (side marker), CO 2 sts,* rep from * to *, work in pattern to end.
There should now be 5 buttonband sts; 35[39, 44, 49, 54, 59, 66] sts for each front; 74[83, 93, 103, 113, 123, 133] sts between side markers for back; 144[161, 181, 201, 221, 241, 265] body sts in total.
Note: On subsequent rows, work the st on each side of the side markers knitwise on every row, in order to create a fake side seam in garter st.

spacer
Body and waist shaping:
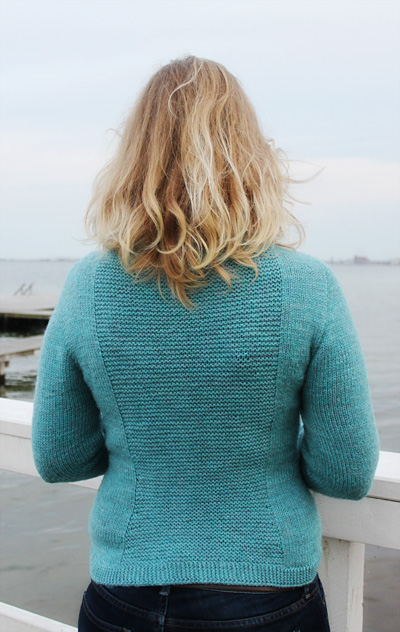
Work straight in pattern for 2 inches, ending with a WS row.

Decrease row [RS]: Work in pattern to 7 sts before side m, ssk, work in pattern to back garter panel marker, k1, k2tog, work in pattern to 3 sts before next marker, ssk, work in pattern to 5 sts after side m, k2tog, work in pattern to end. 4 sts decreased.

Work the Decrease row every 1.25 inches (approximately every 8th row) a total of 4 times.

Work straight for 1.5 inches.

Increase row [RS]: Work in pattern to 6 sts before side m, M1L, work to back garter panel marker, k1, kfb, work in pattern to 1 st before next marker, kfb, work in pattern to 6 sts after side m, M1R, work in pattern to end.

Repeat the Increase row every 1.25 inches a total of 4 times.
Work straight until body measures 11.75[12, 13, 13.75, 13.75, 14.5, 14.5] inches from armhole.

Ribbing:
Note: The garter stitch ribbing will be worked back and forth at a 90 degree angle to the work.

Change to 3mm / US 2.5 needles.

Set up row [WS]: Using backwards loop cast on, CO 7 sts.

Row 1 [RS]: Slpwyf, k5, k2tog (k the last st together with the first st on the body), turn.
Row 2 [WS]: K to end.

Repeat Rows 1 and 2 until all body sts have been worked.
BO all sts.

spacer
SLEEVES
Change to US#6 needles, and using Magic Loop method or DPNs, pick up and knit 2 sts from the cast on body sts, knit sleeve sts, pick up and knit 2 more sts from the cast on body sts, pm. 57[61, 63, 67, 75, 85, 95] sts on needles.

Continue working in the round in st st until sleeve measures 4 inches from underarm.

Decrease rnd: k1, k2tog, k until 3 sts before m, ssk.

Repeat Decrease rnd every 1.25 inches until sleeve measures 16.5[17, 17, 17.25, 17.25, 17.75, 17.75] inches.

Sleeve ribbing:
Change to 3mm / US 2.5 needles.

Set up row [WS]: Using a provisional cast on, CO 5 sts.

Row 1 [RS]: Slpwyf, k3, k2tog (k the last st together with the first st on the sleeve), turn.

Row 2 [WS]: K to end.

Rep Rows 1 and 2 until all sleeve sts have been worked, graft the sts together with the provisionally cast on sts.

spacer

FINISHING
Weave in ends, gently block to measurements. Take especial care of the garter stitch panel on the back, as that might want to stretch more than the rest of the garment.

spacer
ABOUT THE DESIGNER

designernamespacer Dieuwke is a spinner and a knitter with a way too big stash. She has always got an idea on the needles, and packs for at least 3 different knitting projects when going on a weekend trip.

You can watch her blog for occasional ramblings about what's happening in her life.

spacer