
|
| |
||
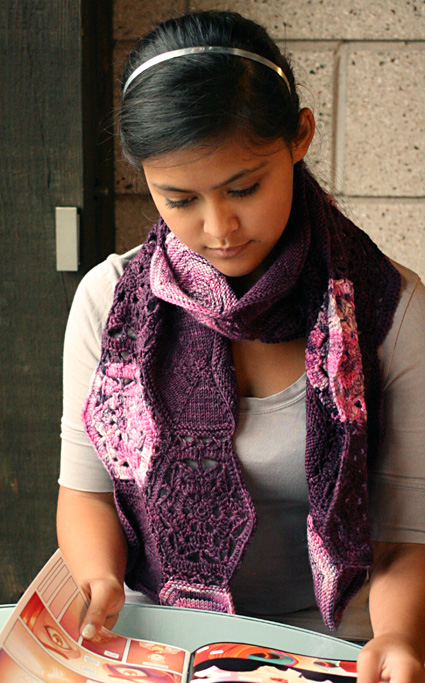
 by Miriam Felton a·pi·cul·ture: noun Miriam dreams of owning some land, raising vegetables, chickens, and bees. She pours over books of chicken breeds and heirloom seed catalogs dreaming of the day she can build her little self-sufficient farm. And what farm would be complete without bees to pollinate the crops and make delectable honey. The hexagonal motifs in this piece are reminiscent of honeycombs. These hexagons can be arranged in a multitude of ways! Don't feel limited by the diagram or the scarf shape if you get a creative urge to do something different! The wonderful thing about motifs is that once you've made a bunch you can lay them out and play around with what you want to make. For this project we made a scarf, but you could easily add another column or two of motifs and make a wrap, or use this layout and make a triangular shawl. You could make a lot of motifs and end up with a blanket too! |
||
|
|
||
|
SIZE |
|
FINISHED MEASUREMENTS |
|
MATERIALS Notions |
|
GAUGE |
| 24 sts/32 rounds = 4 inches in stockinette stitch 12 dc = 2 inches |
|
PATTERN NOTES |
|
Chain: ch You can find hexagonal graph paper for plotting your design layout before making all the motifs here. Adjust your hook or needle size so that both knit and crochet motifs block to the same size (your knit motifs will probably have a larger difference after blocking than the crochet motifs, but both will benefit from a good soaked blocking). Disappearing Loop method for a circular start: Instructions can be found here. Here's an alternate layout if you wish to have a triangular shawl instead. You would need 40 motifs to work the triangular shawl layout as shown. How you divide up these 40 into knit and crochet is up to you. If you want a more open shawl, work more crochet motifs. If you want a more solid shawl, work more knit motifs. The finished shawl in the layout below would be about 78" across the wingspan. |
|
DIRECTIONS Round 1: Ch2, 6sc in first chain, sl st in first sc of rnd. Fasten off. Weave in ends. Knit Motif: Cast on 6 sts using the disappearing loop method; distribute sts across needles as you prefer and join for working in the round. Note: the single knit stitch between the two increases is the "corner stitch", as identified in the joining instructions. Round 1: Kfb 6 times. 12 sts. BO purlwise. |
|
|
FINISHING Joining: Make a slip knot on your hook, and sl st in the corner stitch of the Front Motif. Ch2, sl st in the corner stitch of the Back Motif. Ch2, skip 1 st on the Front Motif and sl st in the 2nd st, (ch2, skip 3 sts on the Back Motif and sl st in the 4th. ch2, skip 3 sts on the Front Motif and sl st in the 4th) 3 times, ch2, sl st in the corner stitch of the Back Motif. Fasten off. Join all motifs in each column, then join the columns together in the same way. You can block again if desired, or you can just spray the joins with water and stretch them out a bit so they relax. Weave in ends from the joining. |
| ABOUT THE DESIGNER |
|
Miriam can be found on on the web at miriamfelton.com, and on Twitter @mimknits. Amy O'Neill Houck blogs at thehookandi.com and tweets @plainsight. Amy and Miriam both have patterns on ravelry.com. |
| Pattern & images © 2014 Amy O'Neill Houck + Miriam Felton. Contact Miriam |