|
|
|
|||
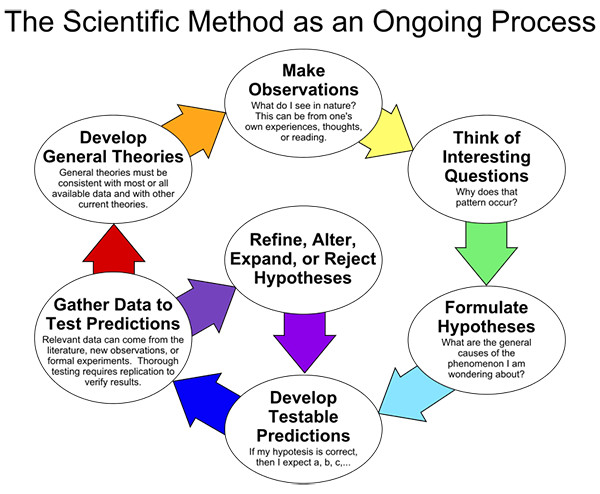
How to Make Great Cloth The Scientific Method
Googling "Scientific Method" led me to the flowchart above on Wikipedia. I tracked down the original creator, Dr. Theodore Garland Jr., Professor of Biology at at University of California, Riverside. He gave me permission to share it with you. I found the full slideshow fascinating. How this method applies to design Once you have your sampling information in hand, you analyze it to see if your hypothesis is supported. The hypothesis is either rejected or accepted. Perhaps do further testing and modifying where necessary. You prove your hypothesis by completing a project or perhaps you make another project until you feel you have the result you are looking for or you may abandon this path and start on a new one. An important last step in this process is that you share the results with others by publishing, posting, blogging, or entering a show. This allows us to build upon each other's work — crediting our sources as we go, as I did with the flowchart and my conversation with Stefanie. There is no end game. This is an iterative processes on which we build a body of knowledge that allows us to gain deeper and deeper understanding in our field of interest. If you stick with it, you begin to create work that furthers our field. The folks that do this are the people that we recognize as designers. Creativity is not necessarily something given to some and held back from others; it is a muscle that can be worked. Sampling I've come to embrace my sampling time as the most liberating of the design process. If you haven't read the Get Warped column in Knitty's 2015 First Fall on Yarn Selection, do that before starting to sample. Here are some sampling tips that I shared in the latest Yarnworker newsletter (sign up here):
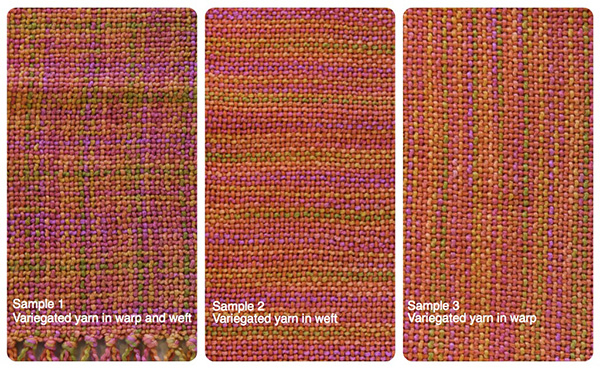
Because I had three samples, I also could test various finishing techniques and ways of wet finishing. All these samples are sett at 8 ends per inch for a balance plain weave and have been washed. Any one of these would have made a perfectly fine piece of cloth. I chose Sample 3 because I like the long painterly brush-stroke. My sett checked out ok, and although I tried various hemstitches, the fancy knotting worked best. Here another project that takes advantage of variegated sock yarn. This is a yarn almost every knitter has in their stash and sometimes struggle to make it do what they want it to do in woven cloth.
|
|||
 by Liz Gipson
Sock yarn is such a draw for weavers. It is available in high-yardage put-ups and comes in gorgeous variegated and self-striping colorways. Most sock yarns are made with either superwash wool or nylon for added wear. These yarns are designed to stretch, but keep their shape in the wash. They don't full or shrink. This poses some challenges for weavers.
|
|||
|
|
|||
|
SIZE |
|
FINISHED MEASUREMENTS (laid flat) |
|
MATERIALS Project specifications
|
|
PATTERN NOTES |
|
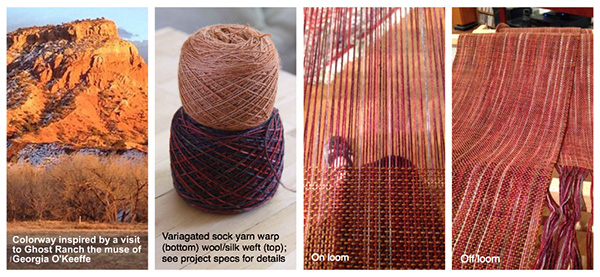
Deciding Your Sett You are aiming for a warp dominant cloth — more visible warp than weft in the final cloth. Yarn wants to bend in the direction where the majority of the yarn is oriented. If you have more warp than weft in the cloth, it will drape in that direction. (See Yarnworker's Terms if you need to freshen up on the language of the loom). In the photo below, you can see how much the yarn changes on and off the loom. The fabric on the loom is translucent while the fabric off the loom is not. Color will shift the look of your variegated yarn a lot. The pumpkin color shifted the purples to rust, giving the sunset on mesas effect I was looking for. I experimented with other colors before I settled on this one.
|
| SETUP Warping Warp the loom following the project specs. Center the warp in the rigid heddle for 10". For the direct warping method, thread 10'' worth of slots. (Warping loom video refresher here.) Wind the warp on the back beam adding packing paper between the layers. Move one thread in each slot to a hole to its left. Tie the warp on the front apron rod and adjust for even tension. |
|
DIRECTIONS Start by weaving about 1'' of scrap yarn to spread the warp evenly. It doesn't matter if you start in an up or down shed. Using your project weft, open the next shed and insert your first pick, leaving a short tail of about 6". Change sheds, tuck the tail in the new shed and then bring it out between two warp ends. Continuing weaving, maintaining the weft angle as you go. This allows the weft enough room to travel over and under the warp ends and keep your fabric from pulling in at the edges. If you have loops at the edges your weft angle is too steep. Beat the yarn gently as you weave to maintain a consistent number of picks per inch. WeavingWind 2 shuttles, one with a smooth scrap yarn, and the other with your weft yarn. To give yourself a good foundation and to spread the warp, start by weaving a piece about 1.5 inches long with scrap yarn. It doesn't matter if you start in an up or down shed. Using your project weft, open the next shed and insert your first pick leaving a tail of about 6 inches. Change sheds, tuck the tail in the new shed and then bring it out between two warp ends. Lay in the next pick at about a 60 degree angle and beat (see top photo at right). Continuing weaving, as you do maintain your weft angle. This will allow the weft enough room to travel over and under the warp ends and keep your fabric from pulling in at the edges. If you have loops at the edges, called selvedges, your weft angle is too steep, Beat the yarn gently as you weave to maintain a consistent number of wefts per inch. (See middle photo.) Your goal is to get the same number of warp and weft ends in an inch of weaving. Don't over think this, though. The goal is to get a few projects under your belt, not perfection! FINISHING Remove the scarf from the loom by cutting the warp behind the rigid heddle and untying the warp from the front apron rods. Using small embroidery scissors and working carefully, cut the scrap yarn in half. Remove half of the scarp and tie the warp in bundles of four warp ends using an overhand knot. Using a 1/8 cup of mild detergent, machine wash on gentle cycle in warm water. Trim fringe to desired length. |
| ABOUT THE DESIGNER |
She recently lanched Yarnworker, a source for indepentantly published patterns and know-how for the rigid-heddle loom. |
Text & images © 2015 Liz Gipson. Contact Liz |