|
Part 1: Cast on
This CO uses two strands of yarn. The included photos show two different colored yarns for demonstration purposes, but you would use the same color yarn.
Hold two strands of yarn together and make a slip knot, leaving a 4-6 inch tail. Loop the slip knot onto needle. Designate one strand as yarn tail (attach a safety pin or removable marker). The other is the working yarn.
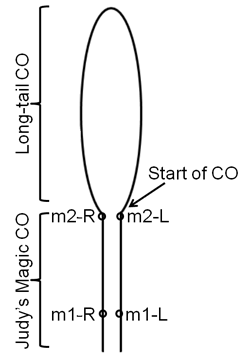
Using long-tail cast on, not counting the slip knot, CO 89[94, 100, 104, 112, 116, 120] sts (see below).
Place marker (designated as m2-R) and CO one more st.
These stitches will form the halter/straps portion of the vest.
Bring the two ends of the circular needle together with sts about evenly distributed on each side (as for setting up for Magic Loop) and moved toward the ends of the needles. Position so that needle tips are facing left and the needle with the marker is on top.
Place a second marker (designated m2-L) on the lower needle.
You have been working before with the yarn tail on the thumb and the working yarn on the pointer finger. Switch their positions so that the tail is on the pointer finger and the working yarn on the thumb. The st after m2-R is the first st for Judy's Magic cast on.
Using Judy's Magic cast on, CO so that after the markers, there are 45[45, 44, 43, 42, 41, 39] sts on each needle, or 90[90, 88, 86, 84, 82, 78] sts total (this total includes that extra st created with the Long Tail CO). If you are working bust darts, you need to CO more sts here, so make sure to do so before moving on to the next step. You should now have something that looks like the photo below:
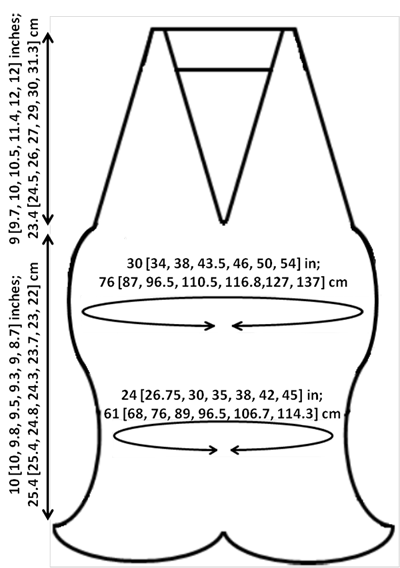
179[184, 188, 190, 196, 198, 198] sts total — not including extra sts required for bust shaping.
Break the "tail" yarn and turn work. WS is now facing and you should see a line of purl bumps. Move working yarn around the right side of the yarn tail and between the needles to the back.
Pull bottom needle out and start working instructions for the set-up.
Part 2: Set-up
Note: The first couple of rows will be a little difficult to work. You need to fiddle with the cable of the circular needle.
For the set-up, you will work first half of magic CO sts to m2-R, then all the long-tail CO sts to m2-L, and then the second half of the magic CO sts, placing the m1-R and m1-L markers as you go (see diagram below). For some of the sizes, you will also work some short rows during the set-up.
Set-up row [WS]: K9 tbl, pm (designated m1-R), k35[35, 34, 33, 32, 31, 29] tbl, you are now at the last long-tail CO st, k that st through the front loop, sl m2-R and STOP.
Note: How you complete the row depends on the size you are making. Identify the instructions for your size and continue:
Sizes S, L, 1X & 3X ONLY:
Continue set-up row [WS]: K to 2 sts past m2-R, w&t.
Next row [RS]: K to 4 sts before m1-R, w&t.
Next row [WS]: K to m2-R, k to 2 sts past the previously wrapped st, w&t.
Next row [RS]: K to m2-R, k to 4 sts before the next wrapped st (the first one you encounter), w&t
Repeat the last two rows –[2, –, 2, 4, –, 0] more times.
 All sizes continue All sizes continue
Continue set-up row [WS]: K to m2-R, k89[94, 100, 104, 112, 116, 120]. You are now at the slip knot where the long-tail cast on started. Drop the slip-knot from the needle and sl m2-L.
You will continue onto the secon d half of the magic CO sts. You will making a loop with the long-tail CO sts anchored on either side by the magic CO sts. This is a little like joining to work in the round, so you want to make sure that your long-tail CO sts are not twisted as you start working the rest of the sts after the join. d half of the magic CO sts. You will making a loop with the long-tail CO sts anchored on either side by the magic CO sts. This is a little like joining to work in the round, so you want to make sure that your long-tail CO sts are not twisted as you start working the rest of the sts after the join.
Sizes S, L, 1X & 3X ONLY:
Continue set-up row [WS]: K –[32, –, 30, 29, –, 26], w&t.
Next row [RS]: K to 2 sts past m2-L, w&t.
Next row [WS]: K to m2-L, k to 4 sts before the previously wrapped st, w&t
Next row [RS]: K to m2-L, k to 2 st past the wrapped st (the first one you encounter), w&t.
Repeat the last two rows –[2, –, 2, 4, –, 0] more times.
Next row [WS]: K to m2-L, -[36, -, 34, 33, -, 30], pm (designated m1-L), k9.
Sizes XS, M, 2X only, Continue set-up row [WS]: K36[—, 35, –, -, 32, -], pm (designated m1-L), k9.
Turn work, ready to start an RS row. Attach a removable marker or safety pin to mark the RS of work.
The set-up is finished, and when RS is facing, you should have something that resembles the diagram above..
Part 3: Front
The front is worked in sections alternating between the left and the right sides. The left and right sides mirror one another, with m1-L and m2-L marking the left side and m1-R and m2-R marking the same places on the right side. The left side is worked first. Short row shaping occurs between m2-L and m2-R, between m1-L and m2-L as well as between lower front edge and m1-L. The lower front edge is shaped with increases and decreases.
Section-L-1 (left side section)
Row 1 [RS]: Slp 1 wyif, k to 4 sts past m2-L, w&t.
Row 2 [WS]: K to 20[20, 20, 20, 18, 18, 18] sts before m1-L, w&t.
Row 3 [RS]: K past m2-L to 3[4, 4, 5, 5, 6, 6] sts past the first wrapped st you encounter, w&t.
Row 4 [WS]: K to 3 sts before end, kfb, k2. 1 st increased.
Row 5 [RS]: Slp 1 wyif, k to 6 sts before m1-L, w&t.
Row 6 [WS]: K to end.
Row 7 [RS]: Slp 1 wyif, k past m2-L to 3[4, 4, 5, 5, 6, 6] sts past the first wrapped st you encounter, w&t.
Row 8 [WS]: K to 3 sts before end, kfb, k2. 1 st increased.
Sizes XS & S ONLY
Row 8a [RS]: Slp 1 wyif, k to 3 sts before m1-L, w&t.
Row 8b [WS]: K to end.
All sizes
Row 9 [RS]: Slp 1 wyif, k past m2-L to 3[4, 4, 5, 5, 6, 6] sts past the first wrapped st you encounter, w&t.
Row 10 [WS]: K to end.
Row 11 [RS]: Slp 1 wyif, k to 6[6, 3, 3, 3, 3, 3] sts before m1-L, w&t.
Row 12 [WS]: K to 3 sts before end, kfb, k2. 1 st increased.
All sizes EXCEPT for 1X
Row 13 [RS]: Slp 1 wyif, k past m2-L to 3[4, 4, 5, –, 6, 6] sts past the first wrapped st you encounter, w&t.
Row 14 [WS]: K to 10[10, 10, 10, –, 9, 6] sts before m1-L, w&t.
All sizes
Last row [RS]: K to end.
Section-R-1 (Right side section):
Row 1 [WS]: Slp 1 wyif, k to 4 sts past m2-R, w&t.
Row 2 [RS]: K to 20[20, 20, 20, 18, 18, 18] sts before m1-R, w&t.
Row 3 [WS]: K past m2-R to 3[4, 4, 5, 5, 6, 6] sts past the first wrapped st you encounter, w&t.
Row 4 [RS]: K to 3 sts before end, kfb, k2. 1 st increased.
Row 5 [WS]: Slp 1 wyif, k to 6 sts before m1-R, w&t.
Row 6 [RS]: K to end.
Row 7 [WS]: Slp 1 wyif, k past m2-R to 3[4, 4, 5, 5, 6, 6] sts past the first wrapped st you encounter, w&t.
Row 8 [RS]: K to 3 sts before end, kfb, k2. 1 st increased.
Sizes XS & S ONLY
Row 8a [WS]: Slp 1 wyif, k to 3 sts before m1-R, w&t.
Row 8b [RS]: K to end.
All sizes
Row 9 [WS]: Slp 1 wyif, k past m2-R to 3[4, 4, 5, 5, 6, 6] sts past the first wrapped st you encounter, w&t.
Row 10 [RS]: K to end.
Row 11 [WS]: Slp 1 wyif, k to 6[6, 3, 3, 3, 3, 3] sts before m1-R, w&t.
Row 12 [RS]: K to 3 sts before end, kfb, k2. 1 st increased.
All sizes EXCEPT for 1X
Row 13 [WS]: Slp 1 wyif, k past m2-R to 3[4, 4, 5, –, 6, 6] sts past the first wrapped st you encounter, w&t.
Row 14 [RS]: K to 10[10, 10, 10, –, 9, 6] sts before m1-R, w&t.
All sizes
Last row [WS]: K to end.
Work Section-L-1 and then Section-R-1 2[2, 3, 3, 4, 4, 4] more times.
Important note: You have worked half of the front. The second half will be worked almost the same except for a few details.
If you are working bust darts, you will start decreases on the next row. See Pattern Notes.
Section-L-2 (left side section)
Row 1 [RS]: Slp 1 wyif, k to 4 sts past m2-L, w&t.
Row 2 [WS]: K to 20[20, 20, 20, 18, 18, 18] sts before m1-L, w&t.
Row 3 [RS]: K past m2-L to 3[4, 4, 5, 5, 6, 6] sts past the first wrapped st you encounter, w&t.
Row 4 [WS]: K to 4 sts before end, k2tog, k2. 1 st decreased.
Row 5 [RS]: Slp 1 wyif, k to 6 sts before m1-L, w&t.
Row 6 [WS]: K to end.
Row 7 [RS]: Slp 1 wyif, k past m2-L to 3[4, 4, 5, 5, 6, 6] sts past the first wrapped st you encounter, w&t.
Row 8 [WS]: K to 4 sts before end, k2tog, k2. 1 st decreased.
Sizes XS & S ONLY
Row 8a [RS]: Slp 1 wyif, k to 3 sts before m1-L, w&t.
Row 8b [WS]: K to end.
All sizes
Row 9 [RS]: Slp 1 wyif, k past m2-L to 3[4, 4, 5, 5, 6, 6] sts past the first wrapped st you encounter, w&t.
Row 10 [WS]: K to end.
Row 11 [RS]: Slp 1 wyif, k to 6[6, 3, 3, 3, 3, 3] sts before m1-L, w&t.
Row 12 [WS]: K to 4 sts before end, k2tog, k2. 1 st decreased.
All sizes EXCEPT for 1X
Row 13 [RS]: Slp 1 wyif, k past m2-L to 3[4, 4, 5, –, 6, 6] sts past the first wrapped st you encounter, w&t.
Row 14 [WS]: K to 10[10, 10, 10, –, 9, 6] sts before m1-L, w&t.
All sizes
Last row [RS]: K to end.
Section-R-2 (Right side section):
Row 1 [WS]: Slp 1 wyif, k to 4 sts past m2-R, w&t.
Row 2 [RS]: K to 20[20, 20, 20, 18, 18, 18] sts before m1-R, w&t.
Row 3 [WS]: K past m2-R to 3[4, 4, 5, 5, 6, 6] sts past the first wrapped st you encounter, w&t.
Row 4 [RS]: K to 4 sts before end, k2tog, k2. 1 st decreased.
Row 5 [WS]: Slp 1 wyif, k to 6 sts before m1-R, w&t.
Row 6 [RS]: K to end.
Row 7 [WS]: Slp 1 wyif, k past m2-R to 3[4, 4, 5, 5, 6, 6] sts past the first wrapped st you encounter, w&t.
Row 8 [RS]: K to 4 sts before end, k2tog, k2. 1 st decreased.
Sizes XS & S ONLY
Row 8a [WS]: Slp 1 wyif, k to 3 sts before m1-R, w&t.
Row 8b [RS]: K to end.
All sizes
Row 9 [WS]: Slp 1 wyif, k past m2-R to 3[4, 4, 5, 5, 6, 6] sts past the first wrapped st you encounter, w&t.
Row 10 [RS]: K to end.
Row 11 [WS]: Slp 1 wyif, k to 6[6, 3, 3, 3, 3, 3] sts before m1-R, w&t.
Row 12 [RS]: K to 4 sts before end, k2tog, k2. 1 st decreased.
All sizes EXCEPT for 1X
Row 13 [WS]: Slp 1 wyif, k past m2-R to 3[4, 4, 5, –, 6, 6] sts past the first wrapped st you encounter, w&t.
Row 14 [RS]: K to 10[10, 10, 10, –, 9, 6] sts before m1-R, w&t.
All sizes
Last row [WS]: K to end.
Work Section-L-2 and then Section-R-2 2[2, 3, 3, 4, 4, 4] more times.
Part 3: Sides
Size XS only:
Row 1 [RS]: Slp 1 wyif, k to 3 sts before m1-L, w&t.
Row 2 [WS]: K to end.
Row 3 [RS]: Slp 1 wyif, k to 6 sts before m1-L, w&t.
Row 4 [WS]: K to end.
Row 5 [RS]: Slp 1 wyif, k to end.
Row 6 [WS]: Slp 1 wyif, k to 3 sts before m1-R, w&t.
Row 7 [RS]: K to end.
Row 8 [WS]: Slp 1 wyif, k to 6 sts before m1-R, w&t
.
Row 9 [RS]: K to end.
Size S only:
Row 1 [RS]: Slp 1 wyif, k to 6 sts past m1-L, w&t.
Row 2 [WS]: K to end.
Row 3 [RS]: Slp 1 wyif, k to 3 sts before m1-L, w&t.
Row 4 [WS]: K to end.
Row 5 [RS]: Slp 1 wyif, k to end.
Row 6 [WS]: Slp 1 wyif, k to 6 sts past m1-R, w&t.
Row 7 [RS]: K to end.
Row 8 [WS]: Slp 1 wyif, k to 3 sts before m1-R, w&t.
Row 9 [RS]: K to end.
Size M only:
Row 1 [RS]: Slp 1 wyif, k to 3 sts before m1-L, w&t.
Row 2 [WS]: K to end.
Row 3 [RS]: Slp 1 wyif, k to 6 sts before m1-L, w&t.
Row 4 [WS]: K to end.
Row 5 [RS]: Slp 1 wyif, k to 6 sts before m1-L, w&t.
Row 6 [WS]: K to end.
Row 7 [RS]: Slp 1 wyif, k to 3 sts before m1-L, w&t.
Row 8 [WS]: K to end.
Row 9 [RS]: Slp 1 wyif, k to end.
Row 10 [WS]: Slp 1 wyif, k to 3 sts before m1-R, w&t.
Row 11 [RS]: K to end.
Row 12 [WS]: Slp 1 wyif, k to 6 sts before m1-R, w&t.
Row 13 [RS]: K to end.
Row 14 [WS]: Slp 1 wyif, k to 6 sts before m1-R, w&t.
Row 15 [RS]: K to end.
Row 16 [WS]: Slp 1 wyif, k to 3 sts before m1-R, w&t.
Row 17 [RS]: K to end.
Size L only:
Row 1 [RS]: Slp 1 wyif, k to 6 sts past m1-L, w&t.
Row 2 [WS]: K to end.
Row 3 [RS]: Slp 1 wyif, k to 3 sts before m1-L, w&t.
Row 4 [WS]: K to end.
Row 5 [RS]: Slp 1 wyif, k to 6 sts before m1-L, w&t.
Row 6 [WS]: K to end.
Row 7 [RS]: Slp 1 wyif, k to 9 sts past m1-L, w&t.
Row 8 [WS]: K to end.
Row 9 [RS]: Slp 1 wyif, k to 3 sts before m1-L, w&t.
Row 10 [WS]: K to end.
Row 11 [RS]: Slp 1 wyif, k to 6 sts before m1-L, w&t.
Row 12 [WS]: K to end.
Row 13 [RS]: Slp 1 wyif, k to 12 sts past m1-L, w&t.
Row 14 [WS]: K to end.
Row 15 [RS]: Slp 1 wyif, k to end.
Row 16 [WS]: Slp 1 wyif, k to 6 sts past m1-R, w&t.
Row 17 [RS]: K to end.
Row 18 [WS]: Slp 1 wyif, k to 3 sts before m1-R, w&t.
Row 19 [RS]: K to end.
Row 20 [WS]: Slp 1 wyif, k to 6 sts before m1-R, w&t.
Row 21 [RS]: K to end.
Row 22 [WS]: Slp 1 wyif, k to 9 sts past m1-R, w&t.
Row 23 [RS]: K to end.
Row 24 [WS]: Slp 1 wyif, k to 3 sts before m1-R, w&t.
Row 25 [RS]: K to end.
Row 26 [WS]: Slp 1 wyif, k to 6 sts before m1-R, w&t.
Row 27 [RS]: K to end.
Row 28 [WS]: Slp 1 wyif, k to 12 sts past m1-R, w&t.
Row 29 [RS]: K to end.
Size 1X only:
Row 1 [RS]: Slp 1 wyif, k to end.
Size 2X only:
Row 1 [RS]: Slp 1 wyif, k to 6 sts past m1-L, w&t.
Row 2 [WS]: K to end.
Row 3 [RS]: Slp 1 wyif, k to 3 sts before m1-L, w&t.
Row 4 [WS]: K to end.
Row 5 [RS]: Slp 1 wyif, k to 9 sts past m1-L, w&t.
Row 6 [WS]: K to end.
Row 7 [RS]: Slp 1 wyif, k to 12 sts past m1-L, w&t.
Row 8 [WS]: K to end.
Row 9 [RS]: Slp 1 wyif, k to 6 sts before m1-L, w&t.
Row 10 [WS]: K to end.
Row 11 [RS]: Slp 1 wyif, k to 15 sts past m1-L, w&t.
Row 12 [WS]: K to end.
Row 13 [RS]: Slp 1 wyif, k to end.
Row 14 [WS]: Slp 1 wyif, k to 6 sts past m1-R, w&t.
Row 15 [RS]: K to end.
Row 16 [WS]: Slp 1 wyif, k to 3 sts before m1-R, w&t.
Row 17 [RS]: K to end.
Row 18 [WS]: Slp 1 wyif, k to 9 sts past m1-R, w&t.
Row 19 [RS]: K to end.
Row 20 [WS]: Slp 1 wyif, k to 12 sts past m1-R, w&t.
Row 21 [RS]: K to end.
Row 22 [WS]: Slp 1 wyif, k to 6 sts before m1-R, w&t.
Row 23 [RS]: K to end.
Row 24 [WS]: Slp 1 wyif, k to 15 sts past m1-R, w&t.
Row 25 [RS]: K to end.
Size 3X only:
Row 1 [RS]: Slp 1 wyif, k to 6 sts past m1-L, w&t.
Row 2 [WS]: K to end.
Row 3 [RS]: Slp 1 wyif, k to 9 sts past m1-L, w&t.
Row 4 [WS]: K to end.
Row 5 [RS]: Slp 1 wyif, k to 12 sts past m1-L, w&t.
Row 6 [WS]: K to end.
Row 7 [RS]: Slp 1 wyif, k to 15 sts past m1-L, w&t.
Row 8 [WS]: K to end.
Row 9 [RS]: Slp 1 wyif, k to end.
Row 10 [WS]: Slp 1 wyif, k to 6 sts past m1-R, w&t.
Row 11 [RS]: K to end.
Row 12 [WS]: Slp 1 wyif, k to 9 sts past m1-R, w&t.
Row 13 [RS]: K to end.
Row 14 [WS]: Slp 1 wyif, k to 12 sts past m1-R, w&t.
Row 15 [RS]: K to end.
Row 16 [WS]: Slp 1 wyif, k to 15 sts past m1-R, w&t.
Row 17 [RS]: K to end.
All sizes:
Last side row [WS]: Slp 1 wyif, k to m2-R, removing all markers along the way. These 45[45, 44, 43, 42, 41, 39] sts will not be worked for the next part.
Loosely bind off from the next st to m2-L. Remove m2-L and bind off one more st. You should have bound off 89[94, 100, 104, 112, 116, 120] sts.
K to end, removing all markers (working 45[45, 44, 43, 42, 41, 39] sts).
There should be 45[45, 44, 43, 42, 41, 39] sts on each side.
Do not break yarn. Turn work to continue working left back.
Part 4: Left Back
Row 1 [RS]: Slp 1 wyif, k1, k2tog, k to 4 sts before end, k2tog, k2. 2 sts decreased.
Row 2 [WS]: Slp 1 wyif, k to end.
Repeat these two rows 3[3, 3, 2, 2, 2, 1] more times. 37[37, 36, 37, 36, 35, 35] sts.
Next row [RS]: Slp1 wyif, k to end.
Next row [WS]: Slp1 wyif, k to end.
Next row [RS]: Slp1 wyif, k to 4 sts before end, k2tog, k2. 1 st decreased.
Next row [WS]: Slp1 wyif, k to end.
Repeat these four rows 3[3, 2, 3, 2, 1, 1] more times. 33 sts rem.
Work another 18[26, 30, 42, 48, 60, 74] rows of garter (with slipped edge as set), ending with WS row.
Work button band in seed stitch as follows:
Row 1 [RS]: Slp 1 wyif, [p1, k1] to end.
Row 2 [WS]: Slp 1 wyif, [p1, k1] to end.
Row 3, buttonhole row [RS]: Slp 1 wyif, p1, k1, [yo, k2tog, p1, k1, p1, k1] 5 times.
Row 4 [WS]: Slp 1 wyif, [p1, k1] to end.
Row 5 [RS]: Slp 1 wyif, [p1, k1] to end.
Bind off all sts in pattern and break yarn.
Part 5: Right Back
You will now work the 45[45, 44, 43, 42, 41, 39] sts that were on hold. With RS facing, attach yarn and work the right back.
Row 1 [RS]: Slp 1 wyif, k1, k2tog, k to 4 sts before end, k2tog, k2. 2 sts decreased.
Row 2 [WS]: Slp 1 wyif, k to end.
Repeat these two rows 3[3, 3, 2, 2, 2, 1] more times.
Next row [RS]: Slp1 wyif, k to end.
Next row [WS]: Slp1 wyif, k to end.
Next row [RS]: Slp1 wyif, k1, k2tog, k to end. 1 st decreased.
Next row [WS]: Slp1 wyif, k to end.
Repeat these four rows 3[3, 2, 3, 2, 1, 1] more times. 33 sts.
Work another 18[26, 30, 42, 48, 60, 74] rows of garter (with slipped edge as set), ending with WS row.
Next 5 rows, work seed stitch edging: Slp 1 wyif, [p1, k1] to end.
Bind off in pattern and break yarn.
|