
|
|
|
|

In 2010, an Italian-led consortium announced they had decoded the complete genome of the Golden Delicious apple. It had the highest number of genes (57,000) of any plant genome studied to date. Some things seem more complicated than they are. Here's a sweater that adds up to more than the sum of its parts: delicate lace, stately cables, elegant waist and neckline shaping. An allover stitch pattern keeps things interesting in between. Each simple little element builds upon the others. Full-bodied, tart and sweet with a crisp finish. Delicious. |
||
|
SIZE |
|
|
FINISHED MEASUREMENTS |
|
MATERIALS Notions |
|
GAUGE |
|
PATTERN NOTES |
|
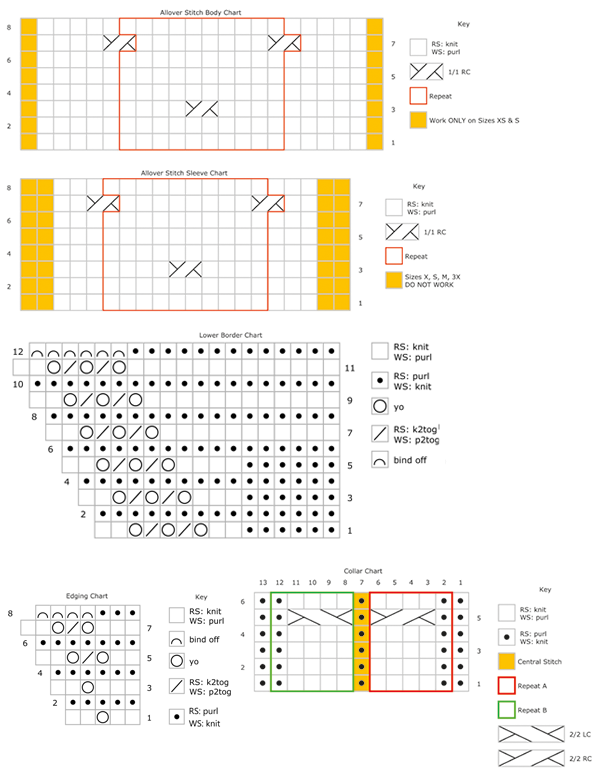
Cardigan is worked back and forth in rows. Lower borders on body and sleeves are worked first, then pieces are picked up and worked from upper edges of borders. Collar and edging are worked flat, then sewn together. Except for collar, all pieces are worked in Allover Stitch Pattern (see chart). Collar pieces are sewn using whipstitch (butted), rather than mattress st (overlapping), see diagram. |
|
base charts, all sizes (updated 1/7/16) |
|
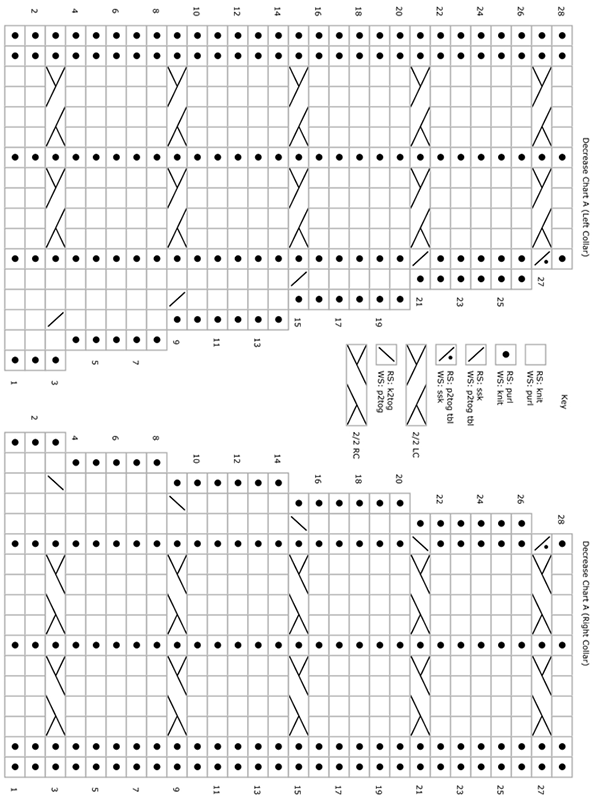
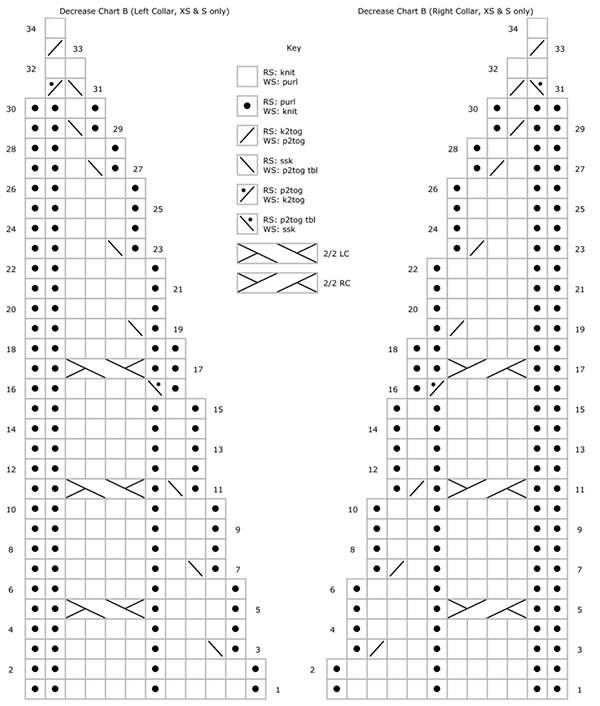
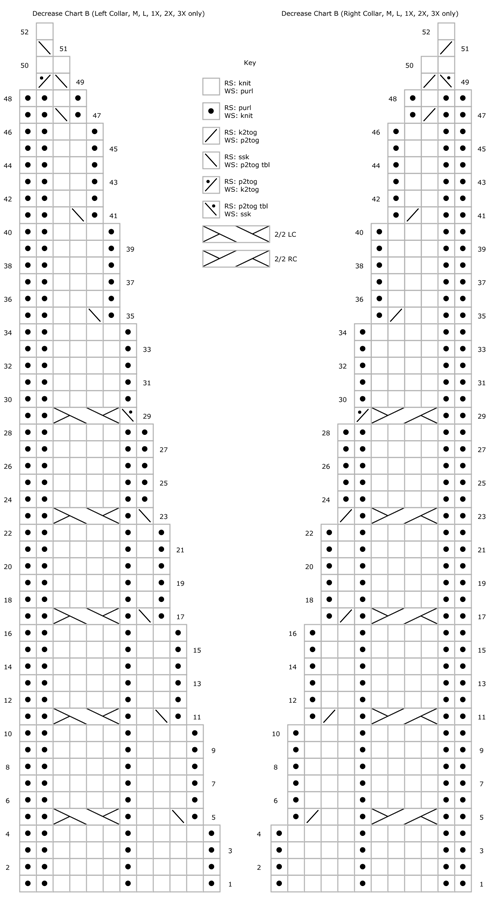
DIRECTIONS BO all sts. Body Next Row [WS]: P 43[48, 55, 60, 65, 70, 75], PM, p 86[96, 110, 120, 130, 140, 150], PM, p 43[48, 55, 60, 65, 70, 75] to end. Work even in Allover Stitch Body Chart until piece measures 1.5 inches from pick-up row, ending with a WS row. Waist Shaping Note: where decreases happen in the middle of a crossed stitch, work in St st instead. Repeat Decrease Row every 4th row 7 more times. 140[160, 188, 208, 228, 248, 268] sts. Work even in patt until piece measures 7 inches from pick-up row, ending with a WS row. Increase Row [RS]: [Work in patt to last 2 sts before marker, M1R, k2, sl marker, k2, M1L] twice, work in patt to end of row. 4 sts inc’d Repeat Increase Row every 8th row 3 more times, incorporating new sts into Allover Stitch pattern. 156[176, 204, 224, 244, 264, 284] sts. Work even in patt until piece measures 11[11.5, 12.5, 13, 13.5, 14, 14.5] inches, ending with a WS row. Separation Row [RS]: Work to last 3[5, 5, 5, 6, 6, 7] sts before marker and place on hold for Right Front, BO 6[10, 10, 10, 12, 12, 14] removing marker. Work to last 3[5, 5, 5, 6, 6, 7] sts before next marker and place on hold for Back, BO 6[10, 10, 10, 12, 12, 14] removing marker, work rem 36[39, 46, 51, 55, 60, 64] sts (Left Front) in patt to end. Make a note of the last chart row worked to ensure all pieces follow correctly. Left FrontWork 1 WS row even. Next Row [RS]: BO 0[2, 3, 4, 5, 6, 6] sts, work in patt to end. NOTE: READ AHEAD - Armhole and Neck Shaping are worked at the same time. Armhole Shaping Row [RS]: K1, ssk, work in patt to end. 1 st dec’d When all shaping is complete, 13[14, 15, 15, 18, 18, 20] sts rem Work even in patt until armhole measures 6.75[7, 7.25, 7.5, 7.75, 8, 8.25] inches BO 5[5, 5, 5, 6, 6, 7] sts at beg of next RS row, BO 4[5, 5, 5, 6, 6, 7] sts at beg of next RS row, BO 4[4, 5, 5, 6, 6, 6] rem sts on next RS row. Right Front Next Row [WS]: BO 0[2, 3, 4, 5, 6, 6] sts, work in patt to end. NOTE: READ AHEAD: Armhole and Neck Shaping is worked at the same time. Armhole Shaping Row [RS]: Work in patt to last 3 sts, k2tog, k1. 1 st dec’d When all shaping is complete, 13[14, 15, 15, 18, 18, 20] sts rem Work even in patt until armhole measures 6.75[7, 7.25, 7.5, 7.75, 8, 8.25] inches BO 5[5, 5, 5, 6, 6, 7] sts at beg of next WS row, BO 4[5, 5, 5, 6, 6, 7] sts at beg of next WS row, BO 4[4, 5, 5, 6, 6, 6] rem sts on next WS row. BackWith WS facing, rejoin working yarn to held Back sts. Work 1 WS row. BO 0[2, 3, 4, 5, 6, 6] sts at beg of next 2 rows. Armhole Shaping Row [RS]: K1, ssk, work in patt to last 3 sts, k2tog, k1. 2 sts dec’d Work even in patt until armhole measures 6.75[7, 7.25, 7.5, 7.75, 8, 8.25] inches, ending with a WS Row. BO 5[5, 5, 5, 6, 6, 7] sts at beg of next 2 rows, BO 4[5, 5, 5, 6, 6, 7] sts at beg of next 2 rows, BO 4[4, 5, 5, 6, 6, 6] sts on next 2 rows. BO rem 40[38, 48, 54, 54, 58, 60] sts. Sleeve With RS facing, along top (i.e., not peaked) edge, evenly pick up and knit 46[46, 46, 50, 50, 50, 56] sts. Work even in Allover Stitch Sleeve Chart, and shape as follows: Increase Row [RS]: K1, M1, work in patt to last st, M1, k1. 2 sts inc’d Rep Increase Row every 4th row 10[13, 15, 18, 18, 25, 24] more times, then every 6th row 6[6, 6, 6, 6, 1, 0] times. 80[86, 90, 100, 100, 104, 106] sts. Work even until sleeve measures 15[15.5, 16, 16.5, 17, 17.5, 18] inches from pick-up row. Sleeve Cap Decrease Row [RS]: K1, ssk, work in patt to last 3 sts, k2tog, k1. 2 sts dec’d BO 2 sts at beg of next 4[8, 10, 10, 10, 7, 2] rows. BO rem 20[18, 18, 22, 22, 24, 20] sts. COLLAR ALL RS rows: Work Repeat A to central st, work central st, work Repeat B to end. Work 6[6, 7, 7, 7, 8, 8] repeats in full, then rep Rows 1-2 once. Separate as follows, keeping patt correct: Left Collar [^]With larger needle, CO 3 sts. Work 45[45, 55, 55, 55, 59, 59] repeats of Edging chart. BO rem 4 sts.[^^] Right Collar Begin working Decrease Chart A (Right Collar). 12 sts rem Work from [^] to [^^]. |
 |
|
FINISHING Front Bands RS rows: [K1, p1] to last st, k1. Place 7 open markers evenly for 7 buttonholes. Next RS row: [Work in patt to 1 st before marker, k2tog, yo] 7 times, work in patt to end. Work 3 more rows in rib and BO. With smaller needle and Left Front RS facing, evenly pick up and knit 77[79, 85, 89, 91, 95, 97] sts from beginning of Neckline shaping to top of Edging. RS rows: [K1, p1] to last st, k1. Work 6 rows in this manner. BO. Sew buttons under buttonholes. |
| ABOUT THE DESIGNER |
|
Mary Scott Huff is a recovering Information Technologist, and the author of five books about knitting. She plays with string in Fairview, Oregon, and everyplace else where knitters can be found. |
|
Pattern & images © 2015 Mary Scott Huff. Contact Mary |