Knitty: little purls of wisdom
Title
beauty shot

Tangy

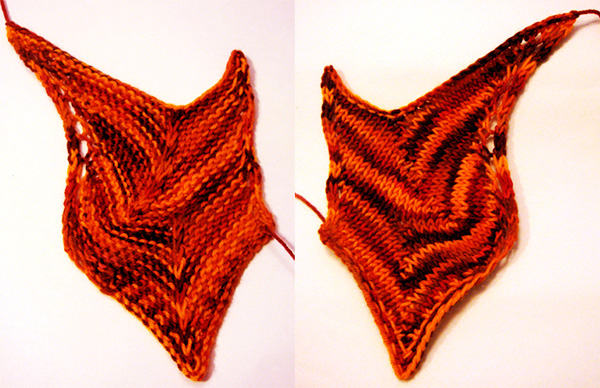
Serendipia is Spanish for Serendipity, and means "fortunate happenstance". We find it everywhere in our lives when we are open to it and allow it to guide us to new experiences. I've been wanting to find a way to harness the stripyness of self-striping yarn in pieces other than socks. So I created a scarf and a wrap that are built from narrow strips that make the most of the sort of short, repeated color changes in hand-painted yarn. To further accentuate the sinuous curves, I developed a decrease that is mostly invisible on the front side of the fabric.

When I was designing this travelling chevron, the stripes became swirls when I repeated the motif. In fact, I was planning to create a different chevron-based effect as I began entering my pattern into stitch-maps.com. I accidentally hit the "go for it!" button before I had finished. It generated my partial pattern with a couple of vertical repeats — with these marvelous swirls. It was a very happy accident. ¡Serendipia por cierto! (Serendipity indeed!)

Serendipia is worked in long, narrow strips starting and ending with linen-stitch edges: You knit one strip, then pick up every stitch along the left-hand edge, cast on another set of stitches and knit the second strip, attaching it to the first strip as you go. Work up additional strips depending on how much yarn you have. It is ideal to weigh your yarn as you knit so that you can make the most of your yarn and not run out. You can follow my basic instructions and end up with whatever patterning your yarn delivers at that number of stitches, or you can customize the width of your piece so that you achieve the best stripyness for your particular yarn.

The pattern is easily adaptable to different yarn weights and lengths of color repeats.
It is recommended that you choose space-dyed yarn with color repeats between approximately 60-80 inches in length. Hand-dyed yarn is ideal. Machine-dyed works fine and creates different effects, but you may not be able to determine the length of the color repeat. (Just make a guess and jump in.) Yarn with long color repeats (as with Noro) will create very different effects, and is not recommended.

spacer model: Tanya Seaman
spacer photos: RA Friedman
 

SIZE
Work to desired size. See Pattern Notes.

FINISHED MEASUREMENTS
Samples shown have the following measurements:
Width: 12 [15] inches
Length: 65 [73] inches

Finished size depends on gauge, weight, and amount of yarn. Completely customizable. See Pattern Notes

spacer

MATERIALS
Yarn

Wrap, Magenta (shown above):
spacer Done Roving Yarns' DK Monochromatic-Dyed Gradients in Frolicking Feet [100% superwash merino; 500 yds/6 0z skein]; color: Shades of Magenta; 2 skeins

Scarf, Orange (shown below):
spacer Done Roving Yarns' DK Frolicking Feet [100% merino; 350 yds/4 oz skein]; color: Autumn Bliss; 2 skeins

Recommended needle size
[always use a needle size that gives you the gauge listed below — every knitter's gauge is unique]
spacer 1 24-32 inch US #6/4mm circular needle
For yarn other than DK, use the largest ones recommended by the yarn manufacturer, that gives you a neat look in stockinette. If too open your center decreases will show.

Note: needles with sharp tips (e.g. Lace needles) are very helpful for working the decrease.

Notions
spacer calculator or calculator app
spacer 15-25 removable markers
spacer tape measure
spacer tapestry needle
spacer lots of pins for blocking (60-100)
spacer blocking wires
spacer digtal scale for weighing the yarn
spacer yarn needle

spacer

GAUGE
Samples were worked at the following gauge:
22 sts/31 rows = 4 inches in stockinette stitch [blocked]
27 sts/20 rows = 4 inches in pattern stitch, after blocking

Note: While not critical, a different gauge will change the size of your piece and the amount of yarn required. Make sure to swatch and wet block to ensure you get a fabric you like.


PATTERN NOTES
[Knitty's list of standard abbreviations and techniques can be found here.]

Center Decreases: One 3-to-1 decrease is done on every RS and WS row, appearing as a chain on the WS of the fabric, and traveling diagonally left from the center. Center decreases line up vertically from one row to the next. See instructional video: https: //youtu.be/4Loy2IKpHv0.

CDR (Center Decrease, worked on RS): With yarn in front, slip next 2 sts tog through the back loops, slip first st (putting tip of left needle through front loop) back to left needle (to untwist it), p2tog, psso.

CDW (Center Decrease, worked on WS): With yarn in back, slip next 2 sts tog knitwise, slip first stitch back knitwise to left needle, k2tog, psso.

M1o (Make 1 open): Insert left needle, from front to back, under the horizontal strand which lies between the stitch just knit, and the following stitch; then knit into the FRONT of this loop. 1 stitch increased.

To ctr: work patt to 1 st bef center decrease

Calculations Used in this Piece: This pattern provides you with a choice in the number of stitches to use because yarns are dyed differently and color repeats are different lengths depending on the size of the skein. For you to achieve the color patterning you like you will begin by doing some simple calculations to determine how to achieve this patterning throughout your piece. The samples shown emphasize striping, but you can choose numbers that force your colors to pool.

On Size and Measurements and Gauge
This pattern is written as a template. The precise numbers and finished size are customizable, to allow you to take advantage of your particular colorway of yarn.

The samples were worked at the same gauge, and with the following numbers, and with the following number of strips:

Magenta Wrap: 15 inches wide by 73 inches long
A: 27; B: 15; C: 7; D: 14; Strips: 4

Orange Scarf: 12 inches wide by 65 inches long
A: 30; B: 17; C: 9; D: 12; Strips: 3

The length of the piece is determined by how many rows in your Typical Repeat, and how many repeats you work.

The width of the piece is set by the number of strips worked and the number of stitches you cast on for each strip.

The number of strips you can work depends on the yardage you have.
1000 yards: 4 strips
750 yards: 3 strips
500 yards: 2 strips

DIRECTIONS
Swatch & Setup
You will need to knit a swatch to see how your particular yarn stripes (or pools, if you prefer), and to check needle size and gauge.

Determine the number of stitches in one color repeat of your yarn. Cast on 27 sts using a long-tail cast-on.

Row 1 [WS]: P all.

Row 2 [RS]: K1, yo, [k1, m1o] 3 times, k7 to ctr, CDR, k to last 2 sts, m1o, k2 (30 sts)

Place one removable marker or safety pin through the yarn at the start and one marker at the end of the next full color repeat in the yarn.

Note: Work Rows 3 & 4 until you have worked all the stitches between the two markers. As you work, keep track of the number of stitches worked between the first and second markers. This is the number of stitches in one color repeat.
Example: 81.

Row 3 [WS]: P to ctr, CDW, p to last 2 sts, drop yo, p1. (27 sts)

Row 4 [RS]: K1, yo, [k1, m1o] 3 times, k to ctr, CDR, k to last 2 sts, m1o, k2. (30 sts)
 
Repeat Rows 3-4 until you reach the second marker.

Determine the numbers that make up a single pattern repeat.

A. Cast-on number: Divide the number of stitches in your color repeat by 2, 3, 4, or any other whole number. Aim for a number between 22 and 40.
For example: 81 divided by 3 is 27.

B. Number of stitches to the right of center: Now, divide the cast-on number by two and add one. [(A/2)+1]
This is the number of stitches you'll work up to your center decrease on the first pattern row.
Example: If the cast on number is 27, then this number is (27/2) + 1=15

C. Number of stitches to the left of center: Now divide your cast-on number by four and round (up or down as required) to the nearest odd number. [(A/4), round up to next odd]. After completing one pattern repeat, this is the number of stitches that remain to the left of the center decrease. This is also the number of stitches you knit on the first row of each repeat after the initial increases.
Example: If the cast on number is 27, then this number is (27/4) = 6.75, which rounds up to 7.

D. Number of rows in pattern repeat: Subtract B and C from A and add 2; multiply this by 2. [A-B-C+2] x 2.
Example: (27-15-7) x 2=14

The Pattern uses the letters for the instructions. Enter yours here:

A:

B:

C:

D:

Number of strips: ____

Use the online calculator to provide you with B, C, and D, and for customized written instructions. You can open it in Excel or Open Office, or upload it to Google Sheets.

Make your swatch (see samples below). Choose a needle size that you would use for stockinette stitch. The denser your knitting, the more invisible your center decreases will be on the RS.

Using a long-tail, cast-on your number of stitches [A] and work two repeats of Typical Repeat. Decide if you like the way the colors stripe. If so, cast off and block. If you don't like the striping (or pooling), make some adjustments (adding or removing even one stitch to the cast on number is enough to make a difference), and try again. Once you find a patterning you like, cast off and block.

swatches

PATTERN
First Strip Setup
Using the Long Tail method, CO your number of stitches: [A].

Remove these stitches and measure the length of your tail end. Now add enough length to this tail so that you have enough length to cast on for each strip, plus one additional length for your initial cast-on. (The cast-ons for your next strips will use the live yarn and this tail.)

CO [A] sts for your first strip; tie the additional tail up in a tidy knot so it doesn't get in the way, or loop it around a bobbin.

First Strip, First Repeat
Notes:
When working with the slipped-stitch pairs [p1, sl1 wyib], [sl1 wyib, p1], [k1, sl1 wyif], and [sl1wyif, k1] across an odd number of stitches you will not be able to work both stitches in the pair. Simply end on the first stitch of the pair. Also, your slipped stitches should be offset one stitch (not stacked) from one row to the next.

At the end of RS rows you will have 3 additional stitches; at the end of the WS rows you will have the same number you cast on.

If A is an odd number, work Row 1 as follows:
Row 1 [WS]: [P1, sl1 wyib] across to last st, p1.

If A is an even number, work Row 1 as follows:
Row 1 [WS]: [P1, sl1 wyib] across to last 2 sts, p2.

Row 2 [RS]: K1, yo, [k1, m1o] 3 times, sl1 wyif, [k1, sl1 wyif] over [B-8] sts, CDR, sl1 wyif, [k1, sl1 wyif] to last 2 sts, m1o, k2. (3 sts increased.)

Note: After working Row 2 there should be [B] sts to the right of the center decrease, including the yarnover.

Row 3 [WS]: P2, [sl1 wyib, p1] to ctr, CDW, p1, [sl1 wyib, p1] to last 5 sts, p3, drop yo, p1. (3 st decreased).
Row 4 [RS]: K1, yo, [k1, m1o] 3 times, k to ctr, CDR, k to last 2 sts, m1o, k2. (3 sts increased.)
Row 5 [WS]: P to ctr, CDW, p to last 2 sts, drop yo, p1. (3 sts decreased).

Repeat Rows 4-5 until you have worked a total of [D+1] rows ([D] center decreases).

You have completed [D] center-decrease rows, and there should be [C] stitches to the left of the center decrease (as viewed from RS).

First Strip, Typical Repeat
Continuing on these stitches

Row 1 [RS]: K1, yo, [k1, m1o] 3 times, k[B-8] to ctr, CDR, k to last 2 sts, m1o, k2 (3 sts increased.)

Note: After working Row 1 there should be [B] sts to the right of the center decrease, including the yarnover.

Row 2 [WS]: P to ctr, CDW, p to last 2 sts, drop yo, p1. (3 sts decreased)
Row 3 [RS]: K1, yo, [k1, m1o] 3 times, k to ctr, CDR, k to last 2 sts, m1o, k2. (3 sts increased.)
Row 4 [WS]: Pto ctr, CDW, p to last 2 sts, drop yo, p1. (3 sts decreased)

Repeat Rows 3-4 until you have a total of [D] rows.

You have completed [D] center-decrease rows, and [C] stitches remain to the left of the center decrease.

First Strip, Continuing
Repeat Typical Repeat until you have used a bit less than one-quarter, one-third, or one-half your total yarn, as determined by the number of strips you wish to work.

First Strip, Final Repeat
Continuing on these stitches

Row 1 [RS]: K1, yo, [k1, m1o] 3 times, k[B-8] to ctr, CDR, k to last 2 sts, m1o, k2. (3 sts increased.)

Note: After working Row 1 there should be [B] sts to the right of the center decrease, including the yarnover.

Row 2 [WS]: P to ctr, CDW, p to last 2 sts, drop yo, p1. (3 sts decreased)
Row 3 [RS]: K1, yo, [k1, m1o] 3 times, k to ctr, CDR, k to last 2 sts, m1o, k2. (3 sts increased.)
Row 4 [WS]: P to ctr, CDW, p to last 2 sts, drop yo, p1. (3 sts decreased)

Repeat Rows 3-4 until you have a total of [D minus 4] rows.

First Strip, Top Edge:
Row 1 [RS]: K1, yo, [k1, m1o] 3 times, [sl1 wyif, k1] to ctr, CDR, [k1, sl1 wyif] to last 2 sts, m1o, k2.
Row 2 [WS]: P2, [sl1 wyib, P1] to ctr, CDW, [p1, sl1 wyib] to last 5 sts, p3, drop yo, p1.
Row 3 [RS]: K1, yo, [k1, m1o] 3 times, [sl1 wyif, k1] to ctr, CDR, [sl1 wyif, k1] to last 2 sts, m1o, k2. Do not turn after this last row.

At this point you should determine that you have used just a bit less than one quarter, one third, or one half of your yarn (depending on the number of strips you plan to work). You need about .1 oz/3gm to set up for the next strip and if that tips you over the fraction, then you risk running out of yarn. If you're concerned, rip back one or more of the Typical Repeats to achieve the proper amount.

Next Strip, Setup
With RS facing, using the tip of your right needle, pick up and knit 1 stitch for every row along the left-hand edge. (Tip: Use markers to count out the stitches to help you identify the stitches for each of your repeats, and help make sure you have the correct number of stitches and rows.)

Note: If you have too many or too few picked up stitches it means you worked too many or too few rows in one of your repeats. Count every row (the WS decreases make this easy!) to figure out where you did this. Then place a marker in that repeat as a reminder, and match this incorrect number of rows at the same place when you work your next strip. This will ensure that your curves line up.

Next Strip, First Repeat
Using the tail set aside from the initial cast on, CO [A] sts for your next strip.
As you work, this new strip will be attached to the previous one.

With an odd-number cast-on:
Row 1 [WS]: [P1, sl1 wyib] across to last st, p1, sl nearest picked-up st purlwise to RH needle. Turn.

With an even-number cast-on:
Row 1 [WS]: [P1, sl1 wyib] across to last 2 sts, p2, sl nearest picked-up st purlwise to RH needle. Turn.

Row 2 [RS]: K2tog the slipped st and the first st, yo, [k1, m1o] 3 times, sl1 wyif, [k1, sl1 wyif] over [B-8] sts, CDR, sl1 wyif, [k1, sl1 wyif] to last 2 sts, m1o, k2. (3 sts increased)

Row 3 [WS]: P2, [sl1 wyib, p1] to ctr, CDW, p1, [sl1 wyib, p1] to last 5 sts, p3, drop yo, p2tog last st with next picked-up st, slip purlwise the next picked-up st to RH needle. Turn. (3 sts decreased plus next picked-up stitch.)
Row 4 [RS]: K2tog, yo, [k1, m1o] 3 times, k to ctr, CDR, k to last 2 sts, m1o, k2. (3 sts increased)
Row 5 [WS]: P to ctr, CDW, p to last 2 sts, drop yo, p2tog last st with next picked-up st, slip purlwise the next picked-up st to RH needle. Turn. (3 sts decreased plus 1 picked-up stitch.)

Repeat Rows 4-5 until you have a total of [D] rows.

Next Strip, Typical Repeat
Row 1 [RS]: K2tog, yo, [k1, m1o] 3 times, k[B-8], CDR, k to last 2 sts, m1o, k2 (3 sts increased)
Row 2 [WS]: P to ctr, CDW, p to last 2 sts, drop yo, p2tog last st with next picked-up st, slip purlwise the next picked-up st to RH needle. Turn. (3 sts decreased plus 1 picked-up stitch.)

Repeat Rows 3-4 until you have a total of [D] rows.

Next Strip, Continuing
Repeat Typical Repeat until you have one repeat less than the first strip.

Next Strip, Last Repeat
Row 1 [RS]: K2tog, yo, [k1, m1o] 3 times, k[B-8], CDR, k to last 2 sts, m1o, k2 (3 sts increased)

Row 2 [WS]: P to ctr, CDW, p to last 2 sts, drop yo, p2tog last st with next picked-up st, slip purlwise the next picked-up st to RH needle. Turn. (3 sts decreased)

Row 3 [RS]: K2tog, yo, [k1, m1o] 3 times, k to ctr, CDR, k to last 2 sts, m1o, k2.

Row 4 [WS]: P to ctr, CDW, p to last 2 sts, drop yo, p2tog last st with next picked-up st, slip purlwise the next picked-up st to RH needle. Turn.

Repeat Rows 3-4 until you have a total of [D minus 4] rows.

Next Strip, Top Edge:
Row 1 [RS]: K2tog, yo, [k1, m1o] 3 times, [sl1 wyif, k1] to ctr, CDR, [k1, sl1 wyif] to last 2 sts, m1o, k2. (3 sts increased)

Row 2 [WS]: P2, [sl1 wyib, P1] to ctr, CDW, [p1, sl1 wyib] to last 5 sts, p3, drop yo, p2tog last st with next picked-up st, slip purlwise the next picked-up st to RH needle. Turn. (3 sts decreased plus 1 picked-up stitch.)

Row 3 [RS]: K2tog, yo, [k1, m1o] 3 times, [sl1 wyif, k1] to ctr, CDR, [sl1 wyif, k1] to last 2 sts, m1o, k2. (3 sts increased)

Subsequent Strips:
Work Next Strip (from Setup to Top Edge) until you have completed the total number of strips desired.

BO as follows:
K the purl sts, and p the slipped sts, and alternate k and p for the purl sts. Work each center decrease before binding them off, and drop the yarn-overs.

spacer

FINISHING
Weave in ends. Soak, squeeze out excess water, and wet-block aggressively. Use blocking wires on the left-hand edge, pin into place, and then pin down the pointy ends. Pin out the right-hand edge of your piece to create the curves using three to four pins for each curve. Use your fingers to flatten out the swirls in the inner Strips; they do not need to be pinned.

spacer
ABOUT THE DESIGNER

Tanya loves to warp straight lines, and has a preference for small multiples. She makes her living as a professional organizer of spaces and finances, and spends most of her time sketching up new ideas and playing with yarn.

You can see more of her designs on Ravelry.

spacer