Pattern: PATTERN NAME
INTRODUCTION
Anyadell
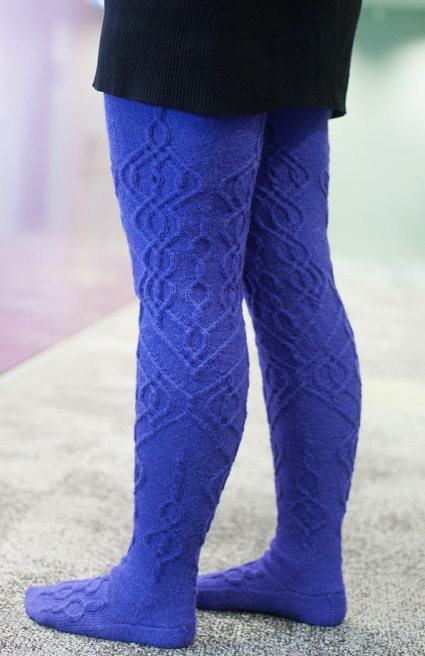

I really love thigh-high socks. I would love to knit and wear them all the time, but the problem is that there aren’t that many thigh-high sock patterns. Currently (in September 2016) there are 26,577 (knitting) sock patterns in Ravelry, of which 14,229 are labeled as adult size. There are only 212 thigh-high sock patterns, of which 121 have been labeled as adult size. This means that 0.80% of all sock patterns are thigh-high, and 0.85% of sock patterns for adults are thigh-high. The odds are not in favor of thigh-high sock lovers.
I’ve been experimenting with different invisible increasing techniques that could be used for toe-up thigh high socks. This pattern uses one of them – adding stitches when making cables. The cable pattern itself was the outcome of doodling and seeing how a cable pattern would increase in width along with height.
I named the pattern after one of my oldest friend’s, Ansu’s, internet nickname. We’ve been friends for over ten years. I hope these socks will warm you up as much as our very long-lasting friendship!
 model: Senja Jarva
photos: Olli Jarva
SIZE
Women’s S[SM, M, ML, L, LL, XL]
(shown in size ML)
FINISHED MEASUREMENTS
Foot length: 9[9.5, 10, 10.5, 11, 11.5, 12] inches/ 23[24, 25.5, 26.5, 28, 29, 30.5] cm
Foot circumference: 6[6.75, 7.25, 7.75, 8.25, 8.75, 9.5] inches/ 15.5[17, 18.5, 20, 21, 22.5, 24] cm
Ankle circumference: 7[7.5, 8, 8.75, 9.25, 9.75, 10.5] inches/ 17.5[19, 20.5, 22, 23.5, 25, 26.5] cm
Calf circumference: 6.2[10.6, 11.4, 13.4, 15, 16.5, 18.1] inches/ 24[27, 28.3, 32, 38, 42.7, 46] cm
Calf circumference measured 10.75[11.5, 11.5, 12.25, 12.5, 13, 13.5] inches/ 27[29, 29, 31, 32, 33, 34] cm from the floor
Choose a size with about 10% negative ease in foot circumference.
MATERIALS
Yarn
![]() ONline Supersocke 3 [75% virgin wool, 25% polyamide; 420m per 100g skein]; color: violet; 3[3, 4, 4, 4, 4, 5]
ONline Supersocke 3 [75% virgin wool, 25% polyamide; 420m per 100g skein]; color: violet; 3[3, 4, 4, 4, 4, 5]
Recommended needle size
[always use a needle size that gives you the gauge listed below - every knitter's gauge is unique]
![]() US #1.5/2.5mm needles for small circumference in the round.
US #1.5/2.5mm needles for small circumference in the round.
Note: If using DPNs, you will need two sets, to manage the stitch counts on the leg.
Notions
![]() crochet hook, size US #1.5/2.5mm – optional, for help picking up stitches
crochet hook, size US #1.5/2.5mm – optional, for help picking up stitches
![]() tape measure
tape measure
![]() stitch markers
stitch markers
![]() yarn needle
yarn needle
![]() quarter-inch/5mm wide elastic, up to 8 times the circumference of thigh
quarter-inch/5mm wide elastic, up to 8 times the circumference of thigh
GAUGE
30 sts/40 rounds = 4 inches/10cm in stockinette stitch
Widest part of chart C_1 = 4 inches/10cm
Widest part of chart B_1 = 5.25 inches/13.5cm
Widest part of chart A_1 = 6.75 inches/17cm
PATTERN NOTES
[Knitty's list of standard abbreviations and techniques can be found here.]
I recommend knitting both socks at the same time. If you have the typical problem of leaving normal socks unfinished after the first one, you'll definitely have the same problem with these ones.
Try them on from time to time as you are knitting to see how they fit. Adjustments can be made along the way as required.
The sizes from ankle to knee and knee to thigh aren't according to the CYC standard, because the standard doesn't provide any measures for those parts of the leg. However, I’ve provided some fixed sizes from ankle onward. These sizes can be further modified by doing more increases than suggested.
The socks stay on with four rounds of elastic which are looped through eyelet rows in the ribbing. You can determine the tightness of the bands yourself. There four rounds because the fewer rounds you have, the tighter the band has to be and a very tight band can be itchy and will wear out or break more easily. In my experience having multiple rounds is very convenient, the bands don’t have to be very tight. You can of course make as many eyelet rows for the elastic bands as you like, although the pattern gives instructions for four.The length of the sock is up to you, but I recommend making them as long as possible, all the way up to groin. In my experience they stay up well because most women have a small curve in our inner thighs (something that many women’s magazines tell us that we should try to eliminate by exercise, but don’t, it is useful for wearing socks!). When the upper rounds of elastic reach above that curve, the socks stay up better than on a thigh that is straight or widening. To maximize the benefits of this inner thigh curve, the upper elastic bands should be tighter than the lower ones. More information about this in the instructions for finishing.
Instructions for Judy's Magic Cast On can be found here.
Instructions for Jeny’s Surprisingly Stretchy Bind off can be found here.
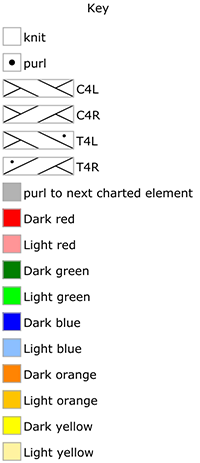
C4L: Slip next 2 sts to cable needle and hold in front of work; k2, then k2 from cable needle.
C4R: Slip next 2 sts to cable needle and hold in back of work; k2, then k2 from cable needle.
T4L: Slip next 2 sts to cable needle and hold in front of work; p2, then k2 from cable needle.
T4R: Slip next 2 sts to cable needle and hold in back of work; k2, then p2 from cable needle.
C4L-inc-light: Slip next 2 sts to cable needle and hold in front of work; kfb, then k2 from cable needle. 1 st increased.
C4R-inc-light: Slip next 1 st to cable needle and hold in back of work; k2, then kfb from cable needle. 1 st increased.
T4L-inc-dark: Slip next 2 sts to cable needle and hold in front of work; pfb, p1, then k2 from cable needle. 1 st increased.
T4L-inc-light: Slip next 2 sts to cable needle and hold in front of work; pfb, then k2 from cable needle. 1 st increased.
T4R-inc-dark: Slip next 2 sts to cable needle and hold in back of work; k2, then pfb, p1 from cable needle. 1 st increased.
T4R-inc-light: Slip next 1 st to cable needle and hold in back of work; k2, then pfb from cable needle. 1 st increased.
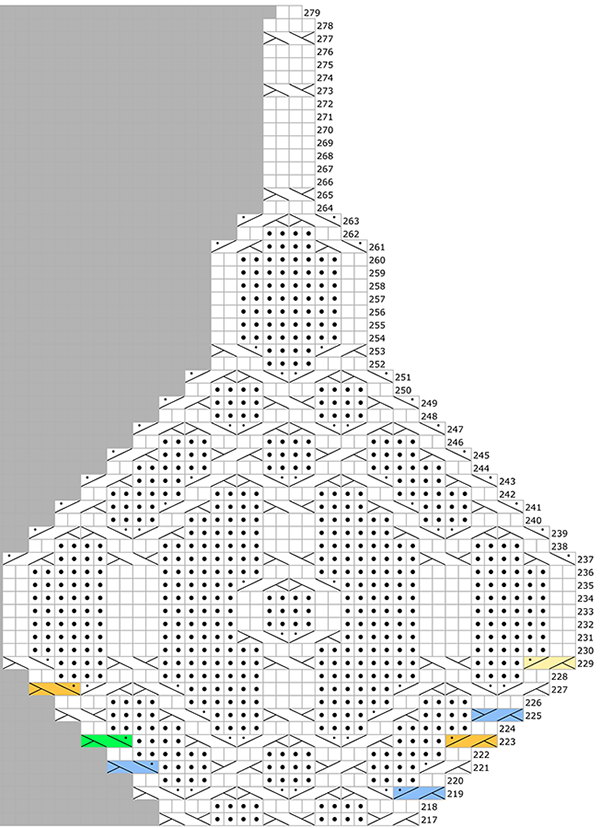
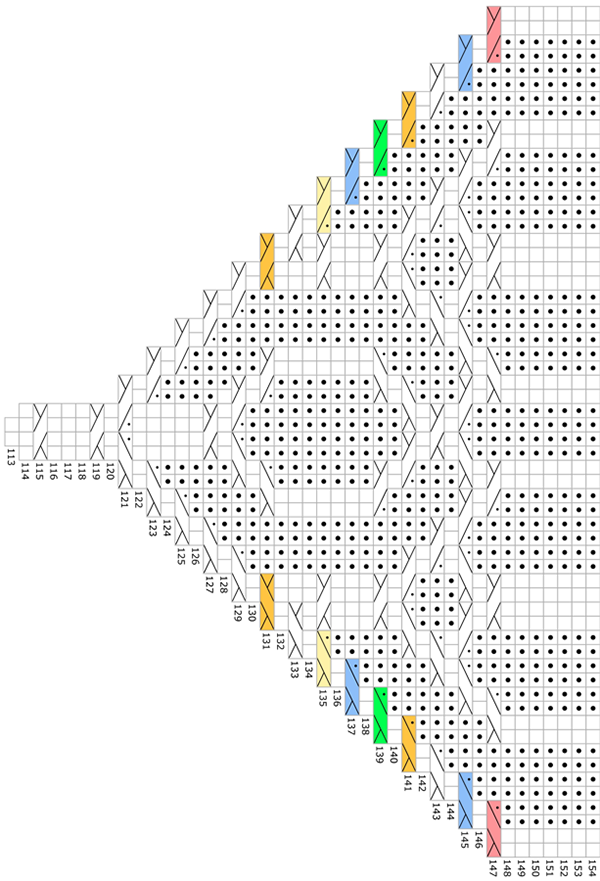
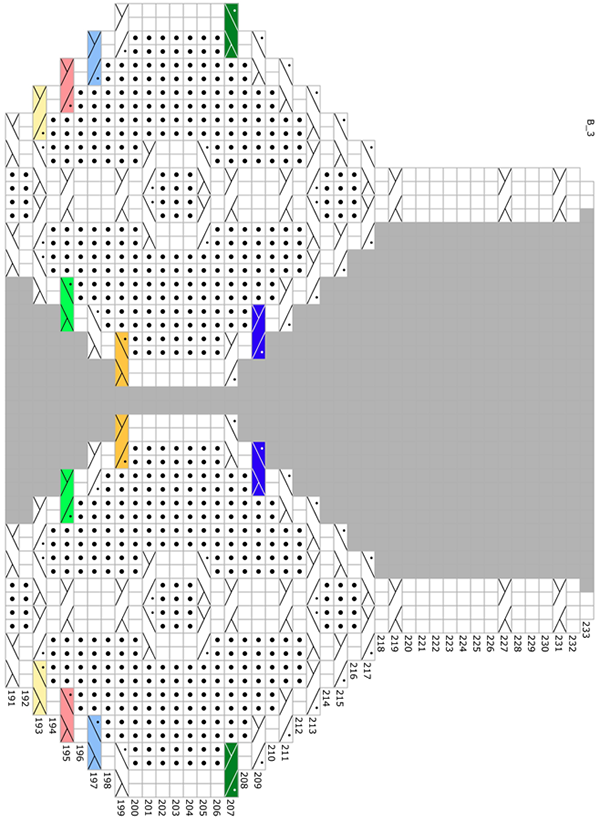
 CHARTS
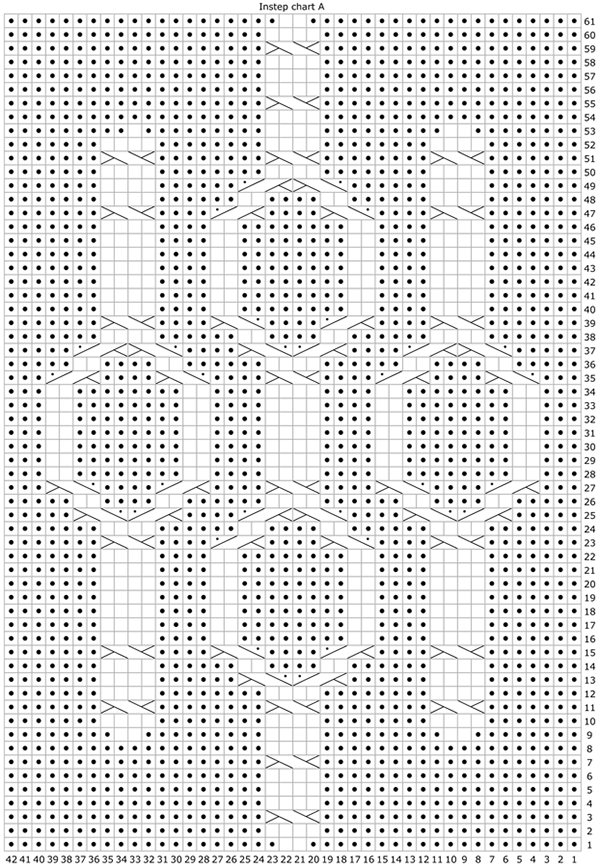
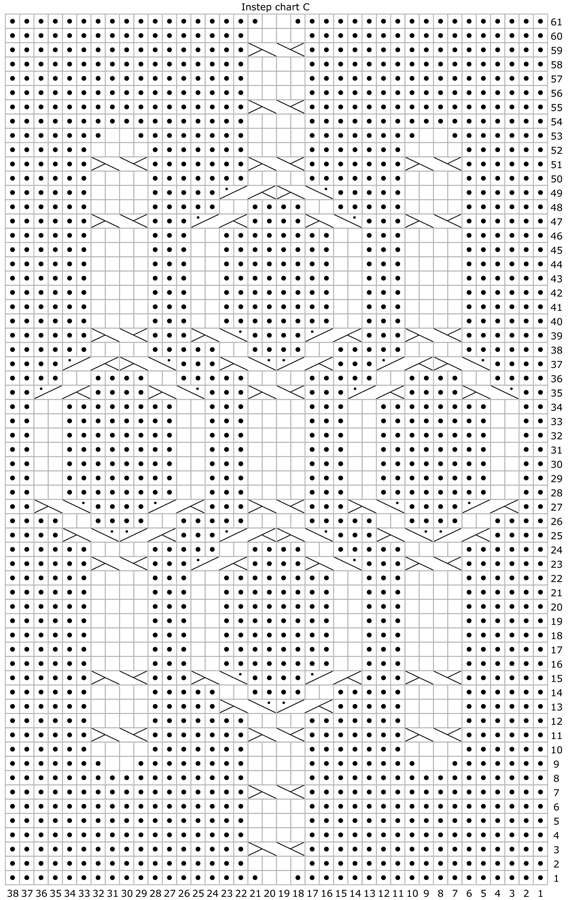
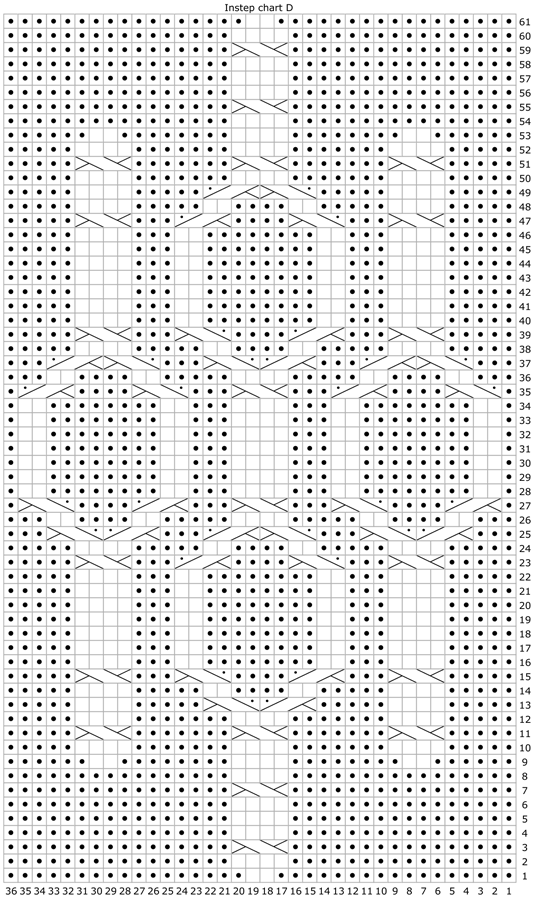
Instep Chart A | Instep Chart B | Instep Chart C | Instep Chart D | Instep Chart E
Chart A1 top | Chart A1 bottom | Chart A2 top | Chart A2 bottom | Chart A3 left | Chart A3 right
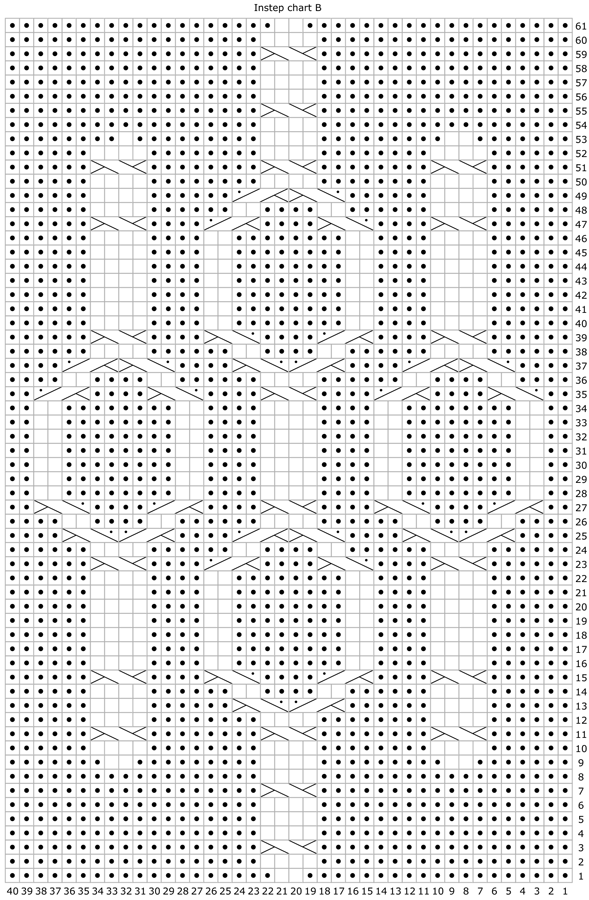
Chart B1
top | Chart B1 bottom | Chart B2 top | Chart B2 bottom | Chart B3
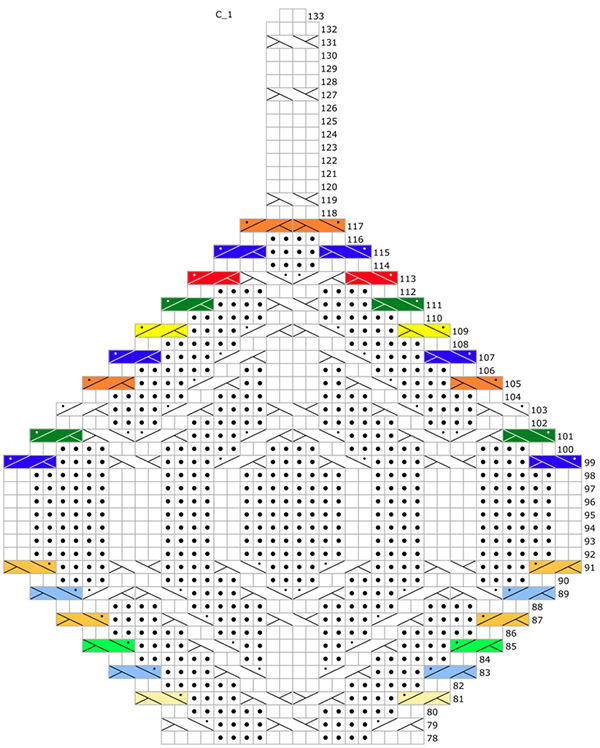
Chart C1 | Chart C2 | Chart C3 | Big and Small Ornaments
Note: See pattern instructions for explanation of the colors and which you should pay attention to for each size.
How you work the cables in every chart depends on size you are working, and the colors of the symbols.
Work all cables as their standard definitions, except for those in the colors below:
Size S and M: blue and orange cables are worked as increase cables.
Size SM and ML: blue and green cables are worked as increase cables.
Size L: blue, green and yellow cables are worked as increase cables.
Size LL: blue, orange and green cables are worked as increase cables.
Size XL: blue, orange, green and yellow cables are worked as increase cables.
To work a cable as an increase cable, see Pattern Notes, and follow the instructions for the relevant “inc” version of the cable.
DIRECTIONS
Toe
Using Judy’s magic cast on, CO 20[20, 20, 24, 24, 28, 28] sts.
Knit one round, placing a marker or dividing the stitches at the center of the round.
Round 1: K1, pfb, p to 2 sts before center of round, pfb, k2, kfb, k to 2 sts before end of round, kfb, k1. 4 sts increased.
Left Sock only, Rounds 2 & 3: K1, pfb, p to 1 st before center of round, k to 2 sts before end of round, kfb, k1. 2 sts increased.
Right sock only, Rounds 2 & 3: K1, p to 2 sts before marker, pfb, k2, kfb, k to end. 2 sts increased.
Repeat Rounds 1-3 3[4, 5, 5, 6, 6, 6] more times, and work Round 1 0[0, 0, 1, 0, 0, 1] more time. 44[52, 60, 68, 72, 76, 80] sts
All sizes:
Round 5: K1, pfb, p to 2 sts before marker, pfb, k1, sm, k to end of round. 2 sts increased.
Repeat Round 5, 6[4, 2, 1, 1, 1, 1] more times. 58[62, 66, 72, 76, 80, 84] sts.
Remove the center of round marker, and rearrange your stitches as follows:
34[34, 34, 36, 38, 40, 42] purled sts for the instep, 24[28, 32, 36, 38, 40, 42] stockinette sts for the sole.
Foot
Sizes ML, LL and XL only:
Next round: P across instep, k to end of round.
Work -[-, -, 3, -, 5, 7] more rounds as set.
All sizes:
Foot round: Work the instep chart E[E, E, D, C, B, A] ; k to end of round.
Work in pattern as set until instep chart is complete.
Sizes M, ML, L, LL and XL only:
Next round: P across instep, k to end of round.
Work -[-, 5, 5, 7, 7, 7] more rounds as set.
Note: At this point, Foot should measure 2.5[2.5, 3, 3.25, 3.25, 3.5, ] inches/ 6.5[6.5, 7.5, 8, 8.5, 8.5, 9] cm short of foot length. If you wish to make foot longer, work even, purling instep and knitting sole stitches, until you hit the measurement you need.
Heel flap:
Heel flap is worked across the sole sts plus additional 1 st from either side of the instep - 26[30, 34, 38, 40, 42, 44] sts total. Rearrange sts as you prefer.
Set up [RS]: P1, turn.
Row 1 [WS]: Sl1 knitwise, p 25[29, 33, 37, 39, 41, 43] , turn.
Row 2 [RS]: Sl1 purlwise, k 25[29, 33, 37, 39, 41, 43] , turn.
Repeat the Rows 1-2 9[9, 10, 10, 11, 11, 12] times or until the heel flap measures 2[2, 2.25, 2.25, 2.5, 2.5, 2.75] inches/ 5[5, 5.5, 5.5, 6, 6, 6.5] cm, ending with a RS row.
Heel turn:
Row 1 [WS]: Sl1 purlwise, p 15[18, 21, 24, 25, 26, 28] , p2tog, turn.
Row 2 [RS]: Sl1 knitwise, k 6[8, 10, 12, 12, 12, 14] , ssk, turn.
Row 3 [WS]: Sl1 purlwise, p 6[8, 10, 12, 12, 12, 14] , p2tog, turn.
Row 4 [RS]: Sl1 knitwise, k 6[8, 10, 12, 12, 12, 14] , ssk, turn.
Repeat Rows 3-4 8[9, 10, 11, 12, 13, 13] more times, until 8[10, 12, 14, 14, 14, 16] sts remain.
Ankle:
Set up round: With RS facing, pick up and knit 15[15, 16, 17, 18, 18, 19] sts from the side of the heel flap, p across instep sts, pick up and knit 15[15, 16, 17, 18, 18, 19] sts from the side of the heel flap, [p1, k1] 4[5, 6, 7, 7, 7, 8] times across heel sts. 70[72, 76, 82, 86, 88, 94] sts total.
Round 1: P to 2 sts before start of instep, p2tog, p to end of instep, p2tog, p end of round. 2 sts decreased.
Round 2: Purl.
Repeat Rounds 1-2 8[7, 7, 8, 8, 5, 6] more times. 52[56, 60, 64, 68, 76, 80] sts.
Ankle to knee:
Sizes L[LL and XL] only:
Purl –[-, -, -, 4, 8, 12] rounds.
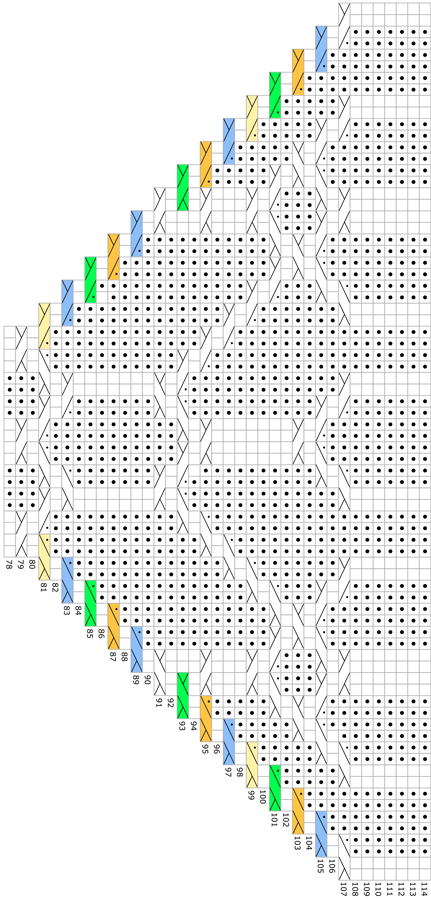
Round 1: P 9[9, 9, 9, 10, 12, 12] , place marker B, p 13[14, 15, 16, 17, 19, 20] , place marker A, p 13[14, 15, 16, 17, 19, 20] , place marker B, p 13[14, 15, 16, 17, 19, 20] , place marker A, p 13[14, 15, 16, 17, 19, 20] .
Markers A should be in the middle of your instep and the middle of calf, and set the center of Big Ornament chart. Markers B should be at the center of the sides of your legs, and mark the middle of Small Ornament chart.
Round 2: P to 1 st before first marker A, work Big Ornament Chart row 1, removing the marker, p to 1 st before second marker A, and work the Big Ornament chart row 1, remove the marker, p to end of round.
Continue in pattern as set for 7 more rounds.
Round 9: P to 1 st before first marker B. This is the new start of round position, and the start of the Small Ornament chart.
Place a marker (or divide your stitches, at this point, and place a removable marker in the fabric) here. Start the Small Ornament chart from row 9, removing marker B, work in pattern as set to 1 st before second marker B, remove it and work the Small Ornament chart from row 9, p to end of round
Place markers C at the starts of the Small Ornament charts and markers D at the starts of Big ornament charts. These markers will have to be moved as the edges of the chart move. The first marker C also marks the beginning of the round.
Work as set until the Ornament charts are complete.
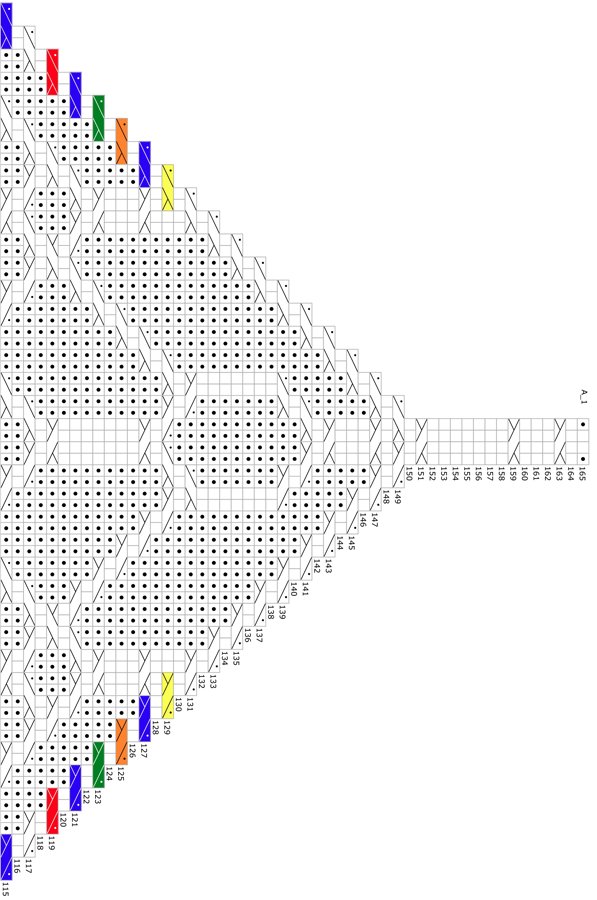
Note:
From here, the patterning becomes a little unusual. Although you are working from the charts, for ease of space not all stitches are shown. The coloring of cable symbols has significance, and whether it is a dark or a light shade. Which chart you use depends on the size you are working:
Size S: C_1 st; Sizes SM and M: B_1 st; Sizes ML, L, LL and XL: A_1.
Next round: [P to marker D, work chart C_1[B_1, B_1, A_1, A_1, A_1, A_1] (starting at row 78)] twice, p to end of round.
Work as set until you have completed round 104[112, 112, 120, 120, 120, 120] .
Important note: if you are working size ML, the A_1 chart will cross over the start/end of the round in rounds 107 to 115. To do this, you will need to shift the start of the round temporarily. When working rounds 106, stop 1 stitch before the end of the round, and then start the next chart round at that point. When working round 116, work 2 more stitches past the end of the round, and start the next chart round at that point. When working Round 118, stop 1 stitch before the end of the round, and start the next chart round at that point.
When working Round 116, work 2 more stitches past the end of the round, and start the next chart round at that point. When working Round 118, stop 1 stitch before the end of the round, and start the next chart round at that point.
As you work the leg, try on the sock every now and then to see how it fits you. If you feel that the fixed sizes are too small, you can do additional increases when you feel like it. You can decide to knit any colored cable as an increase cable. However, remember to do all 4 increases (both charts have 1 increase on the side of the ornament, altogether four increases per row).
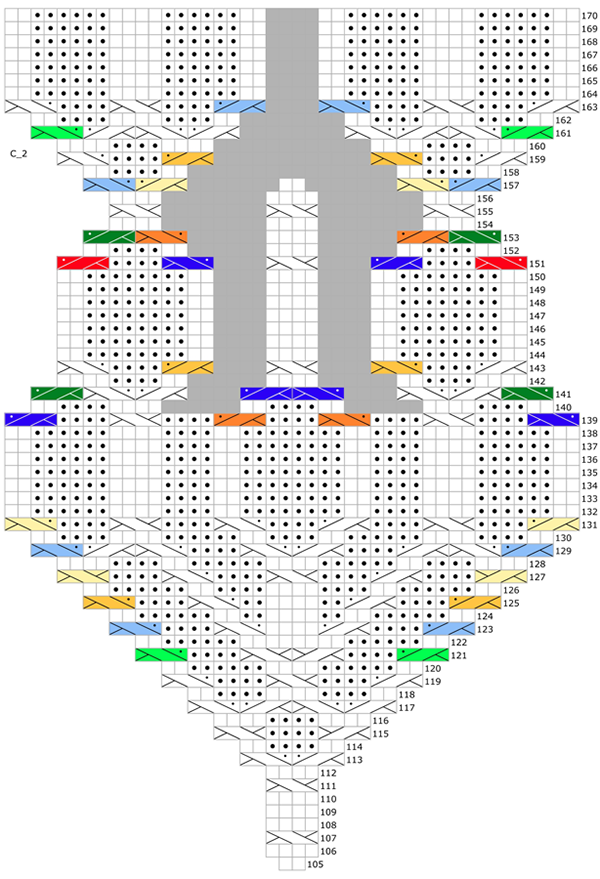
Knee to Thigh
At this point, you start working Chart A/B/C _2 in the plain portions of the leg. The round numbers for the two charts - _1 and _2 – line up, to help you stay on track. The grey region in the middle of charts A_2, B_2 and C_2 represents an v number of purled stitches. The number of these purled sts is unknown, because it depends on how many increases are worked with the colored cable sts. Therefore, and the grey region should be worked as “p all until the next cable or knit sts”.
Ensure you’re positioned at the first marker C for start of round.
Next round: [Work Chart C_2[B_2, B_2, A_2, A_2, A_2, A_2] , p to marker D, work Chart C_1[B_1, B_1, A_1, A_1, A_1, A_1] as set] twice, p to end of round.
Work as set until you have completed A/B/C_1 charts.
Next round: [Work Chart C_2[B_2, B_2, A_2, A_2, A_2, A_2] , p to marker C] twice, p to end of round.
Work as set until you have completed A/B/C_2 charts.
Upper Leg:
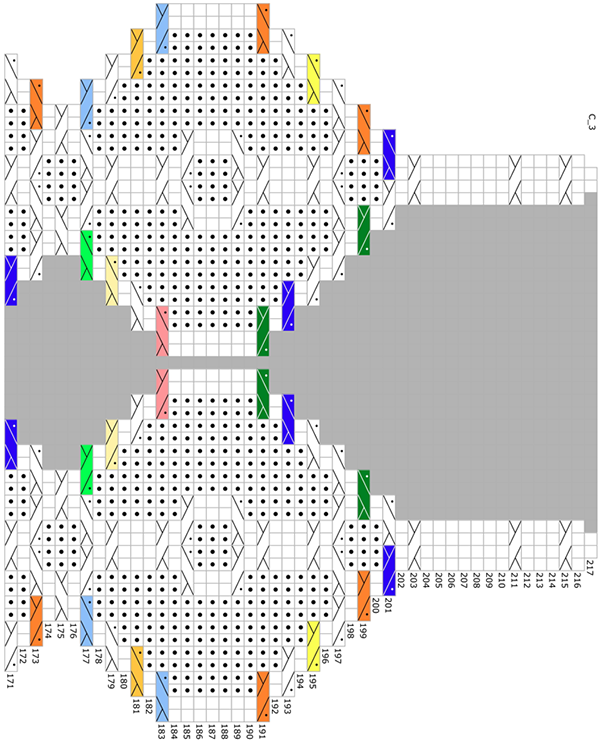
As with Charts A/B/C_2, there are also grey regions in the middle of charts A/B/C_3. As before, work them as “p all until the next cable or knit sts”. The round numbers continue from the previous charts.
Next round: Work Chart C_3[B_3, B_3, A_3, A_3, A_3, A_3] , p to marker C] twice, p to end of round.
Work as set until Chart C_3[B_3, B_3, C_3, C_3, C_3, C_3] is complete.
From here, all stitches are purled.
At this point, you should try the sock on. Because the gauge of reverse stockinette is going to be much looser than for the cable pattern, the sock is going to increase in circumference. If you need to reduce the circumference of the sock, place markers or distribute stitches across your needles to divide your stitches into three (roughly equal) groups, and then decrease as follows:
Decrease round: [P2tog, work to the end of the third] 3 times. 3 sts decreased.
If you want to work the Decrease round more than once, work it on every third round.
When the sock reaches 2 inches/5cm from desired final length, start the ribbing.
Note: In my experience the socks stay up better if they are made as high as possible, all the way to your groin.
Cuff
Setup round: [K1, p3] around.
Rounds 1-4: [K2, p2] around.
Round 5: [K2, p2tog, yo] around.
Repeat Rounds 1-5 three more times, then work Rounds 1-4 once more.
Bind off using Jeny’s Surprisingly Stretchy Bind off method.
FINISHING
Block and weave in ends.
Thread one end of the elastic band through one of the eyelet rows of the sock. When the elastic has been through all the holes, try on the sock to determine the tightness of the band. Make the band tight, because it will stretch out, but not so tight as to leave tight bands leave marks on your skin or to feel uncomfortable. Cut the elastic. Sew the ends together.
Note: If you made the stockings so high that they reach your groin, above the curve in inner thighs, make the two upper elastic bands tighter than the two lower ones. This way you are taking advantage of the inner thigh curve: above the curve your thigh’s circumference is somewhat smaller than in the widest part of the curve, and making the upper elastics tighter, it is harder for the stocking to drop lower.
ABOUT THE DESIGNER
 Senja is a sock enthusiast, who thinks that everyone has a right to knit and wear wonderful socks. Size of socks is not an issue, rather it provides an aesthetic and mathematical challenge to designing socks for everyone. Besides socks, Senja enjoys reading, sailing on a F18 racing boat, cooking and practicing ashtanga yoga.
You can follow Senja on Instagram and find more of her work here.
Pattern & images © 2016 Senja Jarva. Contact Senja