Lutning, a free knitting pattern from Knitty.com. Free knitting pattern for a DETAILS HERE.
INTRODUCTION
Lutning

![]()
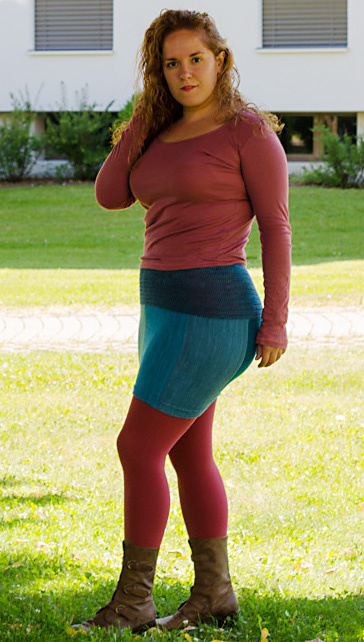
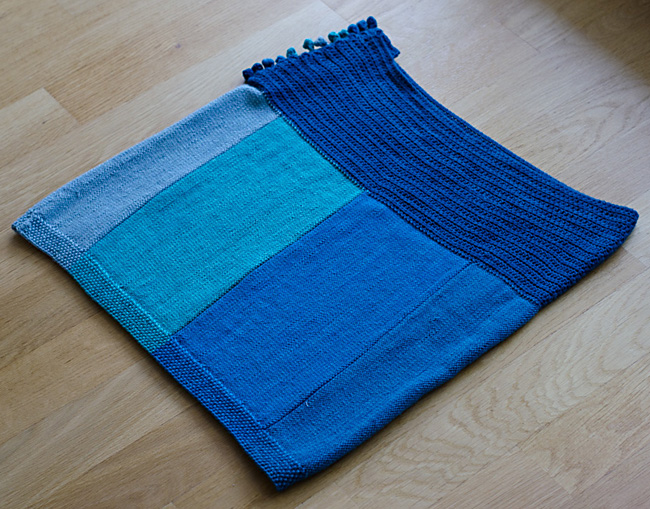
Lutning is a simple skirt that combines knitting and crochet, taking advantage of each technique’s fabric qualities to produce an easy, wearable skirt. It brings together form and color, using a set of mini skeins for a gradient color block effect.
The Rohrspatz & Wollmeise yarns are perfect for this type of project, as their vibrant colors and tight twist provide contrast and great stitch definition to the end result.
Depending on the fit you desire, choose a size with negative ease (as on Asimina at left) or positive ease (as on Kanoko below).
 model: Asimina Saranti (above), Kanoko Ito (below)
 photos: Asimina Saranti
SIZE
XS[S, M, L, 1X, 2X, 3X]
shown in size S with 4 inches/10 cm negative ease at hip on Asimina (above), 4 inches/10 cm positive ease at hip on Kanoko (below)
FINISHED MEASUREMENTS
Waist circumference: 25.75[29.75, 33.75, 37.5, 41.5, 45.5, 49.5] inches/ 65.5[75.5, 85.5, 95.5, 105.5, 115.5, 125.5] cm
Hip circumference: 35.5[39.5, 43.25, 47.25, 51.25, 55, 59] inches/ 90[100, 110, 120, 130, 140, 150] cm
Length: 16.5 inches/41.5 cm
MATERIALS
Yarn
Rohrspatz & Wollmeise Pure Merino Mini [100% Merino; 115 yd/105 m per 30g skein];
![]() [MC] Sail the 7 seas; 2[2, 3, 3, 4, 4, 5] skeins
[MC] Sail the 7 seas; 2[2, 3, 3, 4, 4, 5] skeins
![]() [CC1] Neptun medium; 1[1, 1, 2, 2, 2, 3] skeins
[CC1] Neptun medium; 1[1, 1, 2, 2, 2, 3] skeins
![]() [CC2] Wolke; 1[1, 1, 2, 2, 2, 3] skeins
[CC2] Wolke; 1[1, 1, 2, 2, 2, 3] skeins
![]() [CC3] Neptun light; 1[1, 1, 2, 2, 2, 3] skeins
[CC3] Neptun light; 1[1, 1, 2, 2, 2, 3] skeins
![]() [CC4] Ooohm; 1[1, 1, 2, 2, 2, 3] skeins
[CC4] Ooohm; 1[1, 1, 2, 2, 2, 3] skeins
![]() [CC5] Edel; 1[1, 1, 2, 2, 2, 3] skeins
[CC5] Edel; 1[1, 1, 2, 2, 2, 3] skeins
Recommended needle size
[always use a needle size that gives you the gauge listed below - every knitter's gauge is unique]
![]() 1 set US #1.5/2.5 mm needles for working flat
1 set US #1.5/2.5 mm needles for working flat
Notions
![]() 3.0 mm crochet hook
3.0 mm crochet hook
![]() 1 stitch marker
1 stitch marker
![]() 9 crochet stitch markers
9 crochet stitch markers
![]() yarn needle
yarn needle
![]() 12 buttons, 0.4 inches/11 mm in diameter
12 buttons, 0.4 inches/11 mm in diameter
GAUGE
22 sts/18 rows = 4 inches/10 cm in half double crochet stitch
32 sts/48 rows = 4 inches/10 cm in stockinette stitch
PATTERN NOTES
[Knitty's list of standard abbreviations and techniques can be found here.]
The skirt is worked flat and in two pieces. First, the waistband is worked top-down in crochet. Then the skirt is worked sideways, starting from a Provisional Cast On and finishing with Kitchener Stitch. Then both pieces are sewn together to form the skirt.
Since the waistband is reversible, there is no RS and WS.
The buttonholes are worked on the go, integrated in the chain stitch edge of the waistband.
Seed Stitch (even number of stitches):
Row 1 [RS]: *K1, p1; repeat from * to end of row.
Row 2 [WS]: *P1, k1; repeat from * to end of row.
Repeat Rows 1-2 for pattern.
Techniques
DIRECTIONS
WAISTBAND
With MC, ch 144[166, 188, 210, 232, 254, 276] .
Row 1: Ch4, hdc across, turn.
Row 2: Ch2, hdc across, turn.
Row 3: Repeat Row 1.
Row 4 (increase row): Ch2, hdc 0[1, 3, 1, 3, 0, 2] , *hdc2 in next st, hdc 15[17, 19, 22, 24, 27, 29] , pm to last worked st, repeat from * to last 0[2, 4, 1, 3, 1, 3] sts, hdc 0[2, 4, 1, 3, 1, 3] , turn. 9 sts increased. 153[175, 197, 219, 241, 263, 285 sts
]
Row 5: Ch4, hdc across, turn.
Row 6: Ch2, hdc across, turn.
Row 7: Repeat Row 5.
Row 8 (increase row): Ch2, hdc 0[1, 3, 1, 3, 0, 2] , *hdc2 in next st, hdc to st with the m, move m to this st, repeat from * to last 0[2, 4, 1, 3, 1, 3] sts, hdc 0[2, 4, 1, 3, 1, 3] , turn. 9 sts increased.
Repeat Rows 5-8 5 times total. 198[220, 242, 264, 286, 308, 330] sts.
Fasten off, leaving a 2 inch/5 cm tail.
SKIRT
With CC5, CO 90[90, 90, 90, 90, 90, 90] sts with Provisional CO.
Set-up Row [RS]: Sl1, work in Seed Stitch for 8 sts, pm, p to last st, p1tbl.
Row 1 [WS]: Sl1, k to m, sm, work in Seed Stitch for 8 sts, k1.
Row 2 [RS]: Sl1, work in Seed Stitch to m, sm, p to last st, p1tbl.
Repeat Rows 1-2 14[16, 18, 19, 21, 23, 24] times total, ending with a RS row. 29[33, 37, 39, 43, 47, 49] rows worked with CC5.
Repeat Row 1 once more.
Next Row [RS]: Sl1, work in Seed Stitch to m, sm, k to last st, p1tbl.
Cut yarn leaving a 2 inch/5 cm tail and switch to CC4.
Next Row [WS]: Sl1, p to m, sm, work in Seed Stitch for 8 sts, k1.
Next Row [RS]: Repeat Row 2.
Repeat Rows 1-2 28[32, 36, 38, 42, 46, 48] times total, ending with a RS row. 58[66, 74, 76, 84, 92, 96] rows worked with CC4.
Repeat Row 1 once more.
Next Row [RS]: Sl1, work in Seed Stitch to m, sm, k to last st, p1tbl.
Cut yarn leaving a 2 inch/5 cm tail and switch to CC3.
Next Row [WS]: Sl1, p to m, sm, work in Seed Stitch for 8 sts, k1.
Next Row [RS]: Repeat Row 2.
Repeat Rows 1-2 28[32, 36, 38, 42, 46, 48] times total, ending with a RS row. 58[66, 74, 76, 84, 92, 96] rows worked with CC3.
Repeat Row 1 once more.
Next Row [RS]: Sl1, work in Seed Stitch to m, sm, k to last st, p1tbl.
Cut yarn leaving a 2 inch/ 5 cm tail and switch to CC2.
Next Row [WS]: Sl1, p to m, m, work in Seed Stitch for 8 sts, k1.
Next Row [RS]: Repeat Row 2.
Repeat Rows 1-2 28[32, 36, 38, 42, 46, 48] times total, ending with a RS row. 58[66, 74, 76, 84, 92, 96] rows worked with CC2.
Repeat Row 1 once more.
Next Row [RS]: Sl1, work in Seed Stitch to m, sm, k to last st, p1tbl.
Cut yarn leaving a 2 inch/5 cm tail and switch to CC1.
Next Row [WS]: Sl1, p to m, sm, work in Seed Stitch for 8 sts, k1.
Next Row [RS]: Repeat Row 2.
Repeat Rows 1-2 28[32, 36, 38, 42, 46, 48] times total, ending with a RS row. 58[66, 74, 76, 84, 92, 96] rows worked with CC1.
Repeat Row 1 once more.
Next Row [RS]: Sl1, work in Seed Stitch to m, sm, k to last st, p1tbl.
Cut yarn leaving a 2 inch/5 cm tail and switch to MC.
Next Row [WS]: Sl1, p to m, sm, work in Seed Stitch for 8 sts, k1.
Next Row [RS]: Repeat Row 2.
Repeat Rows 1-2 28[32, 36, 38, 42, 46, 48] times total, ending with a RS row. 58[66, 74, 76, 84, 92, 96] rows worked in MC.
Repeat Row 1 once more.
Next Row [RS]: Sl1, work in Seed Stitch to m, sm, k to last st, p1tbl.
Cut yarn leaving a 2 inch/5 cm tail and switch to CC5.
Next Row [WS]: Sl1, p to m, sm, work in Seed Stitch for 8 sts, k1.
Next Row [RS]: Repeat Row 2.
Repeat Rows 1-2 14[16, 18, 19, 21, 23, 24] times total, ending with a RS row. 29[33, 37, 39, 43, 47, 49] rows worked.
Cut yarn leaving a 40 inch/101.5 cm tail.
FINISHING
Graft live sts and provisional CO sts of the skirt with Kitchener Stitch.
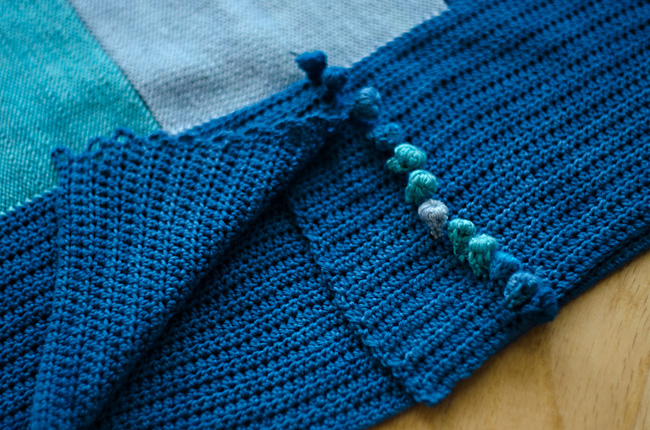
With WS facing, sew the skirt and the waistband together, with the Seed Stitch edge as the lower border of the skirt. Depending on your size, the waistband might end up having a larger circumference than the skirt. In that case, you can overlap and sew the two waistband edges together (see pictures of sample). To check if an overlap is needed before sewing, pin the waistband on the skirt. There should be no ease and almost a stitch for stitch pairing.


Sew the buttons, weave in ends, wash and block to measurements.

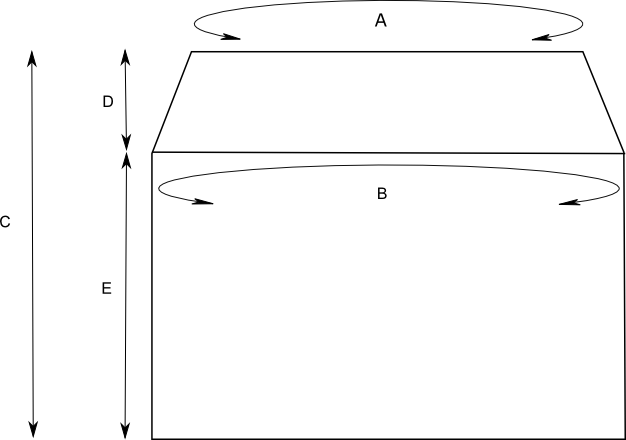
A: waist circumference: 25.75[29.75, 33.75, 37.5, 41.5, 45.5, 49.5] inches/ 65.5[75.5, 85.5, 95.5, 105.5, 115.5, 125.5] cm
B: hip circumference: 35.5[39.5, 43.25, 47.25, 51.25, 55, 59] inches/ 90[100, 110, 120, 130, 140, 150] cm
C: total length: 16.5 inches/41.5 cm
D: waistband length: 5.25 inches/13.5 cm
E: skirt length: 11.25 inches/28.5 cm
ABOUT THE DESIGNER
 Asimina Saranti is a Computer Engineer. She likes to travel, immerse in other cultures and of course, knit!
You can find her designs on Ravelry and follow her knitting and life adventures on her blog.
Pattern & images © 2018 Asimina Saranti.