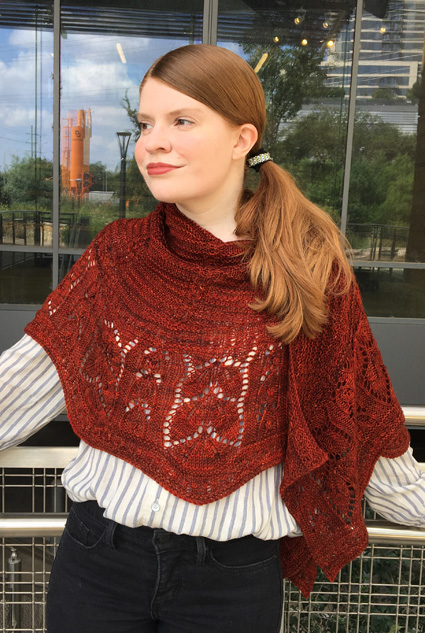
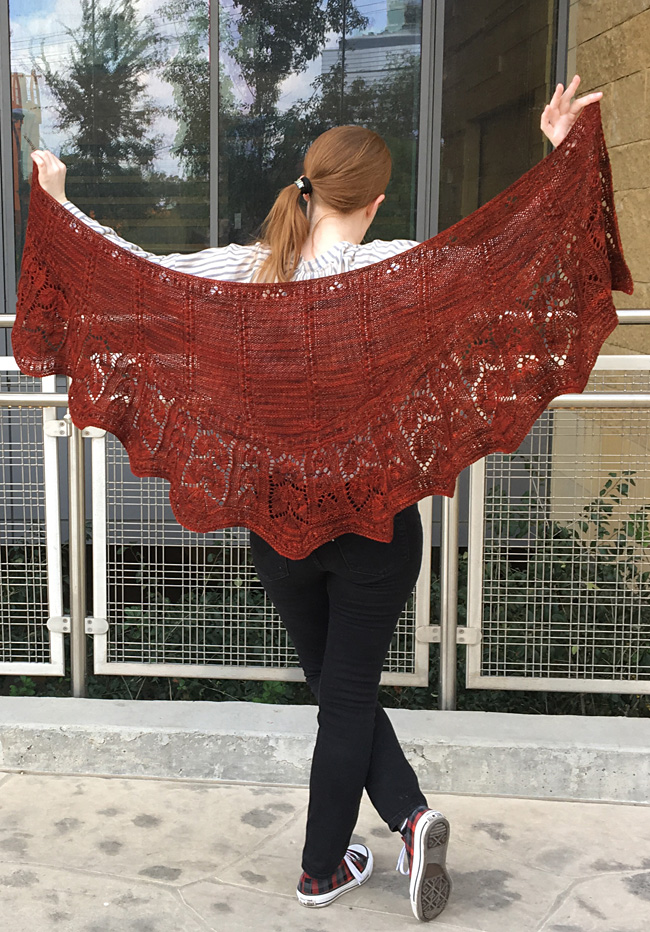
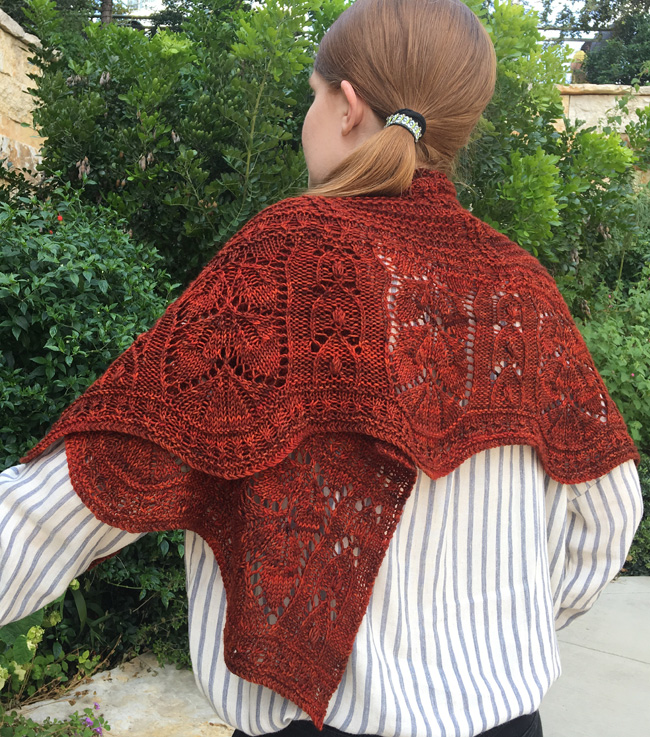
Feuille-morte, a free knitting pattern from Knitty.com. Free knitting pattern for a elegantly patterned lace shawl.
INTRODUCTION
Feuille-morte
 by Sarah Ellis
![]()
The yoke patterns in the second volume of Hitomi Shida's stitch dictionaries have been a particular inspiration to me... I love coming up with applications that aren't sweater yokes for those stitch arrangements. Shortened versions for crescent wrap borders (like this one) are the most obvious application, but there are other intriguing possibilities like making batwing sleeves, or using a single panel to add decorative shaping to a garment.
And this pattern also includes one of my favorite novelty stitches, which I've been calling a 'tuck bobble', but I've seen referred to in other sources (like the Cartouche shawl) as a 'flower bud'. The five-stitch variant is my favorite, because it has a pleasant squishiness to it.
However, a part of me loves the fill for the short-rowed upper section of this wrap even more than the lower lacy section. The contrast of the ridges with the mini cables is so satisfying, and it balances out this piece better than a plain stockinette fill would have.
The literal translation of 'feuille-morte' from French is 'dead leaves', but is used in English to refer to the color of withered leaves, specifically of the russet variety. A fancy fall-related word for a fancy leafy wrap.
 model: Sarah Ellis
 photos: Martha Ellis
SIZE
One
FINISHED MEASUREMENTS
Width along top curve: 52.5 inches / 133 cm
Depth at center: 23.5 inches / 60 cm
MATERIALS
Yarn
![]() Dragonfly Fibers Damsel [100% superwash merino; 340 yd/306 m per 4 oz/115 g skein]; color: Corteza Roja; 3 skeins
Dragonfly Fibers Damsel [100% superwash merino; 340 yd/306 m per 4 oz/115 g skein]; color: Corteza Roja; 3 skeins
Recommended needle size
[always use a needle size that gives you the gauge listed below - every knitter's gauge is unique]
![]() US #8/5mm circular needle, 32 inch/80 cm or longer to accommodate stitches
US #8/5mm circular needle, 32 inch/80 cm or longer to accommodate stitches
![]() US #9/5.5mm circular needle, 32 inch/80 cm or longer to accommodate stitches (for CO only)
US #9/5.5mm circular needle, 32 inch/80 cm or longer to accommodate stitches (for CO only)
Notions
![]() cable needle
cable needle
![]() yarn needle
yarn needle
![]() 4 stitch markers
4 stitch markers
![]() T-pins for blocking
T-pins for blocking
![]() blocking wires (recommended)
blocking wires (recommended)
![]() flexible blocking wires, or nylon monofilament, 50lb test or larger (recommended – fishing line also works); this makes pinning out the scalloped edge a little easier but it's not crucial if you can't find it.
flexible blocking wires, or nylon monofilament, 50lb test or larger (recommended – fishing line also works); this makes pinning out the scalloped edge a little easier but it's not crucial if you can't find it.

GAUGE
16 sts/24 rows = 4 inches/10 cm in stockinette stitch
16 sts/28 rows = 4 inches/10 cm in garter ridge stitch
PATTERN NOTES
[Knitty's list of standard abbreviations and techniques can be found here.]
The selvedge is created by slipping the last stitch of every row (aside from short rows) knitwise with yarn in back. On the following row, fold the yarn around the edge to the back, then knit the first stitch as normal.
The bind-off should be very firm, or the shape will stretch too much when blocking. Stretchy bind-offs like the suspended bind-off, decrease bind-off, or Jeny's Surprisingly Stretchy are not recommended. Work a standard bind-off, and with a tight tension.
Short Rows
The upper section of the shawl is shaped with short rows. The turn gaps are closed with decreases, a very straightforward method that avoids any fussing with wraps or double stitches. When the instruction says turn, just turn. The gaps are covered up with decreases.
Techniques:
- C2B: slip 1 st to cn and hold in back; k1; then k1 from cn.
- C2F: slip 1 st to cn and hold in front; k1; then k1 from cn.
- C4D: [centered quadruple decrease] slip 3 sts together as if to knit, knit next 2 sts tog, pass 3 slipped stitches over. 4 sts decreased.
- Inc 5: knit 1 stitch into purl bump two rows below, leaving it on the needle, [YO, k1 into purl bump two rows below] twice more. Drop original stitch off left needle and let stitches unravel.
- SSSK: slip the next 3 stitches, 1 by 1, knitwise; insert the tip of the left needle from left to right into the fronts of those 3 sts and knit them tog. 2 sts decreased.
- twisted k2tog: slip 1 st purlwise, slip next st as if to knit through the back loop; return both sts to left needle and knit them tog. 1 st decreased.
- twisted sk2p: slip 1 st purlwise, work twisted k2tog on next 2 sts, pass slipped stitch over. 2 sts decreased.
- twisted SKP: slip 1 st purlwise, knit next st, pass slipped stitch over. 1 st decreased.
Garter ridge stitch [for gauge]
Row 1 [RS]: Knit.
Row 2 [WS]: Purl.
Row 3 [RS]: Knit.
Row 4 [WS]: Knit.
CHARTS
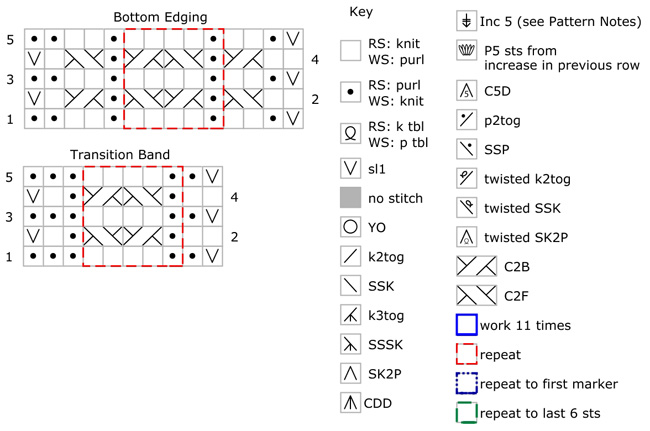
Bottom Edging
Rows 1, 3, 5 [WS]: K2, p2, k1, [p4, k1] to last 4 sts, p2, k1, sl1.
Row 2 [RS]: K2, C2F, p1, [C2B, C2F, p1] to last 4 sts, C2B, k1, sl1.
Row 4 [RS]: K2, C2B, p1, [C2F, C2B, p1] to last 4 sts, C2F, k1, sl1.
Transition Band
Rows 1, 3, 5 [WS]: K2, [k1, p4] to last 3 sts, k2, sl1.
Row 2 [RS]: K2, [p1, C2B, C2F] to last 3 sts, p1, k1, sl1.
Row 4 [RS]: K2, [p1, C2F, C2B] to last 3 sts, p1, k1, sl1.
Edging Pattern
Row 2 [RS]: K2, C2B, C2F, [p1, C2B, C2F, p1, YO, cdd, YO, (p1, C2B, C2F) x2] to marker, slip marker, p1, C2B, C2F, [p1, YO, cdd, YO] x2, p1, C2B, C2F, p1, slip marker, [(C2B, C2F, p1) x2, YO, cdd, YO, p1, C2B, C2F, p1] 5 times, C2B, C2F, p1, sl1.
Row 4 [RS]: K2, C2F, C2B, [p1, C2F, C2B, p1, k1, YO, SSK, (p1, C2F, C2B) x2] to marker, slip marker, p1, C2F, C2B, p1, k1, YO, SSK, p1, k2tog, YO, k1, p1, C2F, C2B, p1, slip marker, [(C2F, C2B, p1) x2, k2tog, YO, k1, p1, C2F, C2B, p] 5 times, C2F, C2B, k1, sl1.

dowload main + edging charts (too large to fit on this page)
DIRECTIONS
Bottom edging
Using the Cable method and larger needles, CO 459 stitches.
Switch to smaller needles.
Setup Rows 1-3: K to last st, sl1.
Work Bottom Edging.
Repeat Setup Rows 1-3, starting and ending with RS.
Main pattern
WS is facing.
Work Main Pattern, working bordered section 11 times, as indicated.
Work as set until pattern is complete. 299 sts.
Transition band
Rows 1-2: K to last st, sl1.
Row 3 [RS] (K2, k2tog) twice, [k24, k2tog] 5 times, k23, [SSK, k24] 5 times, SSK, k2, SSK, k1, sl1. 285 sts.
Work Transition Band, repeating bordered section.
Next 2 rows: K to last st, sl1.
Short-row section:
Row 1 [RS]: K151, turn.
Row 2 [WS]: P17, turn.
Row 3 [RS]: K16, SSK, k6, turn. 1 st decreased.
Row 4 [WS]: K1, p4, k17, k2tog, k1, p4, k1, turn. 1 st decreased.
Row 5 [RS]: P1, C2B, C2F, p1, k17, p1, C2B, C2F, SSP, k3, turn. 1 st decreased.
Row 6 [WS]: P3, k1, p4, k1, p17, k1, p4, k2tog, p3, turn. 1 st decreased.
Row 7 [RS]: K3, pm, p1, C2F, C2B, p1, k17, p1, C2F, C2B, p1, pm, k2, SSK, k2, turn. 1 st decreased.
Row 8 [WS]: K6, p4, k19, p4, k3, k2tog, k2, turn. 1 st decreased.
Row 9 [RS]: K5, p1, C2B, C2F, p1, k17, p1 C2B, C2F, p1, k4, SSK, k3, turn. 1 st decreased.
Row 10 [WS]: P8, k1, p4, k1, p17, k1, p4, k1, p4, p2tog, p3, turn. 1 st decreased.
At this point, the pattern between the markers is set: the center 17 sts are worked in a garter ridge pattern: 3 rows of stockinette followed by a WS knit row, worked every fourth row, on rows 12, 16, 20, 24, 28. Either side of that is a cable motif, worked as follows:
RS row 1, starting on Row 11 of short rows: P1, C2F, C2B, p1.
All WS rows: K1, p4, k1.
RS row 3, starting on Row 13 of short rows: P1, C2B, C2F, p1.
In subsequent rows, you'll build up additional repeats of the pattern, as you work the short rows. (There is a slight difference to subsequent repeats, as noted below.)
Row 11 [RS]: K to marker, work to marker in pattern as set, k7, SSK, k2, turn. 1 st decreased.
Row 12 [WS]: K to marker, work to marker in patter as set, k8, k2tog, k2, turn. 1 st decreased.
Row 13 [RS]: K to marker, work to marker in pattern as set, k9, SSK, k3, turn. 1 st decreased.
Row 14 [WS]: P to marker, work to marker in pattern as set, p9, p2tog, p3, turn. 1 st decreased.
Row 15 [RS]: K to marker, work to marker in pattern as set, k12, SSK, k6, turn. 1 st decreased.
Row 16 [WS]: K1, p4, k to marker, work to marker in pattern as set, k12, k2tog, k1, p4, k1, turn. 1 st decreased.
Row 17 [RS]: P1, C2B, C2F, p1, k to marker, work to marker in pattern as set, k13, p1, C2B, C2F, SSP, k3, turn. 1 st decreased.
Row 18 [WS]: P3, k1, p4, k1, p13, work to marker in pattern as set, p13, p1, p4, k2tog, p3, turn. 1 st decreased.
Row 19 [RS]: K3, pm, p1, C2F, C2B, k13, remove marker, work to next marker in pattern as set, remove this marker, k12, p1, C2F, C2B, p1, pm, k2, SSK, k2, turn. 1 st decreased.
Note: These markers denote the ends of the set patterns. You now have two new repeats set, one each side of the central motif. Each repeat adds a new column of cables, and 13 stitches of the garter ridge pattern. All subsequent repeats added will match these. The only garter ridge section with 17 stitches is the central one.
Row 20 [WS]: K to marker, work to marker in pattern as set, k2, k2tog, k2, turn. 1 st decreased.
Row 21 [RS]: K to marker, work to marker in pattern as set, k4, SSK, k3, turn. 1 st decreased.
Row 22 [WS]: P to marker, work to marker in pattern as set, p4, p2tog, p3, turn. 1 st decreased.
Row 23 [RS]: K to marker, work to marker in pattern as set, k7, SSK, k2, turn. 1 st decreased.
Row 24 [WS]: K to marker, work to marker in pattern as set, k7, k2tog, k2, turn. 1 st decreased.
Row 25 [RS]: K to marker, work to marker in pattern as set, k9, SSK, k3, turn. 1 st decreased.
Row 26 [WS]: P to marker, work to marker in pattern as set, p9, p2tog, p3, turn. 1 st decreased.
Row 27 [RS]: K to marker, k12, SSK, k6, turn. 1 st decreased.
Row 28 [WS]: K1, p4, k to marker, work to marker in pattern as set, k13, k2tog, k1, p4, k1, turn. 1 st decreased.
Repeat Rows 17-28 three more times. 224 sts.
Row 65 [RS]: P1, C2B, C2F, work in pattern as set to last 6 sts, C2B, C2F, k2tog, sl1. 1 st decreased.
Row 66 [WS]: K2, p4, work in pattern as set to last 6 sts, p4, SSK, sl1. 221 sts.
Note: Short-rows are now complete on both sides.
Rows 67 and 68: K2, work in pattern as set, placing markers around the center 19 sts (the 17 of the garter ridge section plus the purl stitch either side), k1, sl1.
Top edging
Rows 1-3: K to last st, sl1.
Work Edging pattern.
Markers can be removed on the next row.
Last 2 rows: K to last st, sl1.
Bind off firmly. See Pattern Notes.

FINISHING
Weave in ends, and wet block shawl. If using blocking wires and nylon monofilament, thread wires through side selvedges, and weave monofilament through cast-on (and, optionally, the row before bind-off) before pinning.
ABOUT THE DESIGNER
 Sarah Ellis lives in Central Texas, along with many cats. She learned how to knit when she was almost ten, and has scarcely spent a day without her knitting since then. She also codes (her speciality is the MERN stack), and built her current website using Gatsby.js.
You can find her on Instagram, Ravelry, and her website.
Pattern & images © 2019 Sarah Ellis.