Nudibranchia, a free knitting pattern from Knitty.com. Free knitting pattern for a DETAILS HERE.
INTRODUCTION
Nudibranchia
 by Cate Carter-Evans

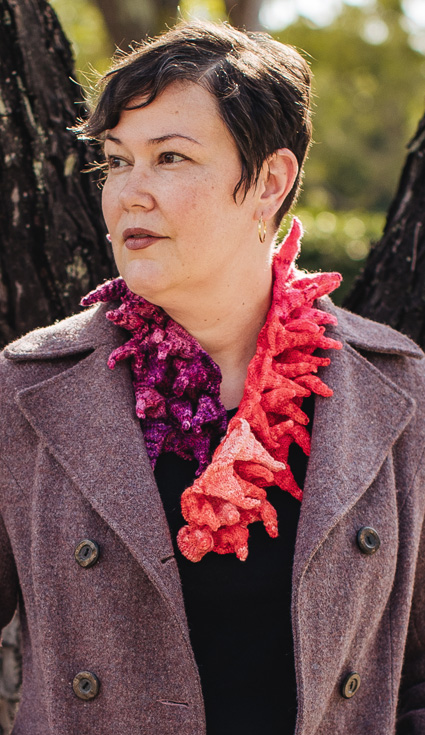
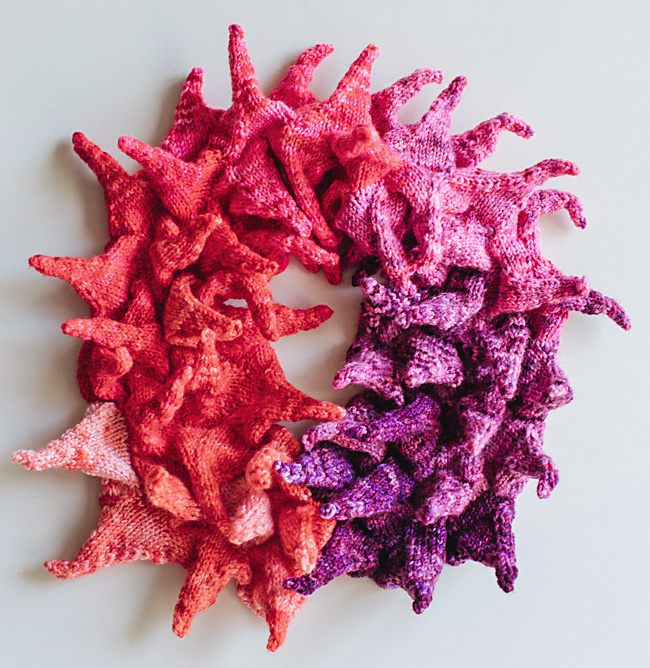
A modular scarf inspired by a colorful and highly textured family of elegant gastropods.
What the heck is a nudibranch? You may know them as sea slugs. Before you get grossed out by the slug factor, have a look at the sea bunny, the peregrina and the Spanish Shawl.
Now that you're solidly pro-sea slug, back to the scarf. It's stop-and-stare gorgeous, easy to knit, and would be totally at home on a fashion runway - but some knitters may be looking at it with trepidation.
It's no fiddlier than knitting hexi-puffs, and you don't have to sew anything together when you're done. If you're on the fence, knit one cone. It's about ten minutes of work, and the first one is the worst. You also don't have to knock the whole thing out in one sitting. It's a small enough project to fit in a purse or backpack, and you can transform ten minutes waiting for the dentist into one finished cone. Knit two cones a day, and you're done in a month.
As for weaving in ends, it's half as many ends as you'd think. The tips of the points are narrow and tight enough that you just poke the end of the yarn through the tip of the cone and clip it off – no need to weave it in.
It's fun to knit, and more than a little addictive. There's a delightful thrill of accomplishment when you finish each cone, and you get to enjoy that feeling 60 times.
Strangers and friends will be fascinated by your knitting and your finished object, and this project is be a perfect way to use up even your smallest sock yarn scraps.
Just think of the satisfaction you'll get when you tell people that yes, you made it.
 model: Cate Carter-Evans
photos: Trina Costes-Siojo
SIZE
One
FINISHED MEASUREMENTS
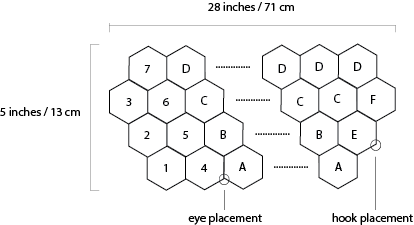
Width: 5 inches/13cm
Length: 28 inches/71cm as written, may be adjusted to fit
MATERIALS
Yarn
![]() Infinite Twist Helix Gradient [100% Merino, 500 yds/ 457 m per 5.8 oz / 165 g]; color: Favorite; 1 skein. Sample used 450 yds / 412 m.
Infinite Twist Helix Gradient [100% Merino, 500 yds/ 457 m per 5.8 oz / 165 g]; color: Favorite; 1 skein. Sample used 450 yds / 412 m.
Recommended needle size
[always use a needle size that gives you the gauge listed below - every knitter's gauge is unique]
![]() US #4/3.5mm needles for working small circumference in the round. Short DPNs are recommended for the small stitch counts, but other methods would work.
US #4/3.5mm needles for working small circumference in the round. Short DPNs are recommended for the small stitch counts, but other methods would work.
Notions
![]() 4 removable stitch markers in two colors
4 removable stitch markers in two colors
![]() yarn needle
yarn needle
![]() Optional: hook and eye closure, sewing thread to match your yarn, and sewing needle
Optional: hook and eye closure, sewing thread to match your yarn, and sewing needle
GAUGE
24 sts/40 rounds = 4 inches/10 cm in stockinette stitch
PATTERN NOTES
[Knitty's list of standard abbreviations and techniques can be found here.]
 The scarf is easily lengthened: as noted in the Body of Scarf instructions, simply work additional repeats of the Body Tier.
The Cone
Round 1: Knit.
Round 2: [K8, k2tog] 3 times. 27 sts.
Round 3: [K7, k2tog] 3 times. 24 sts.
Round 4: [K6, k2tog] 3 times. 21 sts.
Round 5: Knit 1 round.
Round 6: [K5, k2tog] 3 times. 18 sts.
Round 7: Knit 1 round.
Round 8: [K4, k2tog] 3 times. 15 sts.
Round 9 & 10: Knit 2 rounds
Round 11: [K3, k2tog] 3 times. 12 sts.
Round 12 & 13: Knit 2 rounds.
Round 14: [K2, k2tog] 3 times. 9 sts.
Round 15 – 17: Knit 3 rounds.
Round 18: [K1, k2tog] 3 times. 6 sts.
Round 19 – 21: Knit 3 rounds.
Round 22: [K2tog] 3 times. 3 sts.
Round 23: Knit. Break yarn, leaving a 4 inch/ 10 cm tail, and thread the end onto a yarn needle. Pass the end through the three remaining sts twice, and pass the end through the tip of the cone.
DIRECTIONS
FOUNDATION TIERS
Cone One - Setup
Cast on 30 sts. Divide stitches into 3 groups of 10 stitches, either splitting them across 3 DPNs, or using markers to divide them up. Note or mark start of round and join for working in the round. Work The Cone (see Pattern Notes).
You now have a cone with a roughly triangular base, and three distinct vertical lines formed by your decreases. Subsequent setup steps will use these lines for placement.
Cone Two - Setup
Cast on 25 sts. Do not join, just use the working yarn to pick up and knit 5 sts along the lower edge of the first cone, beginning at one of the decrease lines. Place a removable marker in the first picked-up stitch.
Note or mark start of round, distribute sts as you prefer, so that you have three groups of 10 stitches, join for working in the round and work The Cone.
You now have two cones joined by 5 sts.
Note: To set up new cones, you will be picking up stitches along the base of previously-worked cones. All directions for where to pick up assume you have the right side facing, i.e. the pointy ends of the cones are facing up, and you are counting along the bases of your already completed work. In each case, you will cast on a specific number of stitches, and then using the working yarn pick up and knit stitches to add them to the end of the round, so that you'll have 30 in total. Once the pick up is complete, distribute sts as you prefer and join for working in the round. If you're using DPNs, it's easiest to work with 10 on each needle. If you're using another setup, make sure you can keep track of groups of ten. The diagram will help with positioning.
All clockwise and counterclockwise directions are based on the cone they reference, e.g. “count clockwise 5 sts along the edge of Cone 4" assumes that you are treating the base of Cone 4 as the face of a clock, with the top of the cone being 12:00.
Cone Three - Setup
Cast on 25 sts. Starting at the removable marker placed at the base of the Cone Two, count counter-clockwise 10 sts along the edge of Cone Two and place another marker. You should have five stitches between this second marker and the next decrease line. Starting at this new position, pick up and knit an additional 5 sts, working right to left, along the edge of Cone Two.
Note or mark start of round, distribute sts as you prefer, join for working in the round and work The Cone.
Cone Four - Setup
Cast on 25 sts. Refer to the marker you placed when setting up Cone Two, count clockwise 10 sts along the edge of Cone One, and pick up and knit 5 sts.
Note or mark start of round, distribute sts as you prefer, join for working in the round and work The Cone. This becomes Cone A, for the purposes of the Body of Scarf instructions. Remove the marker.
Cone Five - Setup
Cast on 15 sts. Starting at the inside junction between Cones One and Four (the one closest to Cone Two), count clockwise 5 sts along the edge of Cone 4, pick up and knit 5 sts along the edge of Cone Four, 5 stitches along the edge of Cone 1, and five stitches along the edge of Cone Two.
Note or mark start of round, distribute sts as you prefer, join for working in the round and work The Cone. This becomes Cone B, for the purposes of Body of Scarf instructions.
Cone Six - Setup
Cast on 15 sts. Starting at the junction of Cones Two and Five, count clockwise 5 sts along the edge of Cone Five, pick up and knit 5 sts along the edge of Cone Five, 5 stitches along the edge of Cone Two, and five stitches along the edge of Cone Three.
Note or mark start of round, distribute sts as you prefer, join for working in the round and work The Cone. This becomes Cone C, for the purposes of the Body of Scarf instructions.
Cone Seven - Setup
Cast on 20 sts. Starting at the junction between Cones Six and Three, count clockwise 5 stitches along the edge of Cone 6, pick up and knit 5 stitches along the edge of Cone Six, and 5 stitches along the edge of Cone 3.
Note or mark start of round, distribute sts as you prefer, join for working in the round and work The Cone. This becomes Cone D, for the purposes of the Body of Scarf instructions.

BODY OF SCARF
Cone A
Cast on 25 sts. Count clockwise 10 stitches from the junction of the previous tier's Cones A and B, and pick up and knit 5 sts, heading towards the junction point.
Note or mark start of round, distribute sts as you prefer, join for working in the round and work The Cone.
Cone B
Cast on 15 sts. Starting at the junction point between the just-created Cone A and the previous tier's Cone A, count clockwise 5 sts, and pick up and knit 5 sts along the edge of just-worked Cone A, 5 sts along the edge previous tier's Cone A, and 5 sts along the edge of previous tier's Cone B.
Note or mark start of round, distribute sts as you prefer, join for working in the round and work The Cone.
Cone C
Cast on 15 sts. Starting at the junction point between the just-created Cone B and previous tier's Cone B, count clockwise 5 sts, and pick up and knit 5 sts along the edge of just-worked Cone B, previous tier's Cone B and previous tier's Cone C.
Note or mark start of round, distribute sts as you prefer, join for working in the round and work The Cone.
Cone D
Cast on 15 sts. Starting at the junction point between the just-created Cone C and previous tier's Cone C, count clockwise 5 sts, and pick up and knit 5 sts along the edge of just-worked Cone C, previous tier's Cone C and previous tier's Cone D.
Note or mark start of round, distribute sts as you prefer, join for working in the round and work The Cone.
Continue here:
Repeat this process, creating Cones A, B, C and D, until scarf measures 1 inch/2.5 cm short of desired length, or yarn has just about been used up.
Note: Sample as shown has 12 tiers in this section.
ENDING TIERS
Note: The scarf concludes with two partial tiers of cones. The first cone in each partial tier is slightly different from previous cones.
Second Last Tier
Cone E
Cast on 20 sts. Starting at the junction point between the previous tier's Cone A and Cone B, count clockwise 5 sts, and pick up 5 sts along previous tier's cone A, and 5 sts along previous tier's Cone B.
Note or mark start of round, distribute sts as you prefer, join for working in the round and work The Cone.
Work a Cone C and a Cone D as established to complete the tier. When picking up for Cone C, you'll be picking up from Cone E instead of Cone B.
Final Tier
Cone F
Cast on 20 sts. Starting at the junction point between the previous tier's Cone B and Cone C, count clockwise 5 sts, and pick up 5 sts along Cone E, and 5 sts along previous tier's Cone C.
Note or mark start of round, distribute sts as you prefer, join for working in the round and work The Cone.
Work a Cone D to complete the tier. When picking up, you'll be picking up from Cone F instead of Cone C.

FINISHING
Fold the outside edge of each cone under (toward the back side of the scarf) and use any convenient yarn ends to stitch them down one quarter of an inch /6 mm at the middle of the cone. Your hem will be thinner toward the joins since you can't easily fold the joins under.
Weave in your remaining ends, or single crochet over them to secure them if you prefer.
Optional: Use a sewing needle and thread to attach a hook and eye closure to your scarf. Refer to diagram for hook and eye placement.
I found that a quick round of steam was all this piece needed for blocking. If you choose to wet block your scarf, do not lay it out flat with the cones pointing up – they will fall over, lay funny, and probably never recover. Instead, lay the scarf out with the cones poking down in between the rods or mesh of a folding clothes dryer so they dry in a vertical orientation. If you don't have a clothes dryer, a muffin pan or wide-mesh baking rack could also be used.
ABOUT THE DESIGNER
 Cate Carter-Evans is an American dyer, knitter, weaver, spinner, and seamstress residing in Singapore. Her yarns, patterns, and organizational workbooks for knitters can be found here. Her activities are overseen by two unimpressed cats and a three-legged dog.
Find her here on Ravelry.
Pattern & images © 2019 Cate Carter-Evans.