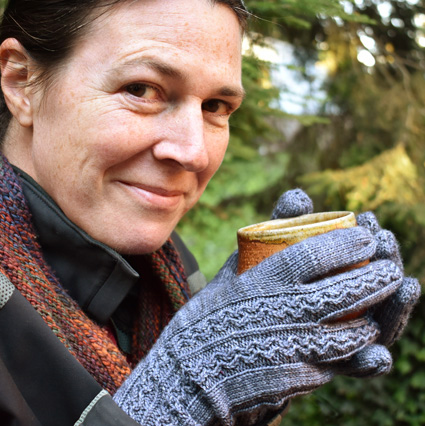
Single Strand Gloves, a free knitting pattern from Knitty.com. Free knitting pattern for a pair of gloves with simple cabled detailing and a unique construction method.
INTRODUCTION
Continuity
 by Jeny Staiman

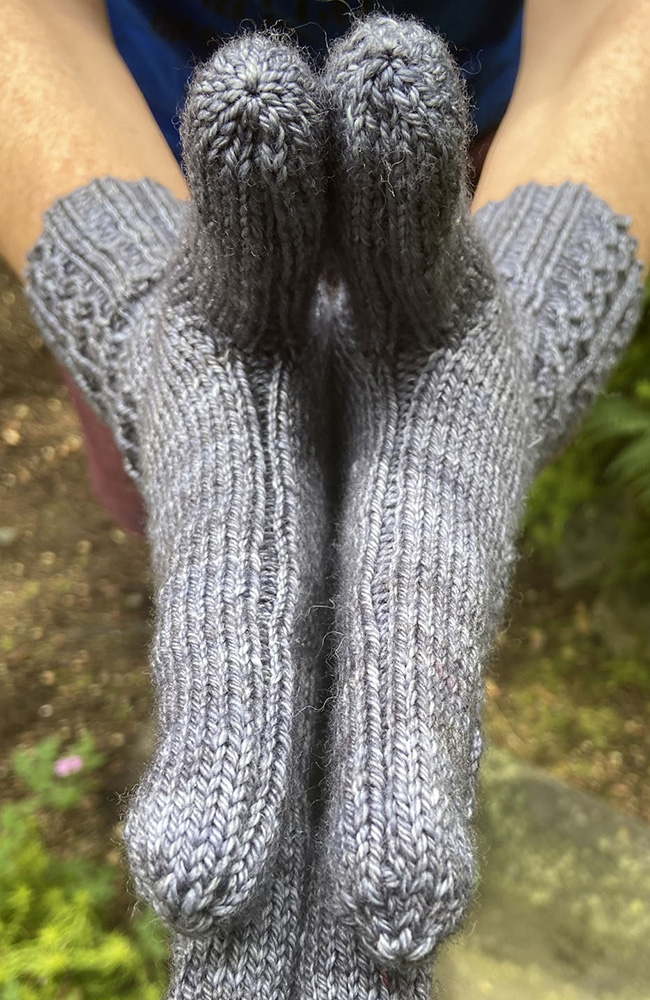
I have always loved knitting complex forms, but I do not love working with many short strands. Every break in a beautiful hand-dyed skein of yarn makes me cringe, and I find it tedious weaving lots of ends into a finished garment. Fortunately, I enjoy finding creative ways to solve pesky problems like this. I was happy to discover that gloves with fully articulated fingers can be knitted without breaking the strand at each fingertip! This pattern will show you how.
Now that I know how to make gloves in one continuous strand, I enjoy the experience so much more, and I hope you will too. This Single-Strand Glove Technique (SSGT) can be applied to any glove or mitten pattern, with fingers of any length or style. Unlike some gloves, the fingers in this design are each finished as you work your way up the hand.
The other challenge of gloves, or any hand wear, is getting a thumb gusset that moves with the hand. I find that many gloves and mittens pinch at the thumb. With careful shaping, sizing, and technique selection, the thumb gusset in this design fits like a second skin.
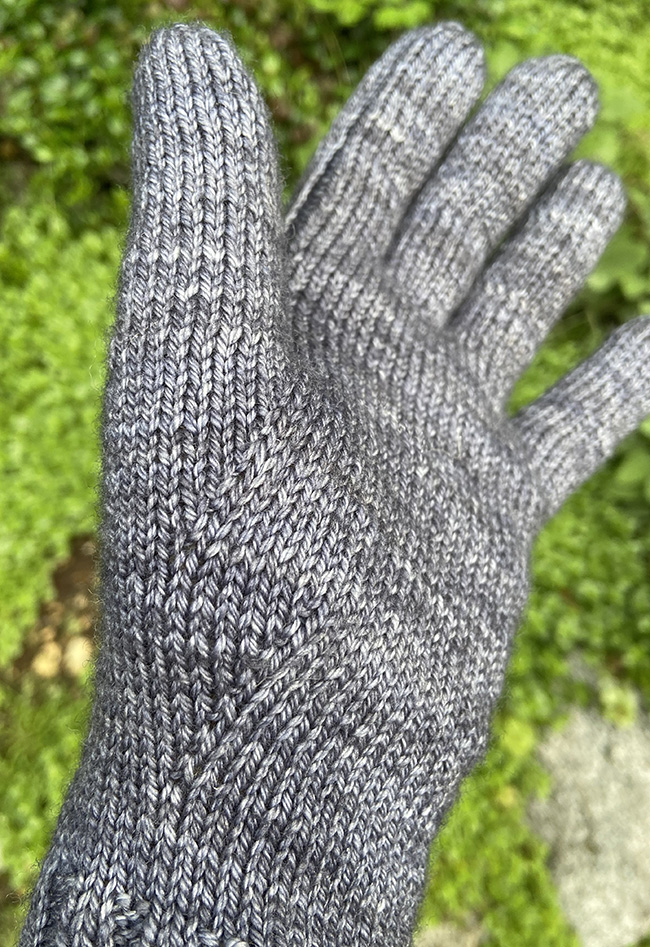
This glove features a decorative twisted stitch motif that runs from cast on to fingertips. If you, like me, enjoy making your own design variations, this motif area is a great place to play.
 model: Jeny Staiman
photos: Jeff Staiman
SIZE
Adult S[M, L, XL]
shown in size L
FINISHED MEASUREMENTS
Glove length (top of wrist to tip of longest finger): 6.5[7.5, 8.5, 9.5] in/ 16.5[19, 21.5, 24] cm – although finger length is adjustable to fit
Glove circumference (measured around the palm): 6[7, 8, 9] in/ 15[17.5, 20, 22.5] cm
MATERIALS
Yarn
![]() Dye House [100% merino wool; 328 yd/300 m per 3.5 oz/100 g]; color: Ooak; 1 skein
Dye House [100% merino wool; 328 yd/300 m per 3.5 oz/100 g]; color: Ooak; 1 skein
Yarn Characteristics: Approximately 200[225, 250, 275] yds/ 180[205, 230, 250] m required. Choose a plied yarn in a solid or near-solid colorway with a tight twist to ensure the gloves are hardwearing and warm.
Recommended needle size
[always use a needle size that gives you the gauge listed below - every knitter's gauge is unique]
![]() 2 sets of US #1/2.5mm needles for small circumference in the round: traditional or flexible DPNs, 1 long circular or two shorter circulars, as you prefer
2 sets of US #1/2.5mm needles for small circumference in the round: traditional or flexible DPNs, 1 long circular or two shorter circulars, as you prefer
If you're working on Magic Loop or two circulars, you might find a set of DPNs easier for the second set.
Notions
![]() stitch markers
stitch markers
![]() yarn needle
yarn needle
Optional:
![]() cable needle
cable needle
![]() stitch holders
stitch holders
![]() crochet hook
crochet hook
![]() scrap yarn (about 12 inches/30 cm)
scrap yarn (about 12 inches/30 cm)

GAUGE
32 sts/44 rounds = 4 in/10 cm in stockinette stitch.
PATTERN NOTES
The pattern features a decorative twisted stitch panel adapted from Twisted-Stitch Knitting: Traditional Patterns & Garments from the Styrian Enns Valley by Maria Erlbacher (Schoolhouse Press, 2009).
Thumb position:
Note that the thumb is not positioned at the midpoint of the hand, but is offset by 2 sts towards the palm side of the glove. This provides a better fit for each hand.
Construction Details
Gloves have a variety of details that are fiddly; the following are my recommendations for achieving the best results.
- Use of cast ons between fingers:
This pattern uses a provisional cast on method at the base of the fingers. This provides superior elasticity for areas of high tension. - Use of needles:
Rather than having you repeatedly slip stitches to holders, the pattern uses a second set of needles to work the thumb and fingers. These rounds are fairly small, and you might find it easier to use short DPNs. - Closing gaps between fingers: At the base of each finger you will pick up 4 sts, and there will be gaps between them and the main set. These gaps are closed as follows:
- Close gap leaning left: sl 1 st purlwise, pick up a loop from the gap, slip both back to left needle and k2tog tbl.
- Close gap leaning right: pick up a loop from the gap and sl 1 st knitwise, sl 1 st knitwise, return both sts back to left needle and knit them together.
Techniques:
- Provisional cast on
- All sts are slipped purlwise unless otherwise noted.
- Single Strand Glove Technique (SSGT)
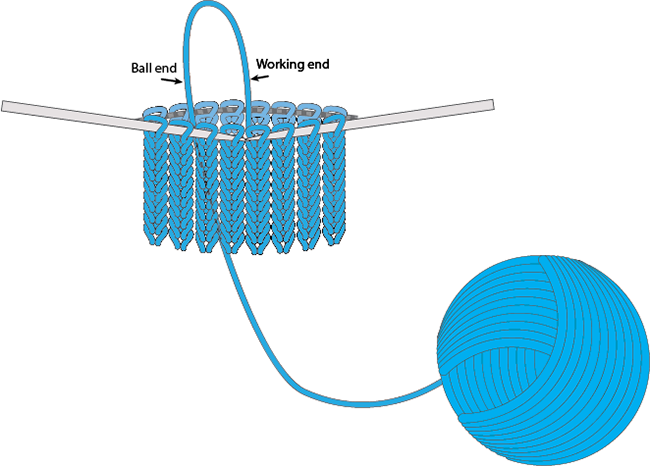
When making gloves in the usual manner, each time you finish a finger, instructions will tell you to break the strand and resume knitting in a new location with a new strand (see below).
That's because the ball of yarn is stuck on the outside of the finished finger, and it's too large to feed back through. If you work the fingers by feeding the yarn through the inside, your ball of yarn will never end up on the outside, thus you can hide the working strand on the inside without breaking it. As you finish each finger, simply pull the working strand back down to the base of the finger and continue working (see below).
Note: If while working the finger you realize you made a mistake and now the ball of yarn is stuck on the outside (I have done this many times), you can get the ball back on the inside without starting the finger again. Thread the working strand through the inside of the finger tube and out the bottom, then re-wind the entire ball of yarn. Otherwise you must either start the finger over again or break the strand at the fingertip.SSGT Execution
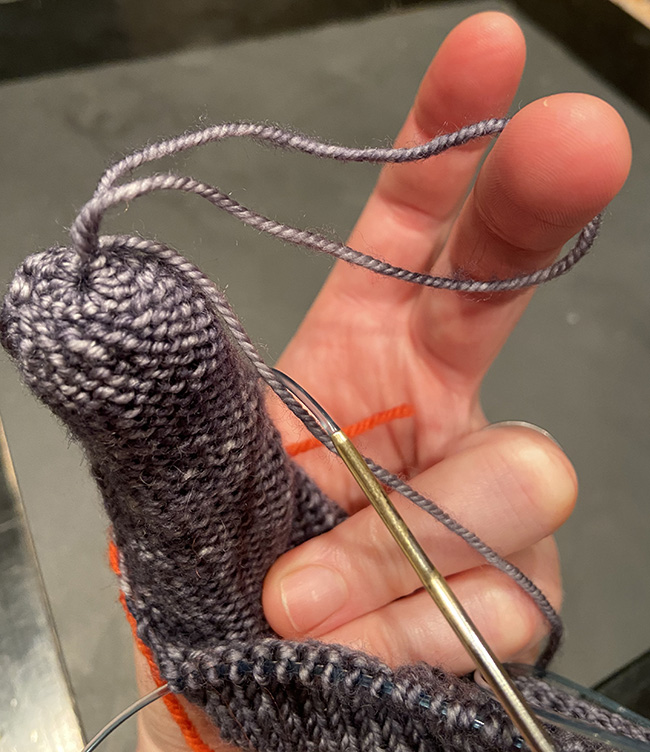
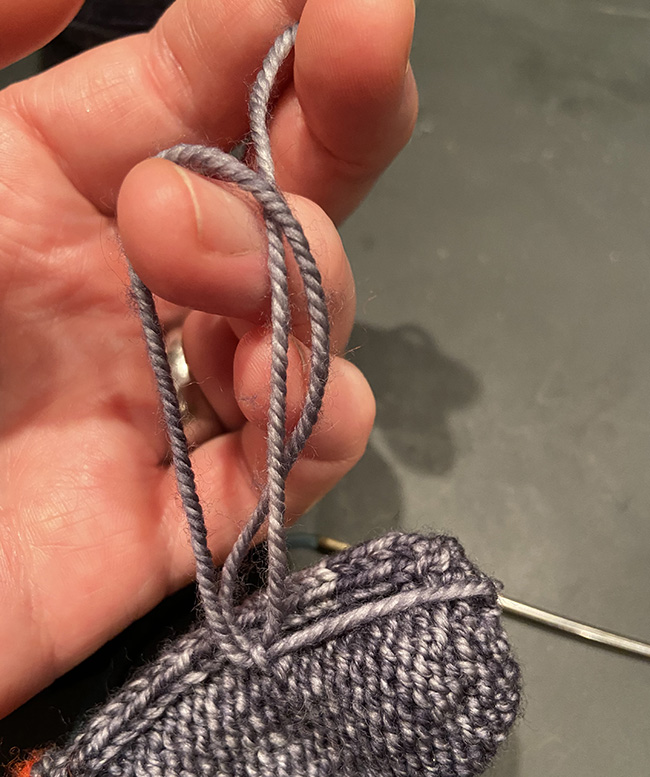
Setup: When starting each new finger, cast on 4 sts. Just before you start knitting in the round, draw a loop of the working yarn from under the needle.
Work the finger: Continue the finger while feeding the yarn through the inside. Take care to use the working end of the loop, not the ball end.
Secure the end of the finger: After you work the last sts on each finger, thread the loop of working yarn through a yarn needle and draw it through all remaining sts. Then use the needle to insert this loop-tail inside the finger. Turn the finger inside out and remove the yarn needle.
Widen the loop enough to bring the ball of yarn through the loop. Snug the loop.
Anchor the working strand: With the finger still inside out, draw a loop of working yarn through a stitch, widen the loop enough to bring the ball of yarn through, the gently snug. Two or three anchors should secure your yarn nicely before you continue working
Video demo:


CHARTS
RT: Slip next st to cable needle, hold in back, k1b then p1 from cable needle
LT: Slip next st to cable needle, hold in front, p1 then k1b from cable needle.
DRT: Slip next st to cable needle, hold in back, k2 tbl, then p1 from cable needle.)
DLT: Slip next 2 sts to cable needle, hold in front, p1 then k2 tbl from cable needle)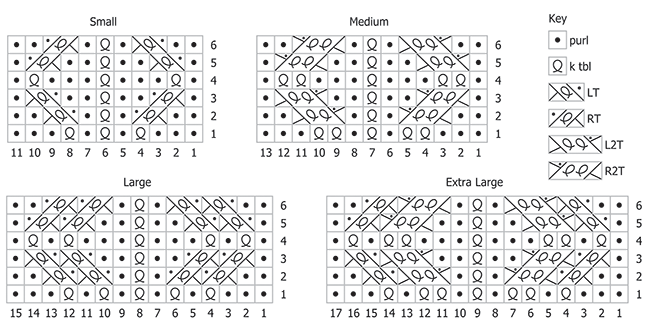
DIRECTIONS
Using your preferred stretchy method, CO 42[48, 54, 60] sts. Distribute across needles as you prefer and join for working in the round. Rounds begin on the little finger side.
Right hand
Cuff
Rnd 1: K2, p2, k2, pm, work Motif for your size across next 11[13, 15, 17] sts, pm, (k2, p2) to last 3 sts, p3.
Rnd 2: K2, p2, k2, work Motif between markers, (k2, p2) to last st, p1.
Continue in pattern as set until work measures 2.5 in/6.5 cm from CO.
Wrist
Rnd 1: K to marker, work Motif as set between markers, k to last 3 sts, p3.
Continue in pattern as set until work measures 3 in/7.5 cm from CO.
Thumb Gusset
Setup: Work in patt as set across the first 21[23, 25, 27] sts, pm for gusset, k4, pm for gusset, k to 3 before end, p3.
Rnd 1: Work in patt as set to first gusset marker, sl m, m1R, k to next marker, m1L, sl m, work in patt as set to end. 2 sts increased.
Rnd 2: Work in patt as set.
Repeat last two rounds 3[4, 5, 6] more times.
Next round: Repeat Round 1, removing gusset markers as you work. 52[60, 68, 76] sts.
Next round: Work in patt as set across the first 23[26, 29, 32] sts, pm for gusset, k8, pm for gusset, k to last 3 sts, p3.
Next round: Work in patt as set to first gusset marker, sl m, m1R, k to next marker, m1L, sl m, k to last 3 sts, p3. 2 sts increased.
Next round: Work in patt as set.
Repeat last two rounds 3[4, 5, 6] more times. 60[70, 80, 90] sts, 16[18, 20, 22] sts between markers for gusset.
Thumb
Setup: Work in patt as set to first gusset marker and remove it. Using needles from second set, k to next marker and remove it. CO 4 sts using a provisional cast on. This will be the start of the round. 20[22, 24, 26] thumb sts. Rem 44[52, 60, 68] sts will be held for now – rearrange as you wish to keep them on the needles and out of your way.
From here the thumb is worked using the second set of needles. Distribute thumb sts as you prefer; do NOT join the round yet.
Draw a loop of working yarn from under the needle, as illustrated in Single Strand Glove Technique above, then join the round.
Rnd 1: K 17[19, 21, 23] , p2, k1.
Repeat the last round until tube is just long enough to cover the tip of the thumb.
To close:
Rnd 1: K2tog around. 9[10, 11, 12] sts.
Rnd 2: Knit around, then secure and anchor as described in SSGT.
Mid-Hand
Note: When you resume working the hand you are not at the beginning of the round, but on the thumb side, ready to work the stockinette side of the glove. 44[52, 60, 68] sts active on the needles.
Setup: Undo the provisional CO and place the 4 sts on a needle from your second set, in position to be worked. There will be gaps between these 4 sts and the active sts on either side; you will close these gaps as you work around.
Setup Rnd 1 (half-round, starting with the sts from the prov CO): Sl 1, p2, close gap leaning left as described in Construction Details section above, k to 3 before existing end of rnd, p3. 48[56, 64, 72] sts active on needles.
Rnd 1: K to marker, work Motif as set between markers, k 23[26, 29, 32] to the gap before the newly picked-up sts, close gap leaning right as described in Construction Details above, k1, p2, k to last 3 sts, p3.
Rnd 2: K to marker, work Motif as set between markers, work in patt as set to last 3 sts, p3.
Work in patt as set until your work reaches the base of the little finger.
Little Finger
Setup: Place the last 6[8, 10, 12] sts worked onto a needle from the second set. Knit the next 6 sts, then CO 4 using provisional cast on. 16[18, 20, 22] little finger sts. Rem 36[42, 48, 54] sts will be held for now – rearrange as needed to keep them out of your way.
Note: The little finger is not centered at the beginning of the round; it is centered in line with the upper fingers.
From here the little finger is worked using the second set of needles. Distribute sts across needles as you prefer, but do NOT join the round yet.
Draw a loop of working yarn from under the working needle, as illustrated in Single Strand Glove Technique) section above, then join the round.
Rnd 1: K 6[8, 10, 12] , p3.
Next round: K to last 3 sts, p3.
Work in patt as set until tube is just long enough to cover the tip of the finger.
To close:
Rnd 1: K2tog around. 8[9, 10, 11] sts.
Rnd 2: Knit around, then secure and anchor as described in SSGT.
Upper Hand
Setup: Undo the provisional CO and place the 4 sts on a needle from your main set, in position to be worked. There will be gaps between these 4 sts and the active sts on either side; you will close these gaps as you work around. 40[46, 52, 58] sts. This will be the new start of the round.
Rnd 1 (starting with the sts from the prov CO): Sl 1, k2, close gap leaning left as described in Construction Details section above, k to first marker, work Motif between markers, k to last st, close gap leaning right as described in Construction Details section above.
Rnd 2: K to first marker, work Motif between markers, k to end.
Repeat last round until your work reaches the base of the ring finger, approximately 0.5 inch / 1 cm above base of little finger.
Ring Finger
Note: On this round the Motif splits across ring and middle fingers and continues up to each fingertip.
Setup: Place the last 5[6, 7, 8] sts worked onto second set of needles, k4, work the first 5[6, 7, 8] sts of Motif, pm, CO 4 using provisional cast on. 18[20, 22, 24] ring finger sts. Rem 26[30, 34, 38] sts will be held for now – rearrange as needed to keep them out of your way.
From here the ring finger is worked using the second set of needles. Distribute sts across needles as you prefer, but do NOT join the round yet.
Draw a loop of working yarn from under the working needle, as illustrated in Single Strand Glove Technique) section above, then join the round.
Rnd 1: K to first marker, work first 5[6, 7, 8] sts of Motif between markers, k to end.
Work in patt as set until tube is just long enough to cover the tip of the finger.
To close:
Rnd 1: K2tog around, removing markers as you go. 9[10, 11, 12] sts.
Rnd 2: Knit around, then secure and anchor as described in SSGT.
Middle Finger
Setup: Place the last 6[7, 8, 9] sts on palm side onto second set of needles. Undo the provisional CO and place the 4 sts on a needle from your second set, in position to be worked. There will be gaps between these 4 sts and the active sts on either side; you will close these gaps as you work around.
Rnd 1 (starting with the sts from the prov CO): Sl 1, k2, close gap leaning left as described in Construction Details section above, k1, pm, work last 5[6, 7, 8] sts of Motif between markers, CO 4 using provisional cast on. 20[22, 24, 26] middle finger sts. Rem 14[16, 18, 20] sts will be held for now – rearrange as needed to keep them out of your way.
From here the middle finger is worked using the second set of needles. Distribute sts across needles as you prefer, but do NOT join the round yet.
Draw a loop of working yarn from under the working needle, as illustrated in Single Strand Glove Technique) section above, then join the round.
Setup: K to last st before newly picked-up sts, close gap leaning right as described in Construction Details section above, k to first marker, work left side of Motif between markers, k to end.
Work in patt as set until tube is just long enough to cover the tip of the finger.
To close:
Rnd 1: K2tog around, removing markers as you go. 10[11, 12, 13] sts.
Rnd 2: Knit around, then secure and anchor as above.
Forefinger
Note: SSGT finger method is not used for working the forefinger since you will break the yarn after finishing this finger.
Setup: Undo the provisional CO for the middle finger and place the 4 sts on working needles, in position to be worked. There will be gaps between these 4 sts and the active sts on either side; you will close these gaps as you work around.
Rnd 1 (starting with the sts from the prov CO): Sl 1, k2, close gap leaning left as described in Construction Details section above, work in patt as set to 1 st before newly picked-up sts, close gap leaning right as described in Construction Details section above. 18[20, 22, 24] forefinger sts.
Work in patt as set until tube is just long enough to cover the tip of the finger.
To close:
Rnd 1: K2tog around. 10[11, 12, 13] sts.
Rnd 2: Knit around, then break yarn and thread through remaining sts to secure them.
Left Hand
The left hand is the mirror image of the right, with the thumb offset in the opposite direction and the plain side worked first. Using your preferred stretchy method, CO 42[48, 54, 60] sts. Distribute across needles as you prefer and join for working in the round.
Cuff
Rnd 1: (K2, p2) 5[6, 7, 8] times, k2, pm, work Motif across next 11[13, 15, 17] sts, pm, k2, p2, k2, p3.
Complete as for Right Hand, working Motif between markers.
Wrist
Work as for Right Hand.
Thumb Gusset
Setup: K 14[18, 22, 26] , pm for gusset, k4, pm for gusset, Work in patt as set to last 3 sts, p3.
Work the next 9[11, 13, 15] rounds as for Right Hand, through marker removal.
Next round: Work in patt as set across the first 16[21, 26, 31] sts, pm for gusset, k8, pm for gusset, k to last 3 sts, p3.
Thumb
Work as for Right Hand.
Mid Hand
Note that when you resume working the left hand, you are at the midpoint of the round, facing the Motif side of the glove. 44[52, 60, 68] sts active on the needles.
Complete as for Right Hand.
Little Finger
Setup: Place the last 9 sts worked onto a needle from the second set. Knit the next 3[5, 7, 9] sts, then CO 4 using provisional cast on. 16[18, 20, 22] little finger sts.
Complete as for Right Hand.
Upper Hand
Work as for Right Hand, working Motif between markers.
Ring Finger
Setup: Place the last 5[6, 7, 8] sts worked onto second set of needles, k 9[10, 11, 12] , CO 4 using provisional cast on.
Complete as for Right Hand, working the first 5[6, 7, 8] sts of Motif as set.
Middle Finger
Setup: Place the last 6[7, 8, 9] sts worked on Motif side onto second set of needles. Undo the provisional CO for the ring finger and place the 4 sts on second set of needles, in position to be worked.
Rnd 1 (starting with the sts from the prov CO): Sl 1, k2, close gap leaning left as described in Construction Details section above, k 6[7, 8, 9] , CO 4 using provisional cast on, pm.
Complete as for Right Hand, working the last 5[6, 7, 8] sts of Motif between markers.
Forefinger
Work as for Right Hand.
FINISHING
Wash and lay flat to dry.
Weave in the two ends on each glove. If there are any gaps in the fabric, close them by adjusting the tension on the adjacent sts and distributing any resulting slack across the row.
ABOUT THE DESIGNER
 Jeny spends her days outside with dogs, and her evenings inside with her family and her craft projects. She enjoys coming up with funky techniques and constructions in her knit designs.
Pattern & images © 2020 Jeny Staiman.