Segovia, a free knitting pattern from Knitty.com. Free knitting pattern for a uniquely created cabled scarf.
INTRODUCTION
Segovia
 by D.N. Ader
![]()
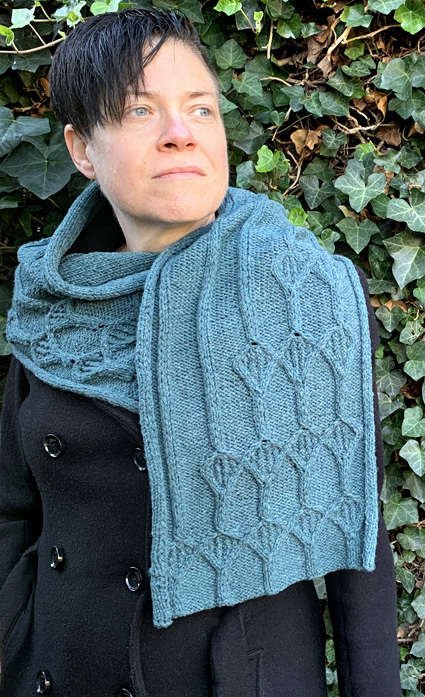
While browsing through a volume of the bible (aka Barbara Walker's collections of knitting stitch patterns) I stumbled across this lovely cable pattern I'd never seen used before. I immediately visualized it as part of a cardigan design, and almost as immediately realized I had a problem: I like to knit sweaters top-down and seamless. In fact, I insist on it (there was an unhappy incident in 2007 with a knit-flat-and-seamed sweater and I remain traumatized). The cable pattern in question was designed to be knit bottom-up.
To determine whether I could succeed at reversing the pattern, I decided to try it out on a scarf, knit bottom-up at one end and top-down at the other. Normally this type of scarf would be knit in two pieces and grafted together in the middle, requiring the stitch pattern to be knit in only one direction. The ability to reverse the cable pattern eliminates the need for grafting, simplifying the construction and finishing (since the above-mentioned Sweater Incident I have been all about simplified construction and finishing).
This pattern can be easily adapted to make a stole by adding cable pattern repeats to make it wider (for the initial cast on, add 9 stitches for every additional pattern repeat you want to add). Its length can be adjusted easily by varying the length of the middle section between charts 2 and 3. Yarn weight is also flexible.
I love the architectural and art deco-like effect of this cable pattern, and hope you do, too!
 models: E. Byars, E. Luijbregts
 photos: D.N. Ader
SIZE
One size, easily adjustable in width or length as desired
FINISHED MEASUREMENTS
Width: 9.5 inches/24 cm
Length: Approximately 60 inches/152 cm; adjustable to preference or yarn quantity
MATERIALS
Yarn
![]() De Rerum Natura Gilliatt [100% merino; 273 yd/250 m per 3.5 oz/100 g skein]; color: Iroise; 3 skeins
De Rerum Natura Gilliatt [100% merino; 273 yd/250 m per 3.5 oz/100 g skein]; color: Iroise; 3 skeins
Other recommended yarns: Drops Merino Extra Fine, madelinetosh Vintage.
Yarn characteristics: This scarf can be knit with any weight from fingering to aran or even bulky (finished dimensions will vary); the most important thing to consider in yarn choice is good stitch definition, so I recommend choosing a firmly plied, smooth yarn.
Recommended needle size
[always use a needle size that gives you the gauge listed below - every knitter's gauge is unique]
![]() US #4/3.75mm needles for working flat
US #4/3.75mm needles for working flat
Notions
![]() cable needle
cable needle
![]() yarn needle
yarn needle
GAUGE
22 sts/ 28 rows = 4 inches/10 cm in stockinette stitch
Although it will affect the scarf's final measurements, gauge is not really important; it's more important to make sure you're getting a fabric with good stitch definition (i.e, gauge not too loose) without unwanted bunching or distortion (i.e., gauge not too tight).
PATTERN NOTES
[Knitty's list of standard abbreviations and techniques can be found here.]
The stitch pattern repeat starts out as a multiple of 9 stitches plus 2 and increases to 13 plus 2.
The edges are worked with garter stitch, and a 3-stitch i-cord. This creates edges that roll in neatly, mimicking the lines in the charted pattern without curling over the cable design.
CHARTS

Download charts here: Chart 1 | Chart 2 | Chart 3 | Chart 4
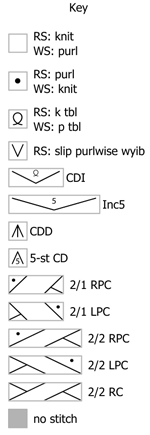
5-st-CD: Five-stitch central decrease. sl 3 with yarn in front, *pass 2nd stitch on right needle over the 1st (center stitch), slip center stitch to left needle and pass 2nd stitch on left needle over center stitch* slip center stitch to right needle and repeat from * once, purl center stitch.
CDI: Increase 2 stitches by working (knit 1 through back loop1, knit 1) in the same stitch, then insert the left-hand needle behind the vertical strand running downward between the 2 stitches just worked and work this strand as knit 1 through the back loop (this YouTube video demonstrates the CDI).
Inc5: p1, yo, p1, yo, p1 into one stitch.
CDD: On RS, slip 2 sts together as if to knit, knit the next stitch, pass 2 slipped sts over.
On WS, slip two sts together as if to purl, purl the next stitch, pass 2 slipped stitches over
2/2RC: Slip next 2 sts to cable needle and hold at back of work, k2; k2 from cable needle.
2/1 RPC: Slip one stitch to cable needle and hold in back, k2; p1from cable needle.
2/1 LPC: Slip two stitches to cable needle and hold in front, p1; k2 from cable needle
2/2 RPC: Slip two stitches to cable needle and hold in back, k2; p2 from cable needle.
2/2 LPC: Slip two stitches to cable needle and hold in front, p2; k2 from cable needle.
DIRECTIONS
Using the long-tail cast-on, or method of your choice, CO 59 sts.
Row 1 [RS]: K6, work Chart 1 to last 6 sts, k3, sl3 wyif.
Row 2 [WS]: K6, work Chart 1 to last 6 sts, k3, sl3 wyif.
Edge patterns are now set.
Work as set until Chart 1 is complete.
Continue, working Chart 2 until it is complete.
Repeat rows 51 and 52 of Chart 2 for about 23 inches/58cm after row 49 (the top of the last cable).
Note:
This is the middle section of the scarf. If you want a scarf longer than 60 inches, you can continue repeating these two rows until you have reached half the desired length of your scarf OR until a little less than half of your yarn has been used.
Continue, working Chart 3 and then Chart 4 as set.
Bind off in pattern.
FINISHING
Weave in ends. Block by soaking in cool water, gently squeezing out excess water, and pinning to dry with straight sides and even width.
ABOUT THE DESIGNER
 D.N. Ader is the fiber fanatic behind FiberQuirks on Bonanza and Etsy. She is a transplanted American residing in the Netherlands with her Dutch husband and American cat. Her bi-national son is off at university, leaving her more time to exercise her creative muscles on developing knitting designs, in addition to producing fiber blends for spinning and supplying tools and materials to her fellow fiberistas.
Her patterns are available on Ravelry.
Pattern & images © 2020 D.N. Ader.