Please Do Not Adjust Your Skirt, a free knitting pattern from Knitty.com.
INTRODUCTION
Please Do Not Adjust Your Skirt
 by Lynne Sosnowski

Pop culture and television are inextricably connected. From the early days of broadcasting black and white live variety shows featuring the likes of Sid Caesar and Milton Berle, through the domestic situation comedies of the 1950s and '60s like I Love Lucy and My Three Sons, to watershed moments like the Apollo 11 lunar landing or the marriage of Prince Charles and Lady Diana, television has been a constant companion of daily life for more than 75 years.
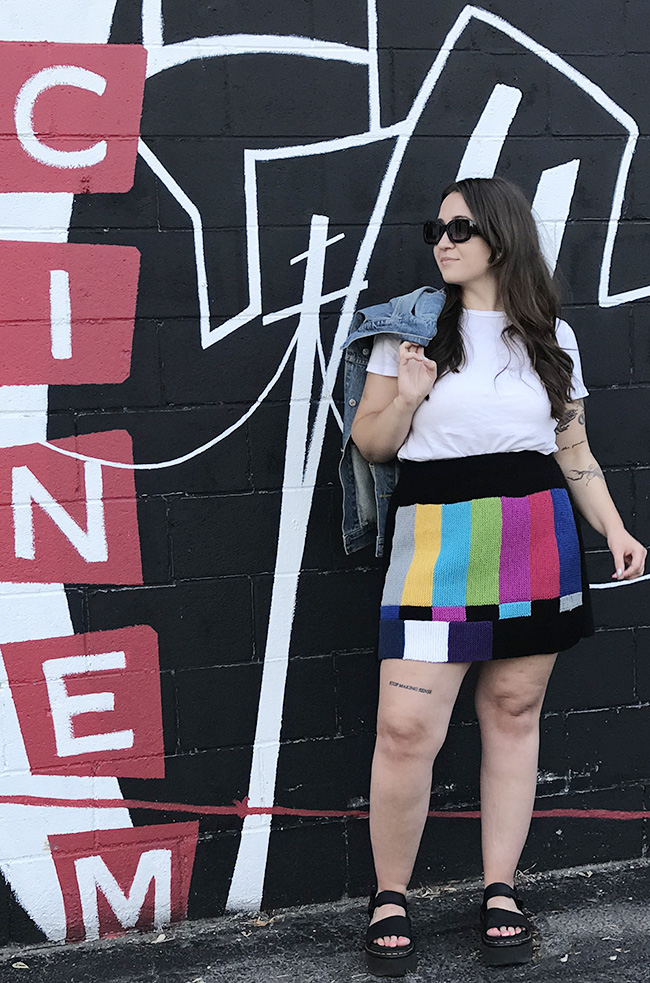
SMPTE (Society of Motion Picture and Television Engineers) bars are a test pattern that was used primarily throughout North America starting in the 1950s, and will be familiar to any night owls who stayed up past the end of scheduled television broadcasting in an era when there were no 24-hour stations. Originally they were printed on card that cameras would be aimed at to calibrate their color settings. Now there are digital versions in use for all sorts of screens, satellite, fibre-optic and webcast displays. Please Do Not Adjust Your Skirt (PDNAYS) takes a bit of liberty in that the bottom-most row of SMPTE bars actually contains a section that comprises 4% less black, black and super-black. There's a lot of talented yarn dyers out there, but matching those subtleties of color might be beyond them so we just used black, and we'll hope no one is aiming a camera at your skirt to calibrate its settings.
Knit skirts can be a delight to wear. But given the vast range of human form, and the paucity of sizing information for the lower half of the body, they can be a bit of a nightmare to design. Case in point: this model has a 16-inch difference between waist and hip, the designer has a 4-inch difference but their hips are actually smaller than their waist.
PDNAYS will fit best with a bit of negative ease at the waist, and some positive ease to cover the hips and thighs. See the Pattern Notes for tools you'll need to customize your skirt to your measurements if you fall outside the "standards".
 model: Daisy B
photos: Lynne Sosnowski
SIZE
Women's XS[S, M, L, 1X, 2X, 3X, 4X, 5X]
shown in size XL with 2 inches/5 cm of positive ease in the hips and 2 inches/5 cm negative ease at the waist
FINISHED MEASUREMENTS
Hips: 35[38, 41, 44, 49, 54, 56, 59, 63] inches/ 89[97, 104, 112, 125, 137, 142, 150, 160] cm
Waist (adjusted waist): 22[25, 28, 31, 35, 38, 42, 45, 48] inches/ 56[64, 71, 79, 89, 97, 107, 114, 122] cm
Length: 16[16, 16, 18, 18, 18, 20, 20, 20] inches/ 41[41, 41, 46, 46, 46, 51, 51, 51] cm
Note: See waist and hip customization options in Pattern Notes if you fall between the sizes above.
MATERIALS
Yarn
Cascade Yarns, Cascade 220 [100% wool; 220 yd/200 m per 3.5 oz/100 g skein];
![]() [MC Black] Color 8555; 1[2, 2, 2, 2, 2, 3, 3, 3] skeins
[MC Black] Color 8555; 1[2, 2, 2, 2, 2, 3, 3, 3] skeins
![]() [CC1 Blue] Color 7818; 1 skein all sizes or 40[40, 40, 80, 80, 80, 105, 105, 105] yards/ 37[37, 37, 73, 73, 73, 96, 96, 96] m
[CC1 Blue] Color 7818; 1 skein all sizes or 40[40, 40, 80, 80, 80, 105, 105, 105] yards/ 37[37, 37, 73, 73, 73, 96, 96, 96] m
![]() [CC2 Grey] Color 8509; 1 skein all sizes or 65[65, 65, 120, 120, 120, 165, 165, 165] yards/ 60[60, 60, 110, 110, 110, 151, 151, 151] m
[CC2 Grey] Color 8509; 1 skein all sizes or 65[65, 65, 120, 120, 120, 165, 165, 165] yards/ 60[60, 60, 110, 110, 110, 151, 151, 151] m
![]() [CC3 Red] Color 7801; 1 skein all sizes or 35[35, 35, 70, 70, 70, 95, 95, 95] yards/ 32[32, 32, 64, 64, 64, 87, 87, 87] m
[CC3 Red] Color 7801; 1 skein all sizes or 35[35, 35, 70, 70, 70, 95, 95, 95] yards/ 32[32, 32, 64, 64, 64, 87, 87, 87] m
![]() [CC4 Magenta] Color 9470; 1 skein all sizes or 40[40, 40, 80, 80, 80, 105, 105, 105] yards/ 37[37, 37, 73, 73, 73, 96, 96, 96] m
[CC4 Magenta] Color 9470; 1 skein all sizes or 40[40, 40, 80, 80, 80, 105, 105, 105] yards/ 37[37, 37, 73, 73, 73, 96, 96, 96] m
![]() [CC5 Cyan] Color 8906; 1 skein all sizes or 40[40, 40, 80, 80, 80, 105, 105, 105] yards/ 37[37, 37, 73, 73, 73, 96, 96, 96] m
[CC5 Cyan] Color 8906; 1 skein all sizes or 40[40, 40, 80, 80, 80, 105, 105, 105] yards/ 37[37, 37, 73, 73, 73, 96, 96, 96] m
![]() [CC6 Green] Color 8903; 1 skein all sizes or 35[35, 35, 70, 70, 70, 95, 95, 95] yards/ 32[32, 32, 64, 64, 64, 87, 87, 87] m
[CC6 Green] Color 8903; 1 skein all sizes or 35[35, 35, 70, 70, 70, 95, 95, 95] yards/ 32[32, 32, 64, 64, 64, 87, 87, 87] m
![]() [CC7 Purple] Color 9690; 1 skein all sizes or 25[25, 25, 50, 50, 50, 65, 65, 65] yards/ 23[23, 23, 46, 46, 46, 60, 60, 60] m
[CC7 Purple] Color 9690; 1 skein all sizes or 25[25, 25, 50, 50, 50, 65, 65, 65] yards/ 23[23, 23, 46, 46, 46, 60, 60, 60] m
![]() [CC8 White] Color 8505; 1 skein all sizes or 25[25, 25, 50, 50, 50, 65, 65, 65] yards/ 23[23, 23, 46, 46, 46, 60, 60, 60] m
[CC8 White] Color 8505; 1 skein all sizes or 25[25, 25, 50, 50, 50, 65, 65, 65] yards/ 23[23, 23, 46, 46, 46, 60, 60, 60] m
![]() [CC9 Yellow] Color 7827; 1 skein all sizes or 35[35, 35, 70, 70, 70, 95, 95, 95] yards/ 32[32, 32, 64, 64, 64, 87, 87, 87] m
[CC9 Yellow] Color 7827; 1 skein all sizes or 35[35, 35, 70, 70, 70, 95, 95, 95] yards/ 32[32, 32, 64, 64, 64, 87, 87, 87] m
![]() [CC10 Navy] Color 2404; 1 skein all sizes or 35[35, 35, 70, 70, 70, 95, 95, 95] yards/ 32[32, 32, 64, 64, 64, 87, 87, 87] m
[CC10 Navy] Color 2404; 1 skein all sizes or 35[35, 35, 70, 70, 70, 95, 95, 95] yards/ 32[32, 32, 64, 64, 64, 87, 87, 87] m
Yarn Characteristics
![]() Cascade 220 is used here for two reasons. First, its vast range of colors made it easy to match the quite specific colors used in the SMPTE bars that form the basis of the design. Second, it's a wool with good memory and is reasonably hard-wearing. While I love the idea of someone wearing their PDNAYS every day, this is more likely to be an occasional wardrobe piece and will need only the usual care of hand-washing and maybe a seasonal de-pilling. If you are substituting yarn, color range should guide first, and wearability second. Cotton is not at all recommended for this garment, as it has very little memory retention.
Cascade 220 is used here for two reasons. First, its vast range of colors made it easy to match the quite specific colors used in the SMPTE bars that form the basis of the design. Second, it's a wool with good memory and is reasonably hard-wearing. While I love the idea of someone wearing their PDNAYS every day, this is more likely to be an occasional wardrobe piece and will need only the usual care of hand-washing and maybe a seasonal de-pilling. If you are substituting yarn, color range should guide first, and wearability second. Cotton is not at all recommended for this garment, as it has very little memory retention.
Recommended needle size
[always use a needle size that gives you the gauge listed below - every knitter's gauge is unique]
![]() One set US #6/4mm needles for working flat (optional: if you are comfortable working flat on circular needles, you can use the circular needle throughout)
One set US #6/4mm needles for working flat (optional: if you are comfortable working flat on circular needles, you can use the circular needle throughout)
![]() One US #6/4mm circular needle, in a length smaller than waist size: 16 inch/40cm for size XS, 16-24 inch/40-60 cm for sizes S-XL, 24-32 inch/60-80 cm for sizes XL-5X
One US #6/4mm circular needle, in a length smaller than waist size: 16 inch/40cm for size XS, 16-24 inch/40-60 cm for sizes S-XL, 24-32 inch/60-80 cm for sizes XL-5X
![]() One US #5/3.75mm circular needle, in a length smaller than waist size: 16 inch/40cm for size XS, 16-24 inch/40-60 cm for sizes S-XL, 24-32 inch/60-80 cm for sizes XL-5X
One US #5/3.75mm circular needle, in a length smaller than waist size: 16 inch/40cm for size XS, 16-24 inch/40-60 cm for sizes S-XL, 24-32 inch/60-80 cm for sizes XL-5X
Notions
![]() sewing needle and thread or sewing machine
sewing needle and thread or sewing machine
![]() 1.5 inch/4 cm wide non-rolling elastic for waistband in a length matching waist measurement plus 2 inches/5 cm
1.5 inch/4 cm wide non-rolling elastic for waistband in a length matching waist measurement plus 2 inches/5 cm
![]() stitch holder or waste yarn
stitch holder or waste yarn
![]() locking stitch markers
locking stitch markers
![]() stitch markers
stitch markers
![]() yarn needle
yarn needle
GAUGE
20 sts/28 rows = 4 inches/10 cm in stockinette stitch
20 sts/40 rows = 4 inches/10 cm in garter stitch after blocking
PATTERN NOTES
[Knitty's list of standard abbreviations and techniques can be found here.]]
Editor's note: Though the Pattern Notes are long, the actual knitting is truly at the Tangy level, aka an easy knit. Take the time to follow the instructions below to get the best possible fit for your skirt.
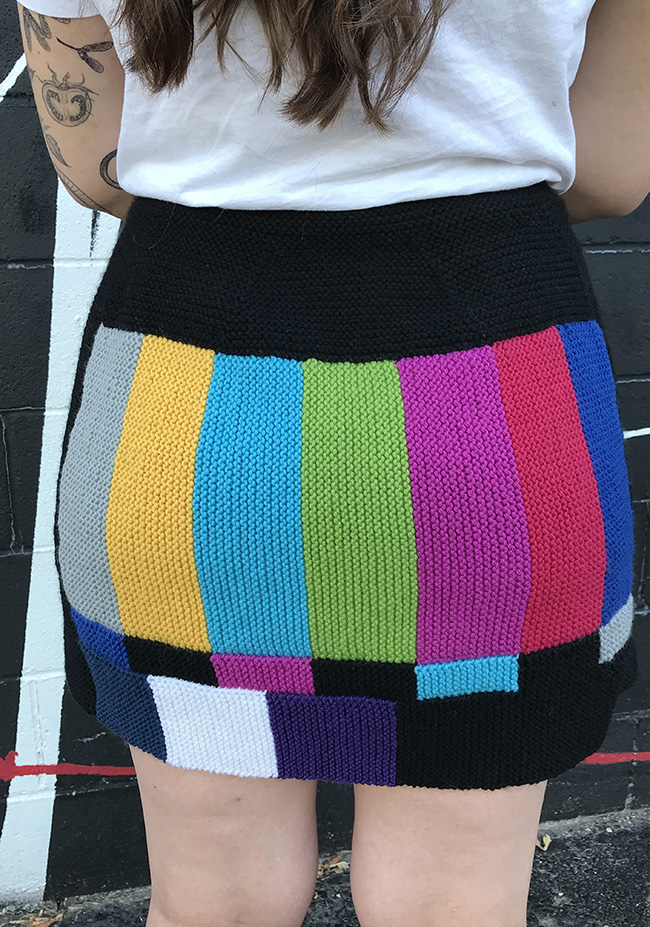
The skirt is constructed in pieces, and worked all in garter except for the waistband. First the SMPTE bar panel is worked in garter intarsia, and then a second made to match. Then two black side panels are made. Once the side panels are the same height as the bar panel, stitches are picked up along the top of each bar panel and the skirt yoke is worked up to the waist in the round. For finishing, the waistband is folded over and stitched to make a casing through which elastic is run, and then the bar panels are seamed to the side panels.
To choose your size, first measure your waist and hip circumferences. Waist measurement is taken at the spot where your abdomen creases when you bend to the side as if you're performing "I'm a little teapot". Hip measurement is taken somewhere in the space from hip bone to haunch, wherever is the largest. Choose a size that is about 2 inches/5 cm larger than your hip measurement. If you are between sizes, choose the larger and to have a bit of additional ease in the hip OR make specific adjustments using the customization steps given below. If your waist is larger than your hip, use your waist size as hip size.
In order for your skirt to hang well, you'll want to make the skirt have to stretch a bit to cling to your waist. Adjust your waist size to have 10% negative ease as follows: waist size – (waist size x 0.1) = adjusted waist, and round to the nearest full inch or cm. The sizing standards are based on a difference from waist to hip of an average of 10 inches/25 cm. If you are among the vast majority of bodies who don't fit the "standard", you can make your skirt based on your hip size as selected above right to the point where the pieces are joined for the yoke, and then come back and work out the yoke shaping you need for the waist you have. Don't worry, it's less complicated than you might think.
Also measure the length from waist to desired length, both at center front and center back of your body. If there's more than .5 inch/1.5 cm difference you can choose to add short rows before the waistband so that your skirt sits level.
The SMPTE bars are worked using garter intarsia. On the first instance where a new color is used, leave a 6 inch/15 cm yarn tail and begin using the new color – a small gap here will be closed when you sew in the tails during finishing. On subsequent right-side (RS) rows, work to the point of a color change, pick up the new color from under the ending color and continue working. On all wrong-side (WS) rows, work to the point of a color change, bring the ending yarn to the front (closest to the knitter), pick up the new color from under the ending color and take that strand to the back to continue working. After each color change, work one or two stitches and give the tails of both colors a little tug to neaten the transition area.
The majority of skirt-wearers do not conform to the tidy set of numbers that are contained in a standard size chart. If the hip measurement you need is not in the measurements above, or if you fall between measurements, you can use the hip customization below. (Remember that the pattern is based on actual hip measurement plus 2 inches/5 cm – you can add more ease if you like, but it's not recommended to have less, so that your hips and thighs will be able to move in your skirt.) If you have made a custom hip adjustment, do work through the waist customization too, to make sure you arrive at waistband that is 2 inches/5 cm smaller than the desired waist. (Negative ease here, where the skirt is smaller than the waist, helps support the weight of the skirt fabric. Both knit fabric and the elastic within will stretch to accommodate.)
If you do find a hip measurement in the pattern that works, you might find that the corresponding waist measurement doesn't work for you. If so, just do a waist customization.
Even if you do a custom hip adjustment, a custom waist – or both – it's still optional to add short rows to level out the hem. You'll want to add short rows if you carry more upholstery on one side of your body than the other.
HIP CUSTOMIZATION
First, determine which size of SMPTE bars you will make for your desired hip size:
There are three versions of the SMPTE bars; they have been designed so that the proportions look good relative to hip circumference. Using standard sizing, the first is used for the three smallest sizes, the second for the middle three sizes, and the third for the three largest sizes.
If your hip circumference plus 2 inches/5 cm ease measures 42 inches/107 cm or smaller you'll use the first version of the SMPTE bars, so your panels will measure 12.6 inches/33 cm each or a total of 25.2 inches/66 cm.
If your hip circumference plus 2 inches/5 cm ease measures from 43 inches/109 cm to 55 inches/140 cm you'll use the second version of the SMPTE bars, so your panels will measure 19.6 inches/50 cm each or a total of 39.2 inches/100 cm.
If your hip circumference plus 2 inches/5 cm ease measures 56 inches/142 cm or more you'll use the third version of the SMPTE bars, so your panels will measure 23.8 inches/60.5 cm each or a total of 47.6inches/121 cm.
Note: It's important when doing raw calculations to use actual numbers for accuracy, but in practice nobody can measure .2 or .6 of an inch accurately in knit fabric. Rounding should only be done at the end calculation. Knitty rounds to the nearest .25 inch, as that's about as precise a measurement as you can usually get, given the stretchy nature of the fabric.
To calculate the size of your side panels:
- Width of side panel = your hip circumference + 2 inches/5 cm – 2 x width of SMPTE panel (see above) = width inches/cm needed for both side panels (______)
- Stitches in total for side panels = inches/cm needed for side panels x 5 sts per inch/2.5 cm (______)
- Number of sts for each side panel = number of stitches for side panels ÷ 2 panels + 2 selvedge stitches for seaming (______)
To use a real example, the model had a hip circumference of 45 inches, or 47 inches including ease. This fell between size L and XL, so a custom size was wanted. - Width of side panel = 47 inches total hip circumference - 39 inches which is 2 x the size 2 SMTPE panels, rounded = 8 inches needed for side panels.
- Stitches in total for side panels = 8 inches for both side panels x 5 sts per inch = 40 sts total for both side panels
- Number of stitches for each side panel = 40 sts ÷ 2 side panels = 20 sts each side panel + 2 selvedge sts = 22 sts per side panel
You'll work your side panel sts in garter as per the instructions.
Continue from Joining round 1 but write in the stitch count of your panel in the space noted by "or (______) " in the pattern below, each time you encounter it.
WAIST CUSTOMIZATION
If the waist circumference you need is not contained in the pattern, if you fall between waist measurements given, or if you need a different waist circumference than what is given for your chosen hip measurement, you can work through this waist customization. In order to complete this, you must first have selected a hip measurement from the pattern or worked through the hip customization section above, because all sizing for this skirt pattern depends primarily on hip circumference.
A waist customization needs three parts: first, to calculate the number of stitches in the desired waist; second, to calculate the number of stitches that need to be decreased from the hip to the waist and third, to calculate the number of decrease rounds it will take to remove those stitches.
- Stitch count at hip: If you have not made any modifications to the hip circumference, find the stitch count that corresponds to the size you are making at the end of Joining round 1 above: 174[190, 204, 226, 250, 274, 282, 296, 316] total sts
To make a hip customization, calculate: hip stitches = (actual hip circumference + 2 inches/5 cm) x 5 sts per inch/2.5 cm. (______) - Stitch count at waist = (actual waist circumference – 2 inches/5 cm) x 5 sts per inch/2.5 cm. (______)
- Stitches to be decreased = stitch count at hip – stitch count at waist Round this number to the nearest number divisible by eight. (______)
In the PDNAYS pattern, a decrease ridge takes away 8 stitches each time it is worked. This means that the final number of sts you have for your waist might vary a small amount from the number you calculated, but should not materially impact the fit.
The number of decrease ridges needed = the number of stitches to be decreased from Step 3 above ÷ 8 (______)
The length of the skirt is given in the pattern as 16[16, 16, 18, 18, 18, 20, 20, 20] inches/ 41[41, 41, 46, 46, 46, 51, 51, 51] cm and the height of the SMPTE panels is 10[10, 10, 14, 14, 14, 17, 17, 17] inches/ 25[25, 25, 36, 36, 36, 43, 43, 43] cm so we have 6[6, 6, 4, 4, 4, 3, 3, 3] inches/ 15[15, 15, 10, 10, 10, 8, 8, 8] cm available for the yoke. If you want a different length for your skirt, calculate your desired length – height of SMPTE panels in your size to determine how much height you have available for your yoke.
At our given gauge, our yoke will take 30[30, 30, 20, 20, 20, 15, 15, 15] ridges to work. If your yoke is a different height, calculate yoke height in inches/2.5 cm x 5 ridges = number of ridges in yoke.
Rate of decrease = number of ridges in yoke ÷ number of decrease ridges needed.
This tells you how many ridges to work before each decrease ridge. If this is a whole number, yay! Just work garter ridges and work a decrease ridge every nth time where n is that whole number.
If this is some number plus a decimal, you'll need to play with the decrease rates. In general, start with decreases spaced farther apart (every 2nd or third ridge), then have them closer together (every ridge) as you approach the waistband.
As an example, in the pattern for size 3x, there are 9 decrease ridges to be worked, and 15 yoke ridges available.
15 ÷ 9 = 1.6, but we can't work a decrease every 1.6 ridges. Round that up to an even number, 2, meaning we work a decrease ridge every 2nd ridge. If we do that 6 times, that would take 12 ridges. Then there are 3 ridges left in the yoke and 3 decrease ridges to complete, so we would decrease on every ridge. Try a few different options on some scrap paper. If you have few decrease ridges to work, you may be able to space them every third ridge, otherwise you will need to work a decrease ridge every second ridge or every ridge.
OPTIONAL SHORT ROWS
Short rows allow us to add length only where it's needed. In the case of skirts, we have a lot of shapely anatomy to cover with fabric. Some skirt-wearers are more gifted on their backside while others may have a generous belly. Either might cause the skirt to pull up on the side where there is more to cover. Up to the waistband, the PDNAYS skirt is identical front and back. You can add extra length in either the front or the back, with the same method.
Step 1: Calculate how many short rows are needed to be worked over the first half of the skirt, which will then be declared the front or the back – wherever that extra length is needed.
The measuring for this part is best done with a helper. First, tie a string around your waist. Mark your desired length with a pen mark on your leg, or put on leggings and use chalk. While the skirt wearer stands still, measure from waist to desired length along the front center of the body and the back center of the body. If those are different by .5 inch/1.5 cm or more, then you could benefit from working short rows.
At our pattern gauge, we get 5 garter ridges per inch/2.5 cm. That means each garter ridge has a height of .2 inch/.5 cm.
Calculate number of short row ridges needed in inches: difference in height between front and back, in inches ÷ .2 inches.
Round up the result to the nearest even number. (______)
OR
Calculate number of short row ridges needed in cm: difference in height between front and back, in inches ÷ .5 cm.
Round up the result to the nearest even number. (______)
In the case of our model, there was a 1.5 inch/4 cm difference, meaning 1.5 inches/.2 inch = 7.5 garter ridges, rounded up to 8.
When working wrap & turn in garter stitch, the wrap is always worked the same way, on both RS and WS: slip the next stitch purlwise; bring the yarn to the front, return the stitch to the left needle. Turn work. When starting the next row, move the yarn to the back as normal, into knit position. The wraps do not need to be lifted or hidden, they disappear nicely into the garter fabric.
When you're ready to add short rows you will have just completed the yoke and decreases to the waist, just before working the waistband. At that point you will have markers as follows: BOR marker; between side panel and SMPTE panel; approximately 1/3 of SMPTE panel; another 1/3 of SMPTE panel; between SMPTE panel and side panel; between side panel and second SMPTE panel; and two more at 1/3 points of the second SMPTE panel. For the short rows you will only need the BOR marker and the 5th marker; the rest may be removed as you encounter them. (The two above the second SMPTE panel won't be encountered until you start the waistband, but you can remove them at that point.)
To work your first short row ridge, k to 1 st before the 5th marker, W&T, k to 1 st before the BOR marker, W&T. One short row ridge complete.
If you are to work 10 or fewer short row ridges, continue as follows:
Next row [RS]: K to 5 sts before the wrapped st, W&T.
Following row: K to 5 sts before the wrapped st, W&T.
If you are to work more than 10 short row ridges, continue as follows:
Next row [RS]: K to 4 sts before the wrapped st, W&T,
Following row: K to 4 sts before the wrapped st, W&T.
For all, continue:
Repeat the last 2 rows until the required number of ridges have been worked.
Break yarn leaving a tail to sew in later and rejoin yarn at the BOR to carry on with waistband instructions.
DIRECTIONS
SMPTE Bars [Skirt Front/Back]
Make 2.
Using larger needle for working flat and MC Black, use the long tail method to CO 50[50, 50, 75, 75, 75, 85, 85, 85] sts.
Set-up row [WS]: K to end.
Note: In the following instructions, you're instructed to place markers to set the position of the three different color blocks. The markers are optional, if you find that they make it more difficult to manage the yarns and the color changes. Most rows are worked with three different colors, one for each block as set by the first bar; some of them have the same color worked across the second and third blocks.
First bar:
Row 1 [RS]: Using CC1 Blue k 33[33, 33, 46, 46, 56, 56, 56, 56] , place marker, using CC2 Grey k 5[5, 5, 6, 6, 6, 7, 7, 7] , place marker, using MC Black k 12[12, 12, 18, 18, 18, 22, 22, 22.]
Row 2 [WS]: Using MC Black k to first marker, using CC2 Grey k to second marker, using CC1 Blue k to end.
These two rows form one garter ridge.
Repeat Rows 1-2 until there are 9[9, 9, 14, 14, 14, 17, 17, 17] ridges.
Cut CC1 Blue and CC2 Grey yarns. Join new colors as they are introduced in each subsequent bar.
Second bar:
Row 1 [RS]: Using CC3 Red k to first marker, using MC Black k to end.
Row 2 [WS]: Using MC Black k to second marker, using CC3 Red k to end.
These two rows form one garter ridge.
Repeat Rows 1-2 until there are 9[9, 9, 14, 14, 14, 17, 17, 17] ridges.
Cut CC3 Red yarn.
Third bar:
Row 1 [RS]: Using CC4 Magenta k to first marker, using CC5 Cyan k to second marker, using MC Black k to end.
Row 2 [WS]: Using MC Black k to first marker, using CC5 Cyan k to second marker, using CC4 Magenta k to end.
These two rows form one garter ridge.
Repeat Rows 1-2 until there are 9[9, 9, 14, 14, 14, 17, 17, 17] ridges.
Cut CC4 Magenta, CC5 Cyan and MC Black yarns.
Fourth bar, part A:
Row 1 [RS]: Using CC6 Green k to first marker, using MC Black k to end.
Row 2 [WS]: Using MC Black k to second marker, using CC6 Green k to end.
These two rows form one garter ridge.
Repeat Rows 1-2 until there are 2[2, 2, 3, 3, 3, 4, 4, 4] ridges.
Cut MC Black yarn.
Fourth bar, part B:
Row 1 [RS]: Using CC6 Green k to first marker, using MC Black k to second marker, using CC7 Purple k to end.
Row 2 [WS]: Using CC7 Purple k to first marker, using MC Black k to second marker, using CC6 Green k to end.
These two rows form one garter ridge.
Repeat Rows 1-2 until there are 7[7, 7, 11, 11, 11, 13, 13, 13] ridges.
Cut CC6 Green and MC Black yarns.
Fifth bar, part A:
Row 1 [RS]: Using CC5 Cyan k to first marker, using CC4 Magenta k to second marker, using CC7 Purple k to end.
Row 2 [WS]: Using CC7 Purple k to first marker, using CC4 Magenta k to second marker, using CC5 Cyan k to end.
These two rows form one garter ridge.
Repeat Rows 1-2 until there are 4[4, 4, 7, 7, 7, 9, 9, 9] ridges.
Cut CC7 Purple yarn.
Fifth bar, part B:
Row 1 [RS]: Using CC5 Cyan k to first marker, using CC4 Magenta k to second marker, using CC8 White k to end.
Row 2 [WS]: Using CC8 White k to first marker, using CC4 Magenta k to second marker, using CC5 Cyan k to end.
These two rows form one garter ridge.
Repeat Rows 1-2 until there are 5[5, 5, 7, 7, 7, 8, 8, 8] ridges.
Cut CC5 Cyan and CC 4 Magenta yarns.
Sixth bar, part A:
Row 1 [RS]: Using CC9 Yellow k to first marker, using MC Black k to second marker, using CC8 White k to end.
Row 2 [WS]: Using CC8 White k to first marker, using MC Black k to second marker, using CC9 Yellow k to end.
These two rows form one garter ridge.
Repeat Rows 1-2 until there are 7[7, 7, 11, 11, 11, 13, 13, 13] ridges.
Cut CC8 White yarn.
Sixth bar, part B:
Row 1 [RS]: Using CC9 Yellow k to first marker, using MC Black k to second marker, using CC10 Navy k to end.
Row 2 [WS]: Using CC10 Navy k to first marker, using MC Black k to second marker, using CC9 Yellow k to end.
These two rows form one garter ridge.
Repeat Rows 1-2 until there are 2[2, 2, 3, 3, 3, 4, 4, 4] ridges.
Cut CC9 Yellow and MC Black yarns.
Seventh bar:
Row 1 [RS]: Using CC2 Grey k to first marker, using CC1 Blue k to second marker, using CC10 Navy k to end.
Row 2 [WS]: Using CC10 Navy k to first marker, using CC1 Blue k to second marker, using CC2 Grey k to end.
These two rows form one garter ridge.
Repeat Rows 1-2 until there are 9[9, 9, 14, 14, 14, 17, 17, 17] ridges.
Cut all yarns.
Ending Row 1 [RS]: Using MC Black, k to end.
BO knitwise.
Side Panels
These side panels make up the balance of the finished hip circumference alongside the SMPTE panels. If your hip measurement is not found in the pattern, go now to Hip Customization (see Pattern Notes) to calculate the side panels that will work for you. Return to the pattern at Skirt Yoke, below.
Using larger needle for working flat and MC Black, use the long-tail method to CO 24[32, 39, 15, 27, 39, 22, 29, 39] or (______) sts.
Set-up row [WS]: K to end.
Knit all rows until height of the panel matches the width of the SMPTE bars, or in other words, until there are 50[70, 85, -, -, -, -, -, -] ridges.
Break yarn, and put the stitches on a holder or waste yarn.
Complete a second panel to match, but do not break yarn or remove from working needle.
To make the skirt yoke, the four pieces made so far (two SMPTE bars, one side panel on hold, one side panel on needles) need to be connected on the circular needle, and then the yoke is worked up to the waist.
Note: In the following instruction when picking up stitches, DO NOT pick up sts in the black stripes at cast-on and bind-off edges of the SMPTE bars. These become the seam allowances when these pieces are joined to the side panels during finishing. On the following purl round, more markers are placed above the SMPTE bars to aid in working decreases.
Joining round 1: Knit across the 24[32, 39, 15, 27, 39, 22, 29, 39] or (______) sts of second side panel on needle, pm, pick up and knit one stitch in each ridge along the long top edge of one set of SMPTE bars for 63[63, 63, 98, 98, 98, 119, 119, 119] sts, pm, return the 24[32, 39, 15, 27, 39, 22, 29, 39] or (______) sts from first side panel to LH needle and knit them, pm, pick up and knit one stitch in each ridge along the long top edge of second set of SMPTE bars for 63[63, 63, 98, 98, 98, 119, 119, 119] sts, place BOR marker. 174[190, 204, 226, 250, 274, 282, 296, 316] sts.
Round 2: P to marker, p 18[18, 18, 28, 28, 28, 34, 34, 34] , pm, p 27[27, 27, 42, 42, 42, 51, 51, 51] , pm, p 18[18, 18, 28, 28, 28, 34, 34, 34] , sm, p to marker, p 18[18, 18, 28, 28, 28, 34, 34, 34] , pm, p 27[27, 27, 42, 42, 42, 51, 51, 51] , pm, p 18[18, 18, 28, 28, 28, 34, 34, 34] . There are now markers between the side panels and the SMPTE bars, and markers above the SMPTE bars between bars 2 & 3 and between bars 5 & 6. (This roughly divides those panels in thirds, with a bigger central "third".)
If your waist measurement differs from what's available in the pattern, go now to Waist Customization (see Pattern Notes) to calculate what works for you. Return to the pattern at Waistband below.
*Work 3[3, 3, 2, 2, 1, 1, 1, 1] garter ridges.
Garter ridge decrease round 1: K across side panel sts to first m, *sm, k1, ssk, k to next m, sm, k1, ssk, k to 3 sts before next m, k2tog, k1, sm, k to 3 sts before next m, k2tog, k1**, sm, k across side panel sts to next m, work from * to ** once more. 8 sts decreased.
Garter ridge decrease round 2: P to end.
Repeat from * 6[6, 6, 5, 4, 8, 5, 5, 5] more times.
**Work 1[1, 1, 0, 0, 1, 0, 0, 0] garter ridges, followed by Garter ridge decrease round 1 and 2.
Repeat from ** 0[0, 0, 1, 3, 0, 2, 2, 2] more times.
Size XL only:
Work 1 more garter ridge.
Sizes 2X and 5X only:
Final decrease round: K to m, sm, k1, ssk, k to 3 sts before next marker, k2tog, k1, k to second marker, sm, k1, ssk, k to 3 sts before next marker, k2tog, k1, k to end. 4 sts decreased.
Next round: P to end.
110[126, 140, 162, 178, 190, 210, 224, 240] sts rem.
If your length measurements taken on the front and the back of the body were more than .5 inches/1.5 cm different, you may choose to add short rows so that your skirt hangs level - go now to Optional Short Rows before working the waistband.
Waistband
Change to the smaller needle and work a turning round as follows: purl to end, removing all but the BOR marker.
Continuing with the smaller needle, knit nine rounds; the fabric above the turning round will be just a bit wider than the 1.5 inches/7 cm wide elastic.
BO loosely as follows: K2, *return 2 sts to LH needle, k2tbl, k1; repeat from * until one st remains, break yarn leaving a 1.5 yard/1.5 m tail and draw through last st to fasten off.

FINISHING
Thread yarn needle with long tail from BO and whipstitch the bound off edge to the inside of the skirt to form a casing, stopping with 3-4 inches/8-10 cm unsewn. Cut waistband elastic to a length that feels snug but comfortable around the waist, plus one inch/2.5 cm at each end to overlap and sew together - you may wish to thread this length of elastic into the casing and join with safety pins and try on your skirt. Adjust elastic length if needed, and once threaded through the casing, overlap the ends by one inch/2.5 cm and using needle and thread (or sewing machine) sew through both layers of elastic with 3 or 4 rows of stitching to secure. Push the joined elastic into the casing and finish whipstitching.
Seam together the cast-on and bind-off edges of the SMPTE bar panels and the sides of the side panels using mattress stitch, joining each row of side panel to one stitch of SMPTE panel.
Use yarn needle to secure all yarn ends on the wrong side of the fabric. At the color change junctions, feed yarn tails first diagonally across the back of the work at the junction (yarn tails should form an X across the back of the junction) then back behind the block of the same color. In most situations, it's best to wash/block and then weave in yarn ends but here the small spaces that can happen at color changes can grow wider with the handling involved in washing, and so it's recommended to close those tiny gaps beforehand.
Wash the skirt in tepid water in a no-rinse wool wash, squeeze out the excess water in a big towel, and lay flat to dry, turning occasionally as it dries so creases don't form.
Store your PDNAYS flat or rolled up rather than hanging to prevent it from growing in length over time.
ABOUT THE DESIGNER
 After a career of producing large-scale municipal festivals and events, Lynne now splits her time between designing knitwear, teaching knitting classes that specialize in "knit literacy", and producing stand-up comedy festivals and live shows in Ontario, Canada. She's funny for a regular person.
You can find Lynne's work as Etcgirl on Ravelry and thatetcgirl on Instagram.
Pattern & images © 2022 Lynne Sosnowski