Fumin' Womb, a free knitting pattern from Knitty.com.
INTRODUCTION
Fumin' Womb
 by Anna Hrachovec

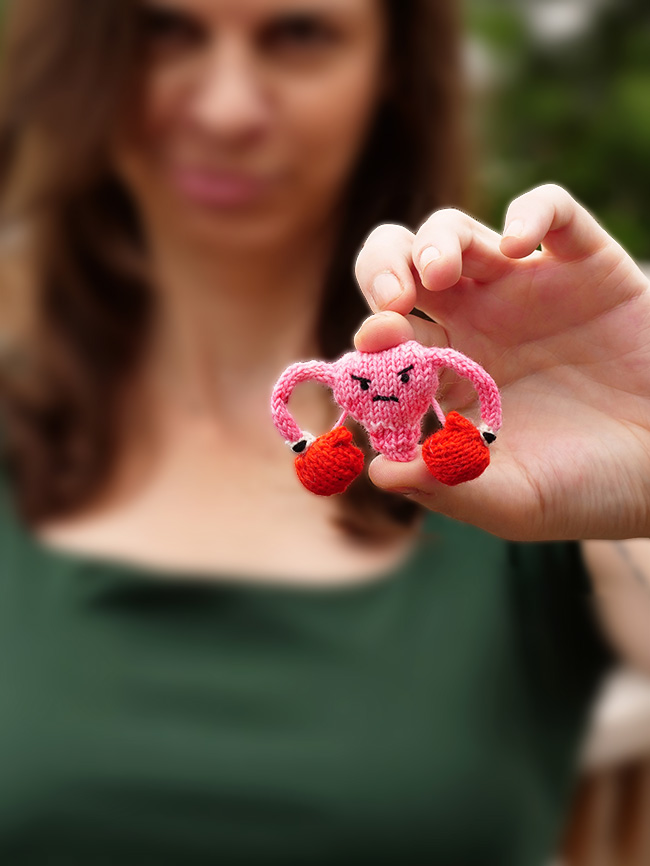
She's rolled with the punches, she's taken hits below the belt, but this tough little organ will never be down for the count when it comes to her rights. Now more than ever, she needs us in her corner for the long fight ahead for reproductive freedom.
When Roe v. Wade was overturned, many of us felt it as a gut punch. But there are also many ways to punch back and join the fight for bodily autonomy—if you need some ideas, this resource from the ACLU is one place to start.
As serious as this struggle is, sometimes you need a break. And you may find, like I did, that embroidering a tiny angry face onto your pissed off uterus is quite satisfying!
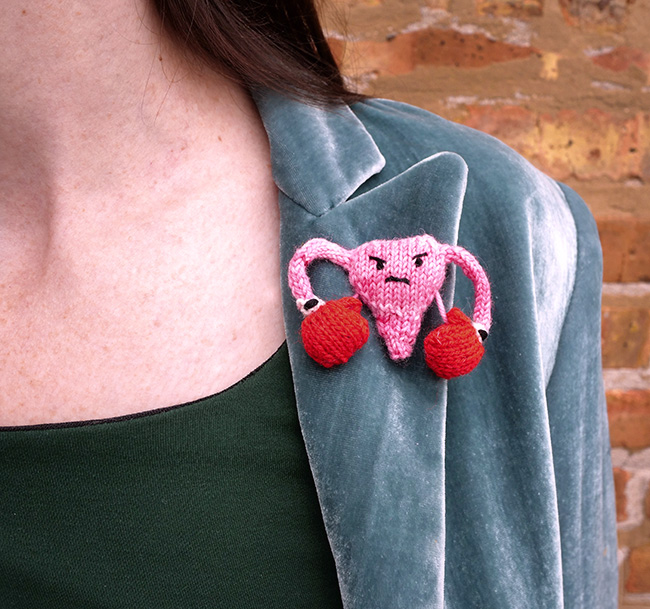
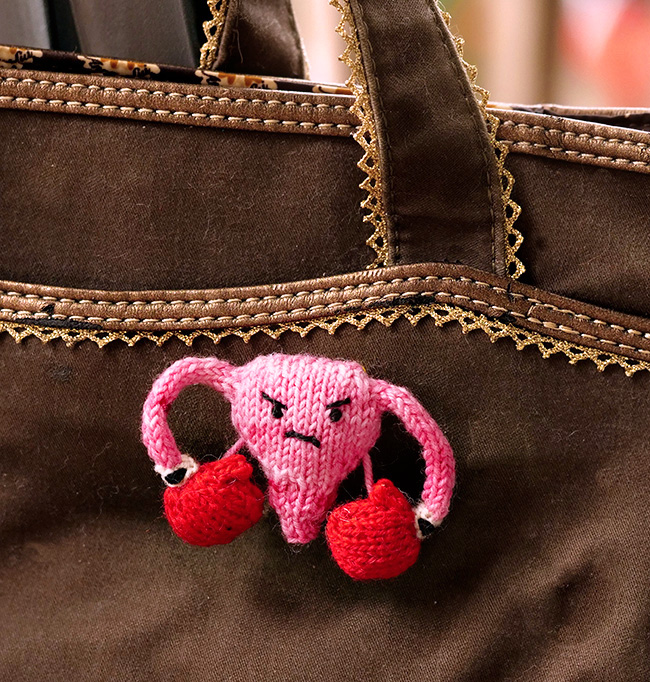
Knit in fingering-weight yarn, this project is the perfect size to make into a pin or brooch that declares your support for human rights. Or you can hang tiny uteri on your Christmas tree! Or mail them to your representatives! What should you do with your tiny angry uterus? Whatever the heck you want!
A hand-dyed yarn gives the uterus some depth and organic verve, and small amounts of solid colors lend a pop that demands attention. Or use yarn scraps in whatever weight you like, with corresponding needle size—you don't need much yardage or time for this timely project.
 model: Kate O'Leary
photos: Anna Hrachovec
SIZE
One
FINISHED MEASUREMENTS
Height: 1.5 inches/4 cm
Width: 2.75 inches/7 cm
MATERIALS
Yarn
![]() [MC] Hand Dyed Diva Homegrown Sock [80% superwash shaniko wool/20% nylon; 105 yd/96m per 25g skein]; color: Pink Petunia; (12 yards/11 m used)
[MC] Hand Dyed Diva Homegrown Sock [80% superwash shaniko wool/20% nylon; 105 yd/96m per 25g skein]; color: Pink Petunia; (12 yards/11 m used)
Knit Picks Palette [100% Peruvian Highland Wool; 231 yd/211m per 50g skein];
![]() [CC1] White; (4 y/4 m used)
[CC1] White; (4 y/4 m used)
![]() [CC2] Tomato; (6 y/6 m used)
[CC2] Tomato; (6 y/6 m used)
![]() [CC3] Black; (2 y/2 m used)
[CC3] Black; (2 y/2 m used)
Yarn Characteristics
![]() The sample shown uses a hand-dyed, fingering-weight yarn, accompanied by solid fingering-weight yarns. Yarn scraps of any material will also work great for this project!
The sample shown uses a hand-dyed, fingering-weight yarn, accompanied by solid fingering-weight yarns. Yarn scraps of any material will also work great for this project!
Recommended needle size
[always use a needle size that gives you the gauge listed below - every knitter's gauge is unique]
![]() set US #1/2.25mm needles for working a small circumference in the round – because of the size of the project and the small stitch counts, traditional DPNs are recommended
set US #1/2.25mm needles for working a small circumference in the round – because of the size of the project and the small stitch counts, traditional DPNs are recommended
Notions
![]() stuffing – a very small quantity of polyester stuffing, wool roving or yarn scraps
stuffing – a very small quantity of polyester stuffing, wool roving or yarn scraps
![]() yarn needle
yarn needle
GAUGE
38 sts/ 46 rows = 4 inches/10cm in stockinette stitch
Note: Gauge isn't important for this project — instead, aim to make stitches tight enough so that stuffing won't show between them. This usually means choosing a needle that's 2-3 sizes smaller than normally recommended for the yarn you're using.
PATTERN NOTES
[Knitty's list of standard abbreviations and techniques can be found here.]
Instructions for grafting can be found here (photos) and here (video).
DIRECTIONS
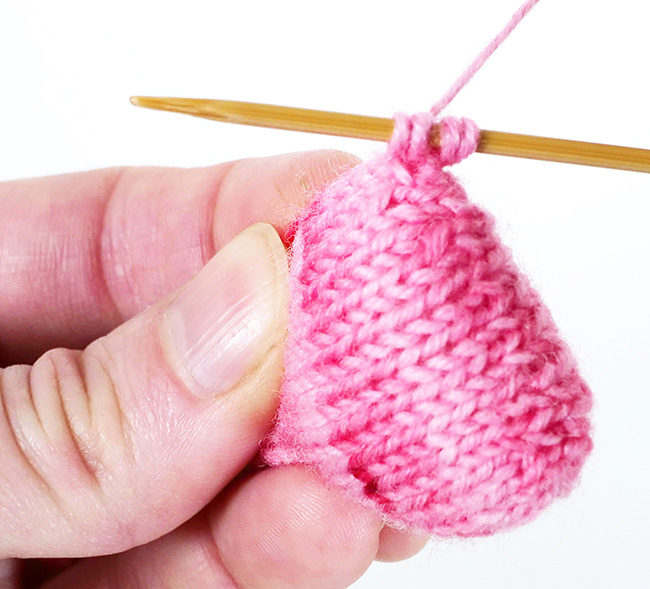
Cervix and Uterus
With MC, cast on 8 stitches and distribute onto 3 needles to work in a round.
Rounds 1-3: Knit.
Round 4: (M1, k2) 4 times. 12 sts.
Rounds 5-7: Knit.
Round 8: (K2tog, k1) 4 times. 8 sts.
Round 9: (M1, k1) 8 times. 16 sts.
Round 10: Knit.
Round 11: (K1, m1, k6, m1, k1) twice. 20 sts.
Round 12: Knit.
Round 13: (K1, m1, k8, m1, k1) twice. 24 sts.
Round 14: Knit.
Round 15: (K1, m1, k10, m1, k1) twice. 28 sts.
Rounds 16-19: Knit.
Round 20: (K2tog, k10, ssk) twice. 24 sts.
Round 21: Knit.
Round 22: (K2tog twice, k4, ssk twice) twice. 16 sts.
Cut yarn, leaving a tail about 6 inches/15 cm long.
Stuff the piece, leaving the narrow opening unstuffed.
Divide the stitches onto 2 needles, and graft them together.
Weave in the loose ends.
Fallopian Tube and Boxing Glove
With MC, and using one needle, pick up and knit 2 stitches at a diagonal at the top right corner of the uterus, placing them slightly to the front of the corner.
See photo as a guide.
Turn the piece around, and pick up and knit two more stitches parallel to the first two at the back of the same corner. The purl sides of the stitches should be facing each other.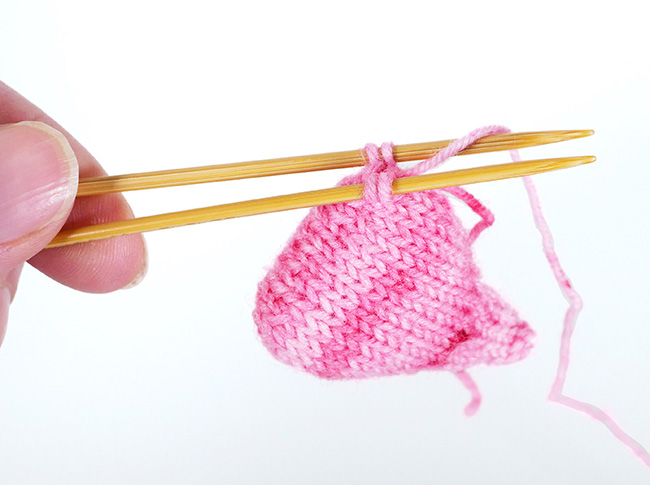
Place all four stitches onto one needle, with the working yarn attached to the leftmost stitch on the right side.
Knit 16 rows of i-cord, as follows:
*Knit 4, return sts to left hand needle without twisting; repeat from * until you have worked 16 rows total.
Switch to CC1.
Work 1 more row of i-cord.
Work 2 rows of i-cord purling rather than knitting the sts.
Switch to CC2.
Work 1 more row of i-cord.
Final i-cord row: Kfb 4 times. 8 sts.
Distribute the stitches onto 3 needles to begin working in the round.
Round 1: Kfb 8 times. 16 sts.
Knit 7 rounds.
Final round: (K2tog, k4, k2tog) twice. 12 sts.
Stuff the glove. Cut yarn, leaving a tail about 6 inches/15 cm long.
Divide the stitches onto 2 needles, and graft them together using Kitchener stitch.
Weave in the loose ends.
Turn the piece around so that the finished tube is on the left, and repeat this section for the second tube and glove.
Thumb
Turn the glove so that the grafted stitches are at top, and the interior side of the glove is toward you. Consult photos for placement of the thumb.
With CC2, and using one needle, pick up and knit 3 stitches horizontally, placed 2 stitches up from the last color change.
Knit 2 rows of i-cord.
Cut the yarn and draw it tightly through the stitches; use the tail to attach the tip of the thumb to the glove, with the tip of the thumb pointing toward the grafted stitches.
Weave in the loose ends.
Repeat this section on the second boxing glove.
FINISHING
Consult photos above and below for a guide.
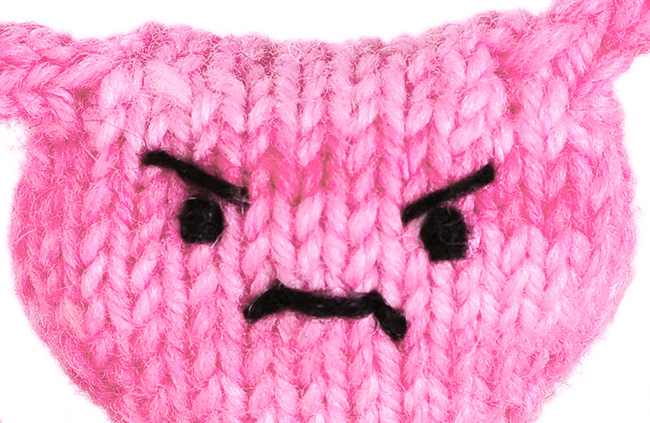
With CC3, embroider eyes onto the uterus with 2 small horizontal stitches for each, spaced about 4 stitches apart.
Embroider a frown with three stitches as shown.
For the finer eyebrows, split a piece of CC3, and use the thinner yarn to embroider two small, angled stitches above each eye.
With CC3, embroider a small horizontal patch onto the CC1 section of the glove, so that the patch will face forward. Use one piece of MC to connect the gloves to the uterus as shown.
ABOUT THE DESIGNER
 Anna Hrachovec is a designer and artist who is obsessed with knitting tiny toys and bringing them to life through stop-motion animation. Just about everything is fun when knit in miniature, so she's inspired by everything! She named her wooly world Mochimochi Land after learning to knit in Japan, which is also where she fell in love with squishy, adorable, delicious mochi.
She now lives in Chicago with her husband and two kids.
Pattern & images © 2022 Anna Hrachovec