Clapotis '24, a free knitting pattern from Knitty.com.
INTRODUCTION
Clapotis '24
 by Kate Gilbert
![]()
French women are known for wearing scarves. Starting in September and until the following summer arrives, this is a most important accessory. The scarf may be striped or patterned, colorful, wrinkled and is much bigger than the scarves you probably have. Women just wrap the scarf around their neck in a "Je suis belle et ça ne demande aucun effort*" sort of way and off they go.
Since I have lived in Paris, I have realized that these ladies are on to something. I find I am much warmer wearing a scarf, even if I’m not wearing a jacket, so here is my knit version of the French scarf. It’s knit on the bias so the variegated yarn makes diagonal stripes and stitches are carefully dropped to make a pattern in the opposite direction. This creates a scarf which tends to be a little more of a parallelogram than a rectangle, but I promise, it’s nice that way.
It’s made of the softest, most luxurious yarn I have ever used and is a dream to wear. Instructions are included to modify it to create a stole.
(*I’m beautiful and I don’t even try.)
Editor's note: This updated version of the legendary Clapotis pattern is here to commemorate the pattern's 20th Anniversary of publication as part of the Clapotisfest celebration! Find out more about Clapotisfest here, and learn how you could win some gorgeous indie-dyed yarn!
 model: Émilie Vandenameele
 photos: Kate Gilbert
SIZE
One
FINISHED MEASUREMENTS
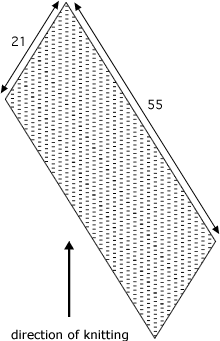
Width: 21 inches/53.5 cm
Length: 55 inches/139.5 cm
MATERIALS
Yarn
![]() Lorna's Laces Lion and Lamb [50% silk, 50% wool; 205yd/184m per 100g skein]; color: Bittersweet; 4 skeins
Lorna's Laces Lion and Lamb [50% silk, 50% wool; 205yd/184m per 100g skein]; color: Bittersweet; 4 skeins
Yarn Characteristics
![]() The original (long-discontinued) yarn is a silk/wool worsted-weight hand-dyed single. See Pattern Notes for information on suggested yarn options and how to adjust for different gauges. See the Clapotisfest booklet for more than 60 variations knit in indie-dyed yarn of every description, and learn how you could win some of that yarn for yourself!
The original (long-discontinued) yarn is a silk/wool worsted-weight hand-dyed single. See Pattern Notes for information on suggested yarn options and how to adjust for different gauges. See the Clapotisfest booklet for more than 60 variations knit in indie-dyed yarn of every description, and learn how you could win some of that yarn for yourself!
Recommended needle size
[always use a needle size that gives you the gauge listed below – every knitter's gauge is unique]
![]() 1 set US #8/5mm straight needles
1 set US #8/5mm straight needles
Notions
![]() many stitch markers
many stitch markers
![]() yarn needle
yarn needle
GAUGE
19 sts/25 rows = 4"/10 cm in stockinette stitch
PATTERN NOTES
[Knitty's list of standard abbreviations and techniques can be found here.]
Construction method: The scarf begins in a point at one corner, and increases are worked at the end of each row. Once you’ve reached the full width of the scarf for the main body, it is worked straight until the desired length is achieved, then decreased back down to a point at the far corner.
Suggested yarn: Any yarn in any weight can be used in place of the discontinued original yarn. Adjust needle size to match the yarn you use so that the solid sections read as solid. The finished shawl will be most interesting when a non-solid colorway is used. Because of the simple stitch pattern, a super-variegated high-contrast colorway can work well here. Note that with fuzzy yarn (such as mohair or brushed alpaca), dropping the laddered stitches will be a bit more laborious. Yarn with stretch/memory, such as non-superwash wool, will show the ripples best. Shimmery, smooth yarns will not hold the ripples but can also be beautiful.
This pattern can easily be adjusted in size (especially helpful if you are changing the gauge of the yarn) in this way:
1. Work Set-up Rows as for scarf.
2. Work Increase Rows until piece is desired width (measure width along right-hand side of triangle, with RS facing.) Work Increase Rows 1-6 once more before proceeding to Straight Rows.
3. Work Straight Rows until piece is desired length (measure length along left-hand side of piece, with RS facing.)
4. Work Decrease Rows as necessary until 23 sts rem.
Work Decrease Rows 1-10 once more.
Work Final Rows.
Which side is the right side?
The ripples show best when the purl side is displayed, and that's how it's intended to be worn. See picture below. Blocking is neither required or recommended, in order to leave the ripples in their original ripply state.
Knitting tip: If you find stitch markers annoying, try this (thanks to AzzyMakes for the tip!):
- On the RS, purl the stitch to be dropped (knit on the WS) – this will allow you to forgo the use of stitch markers
- On the WS, purl through the back loops of the stitches that were knit through the back loops on the RS – this gives neater edges once the stitches are dropped
DIRECTIONS
Section 1 – Set-up Rows
CO 2 sts.
Row 1 [RS]: P1, pfb.
Row 2 [WS]: Sl1, k1, pm, yo, kfb.
Row 3 and all odd-numbered rows: Sl1, p to last st, pfb.
Row 4: Sl1, k1, k tbl, k1, k tbl, kfb.
NOTE: From this point forward, on even-numbered rows, you will knit the st before the marker through the back loop, and knit the stitch after the marker through the front as normal, then the next st through the back loop. The untwisted line of sts will later be dropped and unravelled, and the adjacent columns of twisted sts will stay nice and tight, helping the fabric keep its structure.
Row 6: Sl1, k2, k tbl, k1, k tbl, k1, kfb.
Row 8: Sl1, k3, k tbl, k1, k tbl, k2, kfb.
Row 10: Sl1, k4, k tbl, k1, k tbl, k3, kfb.
Row 12: Sl1, k5, k tbl, k1, k tbl, k4, kfb.
Row 14: Sl1, k1, pm, yo, k2tog, k3, k tbl, k1, k tbl, k3, ssk, pm, yo, kfb. 17 sts on needle.
Section 2 – Increase Rows
Row 1 and all odd-numbered rows [RS]: Sl1, p to last st, pfb.
Row 2 [WS]: Sl1, k1, k tbl, [k1, k tbl, k3, k tbl] to last marker, k1, k tbl, kfb.
Row 4: Sl1, k2, k tbl, [k1, k tbl, k3, k tbl] to last marker, k1, k tbl, k1, kfb.
Row 6: Sl1, k3, k tbl, [k1, k tbl, k3, k tbl] to last marker, k1, k tbl, k2, kfb.
Row 8: Sl1, k4, k tbl, [k1, k tbl, k3, k tbl] to last marker, k1, k tbl, k3, kfb.
Row 10: Sl1, k5, k tbl, [k1, k tbl, k3, k tbl] to last marker, k1, k tbl, k4, kfb.
Row 12: Sl1, k1, pm, yo, k2tog, k3, k tbl, [k1, k tbl, k3, k tbl] to last marker, k1, k tbl, k3, ssk, pm, yo, kfb.
Repeat Increase Rows 1-12 6 times more. 101 sts on needle.
Repeat Increase Rows 1-6 once more. 107 sts on needle.
Section 3 – Straight Rows
Row 1 and all odd-numbered rows [RS]: Sl1, p to last 2 sts, p2tog.
Row 2 [WS]: P1, k2, k tbl, [k1, k tbl, k3, k tbl] to last marker, k1, k tbl, k3, kfb.
Row 4: P1, k1, k tbl, [k1, k tbl, k3, k tbl] to last marker, k1, k tbl, k4, kfb.
Row 6: P1, k tbl, [k1, k tbl, k3, k tbl] to last marker, k1, k tbl, k3, ssk, pm, yo, kfb.
Row 8: P1, remove marker, drop next st, let it drop down several rows, pick up top bar with left needle to form a new st (make sure this st isn't twisted), k this and foll st tbl, k3, k tbl, [k1, k tbl, k3, k tbl] to last marker, k1, k tbl, kfb.
Row 10: P1, k4, k tbl, [k1, k tbl, k3, k tbl] to last marker, k1, k tbl, k1, kfb.
Row 12: P1, k3, k tbl, [k1, k tbl, k3, k tbl] to last marker, k1, k tbl, k2, kfb.
Repeat Straight Rows 1-12 12 times more.
Section 4 – Decrease Rows
Row 1 and all odd-numbered rows [RS]: K1, p to last 2 sts, p2tog.
Row 2 [WS]: P1, k2, k tbl, [k1, k tbl, k3, k tbl] to last marker, k1, k tbl, k2, ssk.
Row 4: P1, k1, k tbl, [k1, k tbl, k3, k tbl] to last marker, k1, k tbl, k1, ssk.
Row 6: P1, k tbl, [k1, k tbl, k3, k tbl] to last marker, k1, k tbl, ssk.
Row 8: P1, remove marker, drop next st and let it drop down several rows, pick up top bar with left needle to form a new st (make sure this st isn't twisted), k this and foll st tbl, k3, k tbl, [k1, k tbl, k3, k tbl] to last marker, drop next st and form new st as for previous dropped st, k this st tbl, ssk.
Row 10: P1, k4, k tbl, [k1, k tbl, k3, k tbl] to last marker, remove marker, ssk.
Row 12: P1, k3, k tbl, [k1, k tbl, k3, k tbl] to last marker, k1, k tbl, k3, ssk.
Repeat Decrease Rows 1-12 6 times more. 23 sts rem.
Repeat Decrease Rows 1-10 once more. 13 sts rem.
Section 5 – Final Rows
Rows 1, 3, 5, 7, 9 [RS]: K1, p to last 2 sts, p2tog.
Row 2 [WS]: P1, k3, k tbl, k1, k tbl, k3, ssk.
Row 4: P1, k2, k tbl, k1, k tbl, k2, ssk.
Row 6: P1, k1, k tbl, k1, k tbl, k1, ssk.
Row 8: P1, k tbl, k1, k tbl, ssk.
Row 10: P1, remove marker, drop st (DO NOT form a new st this time), ssk.
Row 11 (last row): P2tog.
Break yarn and draw through loop of last st.
FINISHING
Finish unravelling any drop-stitch ladders that remain unravelled. Weave in ends. Blocking is not necessary or even recommended.

ABOUT THE DESIGNER
 Kate Gilbert designed this, the (arguably) first internet-viral knitting pattern, while living in a small apartment with a large stash in Paris, France. She went on to design many more beautiful patterns, and created Twist Collective (Ravelry link), an innovative independent online knitting magazine.
Nowadays, she uses her extensive experience and training to help small business owners efficiently market their products and services. She lives in Montreal, Canada, with the world's coolest teenager.
Check her out at kategilbert.com
Pattern & images © 2024 Kate Gilbert