Seiche, a free knitting pattern from Knitty.com.
INTRODUCTION
Seiche
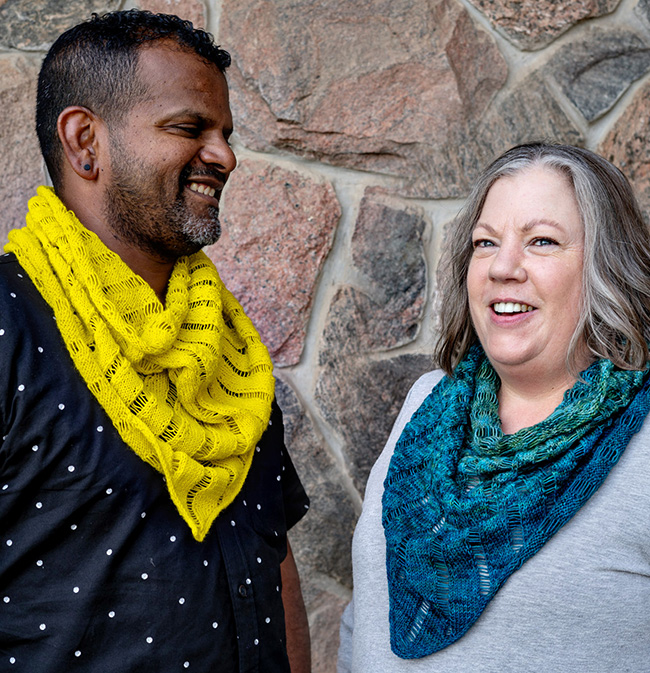
by Lynne Sosnowski

It's a heady responsibility to create something in homage to another designer. How to capture the essence of a thing without copying? Kate Gilbert's Clapotis ("clap-oh-tee") is a knit for the ages – an eminently wearable accessory that can be worked in a zillion different looks and adds panache to them all.
Clapotis is the name given to a standing wave pattern, a fine description of the dropped-stitch channels and runnels in the fabric of the same name. This bandana cowl I named Seiche ("sayshe"), a word used for a standing wave formation in an enclosed body of water. Seiche's channels are formed similarly but in the enclosed form of a tube that's biased in a different manner from its inspiration. I hope this small act of magic – dropping the line of a stitch on purpose and seeing the fabric transform – brings you joy along with a wearable, light cowl.
 model: Jeyas B., Lynne Sosnowski, Steve Goodtime
photos: Hayley Angold
SIZE
One
FINISHED MEASUREMENTS
Top circumference: 21 in/53 cm
Bottom circumference: 32 in/81 cm
Height at back neck: 24.5 in/62 cm
Height to bandana point: 30.5 in/77.5 cm
MATERIALS
Yarn
![]() Coates & Co. Fiber Cottage Sock [75% merino, 25% nylon; 446 yd/448 m per 3.53 oz/100 g skein]; Electric Yellow; 1 skeins. Note: every last yard of the skein was used; it's recommended that you have a second skein.
Coates & Co. Fiber Cottage Sock [75% merino, 25% nylon; 446 yd/448 m per 3.53 oz/100 g skein]; Electric Yellow; 1 skeins. Note: every last yard of the skein was used; it's recommended that you have a second skein.
OR
![]() Gobsmacked BFL Giant [100% superwash Bluefaced Leicester; 657 yd/600 m per 5.3 oz/150 g cake]; Tis Not For Another But For Thee; 1 cake.
Gobsmacked BFL Giant [100% superwash Bluefaced Leicester; 657 yd/600 m per 5.3 oz/150 g cake]; Tis Not For Another But For Thee; 1 cake.
Yarn Characteristics
![]() Samples shown use a smooth fingering-weight wool-based yarn that offers good stitch definition, and is soft enough to wear around the neck. The smoothness of the yarn makes the dropped stitches easier to ladder down – yarns with fuzz or halo may prove frustrating and sticky and require more effort to ladder down.
Samples shown use a smooth fingering-weight wool-based yarn that offers good stitch definition, and is soft enough to wear around the neck. The smoothness of the yarn makes the dropped stitches easier to ladder down – yarns with fuzz or halo may prove frustrating and sticky and require more effort to ladder down.
Recommended needle size
[always use a needle size that gives you the gauge listed below - every knitter's gauge is unique]
![]() 1 US #4/3.5 mm circular needle, 20-24 in/50-60 cm
1 US #4/3.5 mm circular needle, 20-24 in/50-60 cm
Notions
![]() 22 circular stitch markers
22 circular stitch markers
![]() 1 circular stitch marker of a different style or colour to mark beginning of round
1 circular stitch marker of a different style or colour to mark beginning of round
![]() removable locking stitch markers or safety pins
removable locking stitch markers or safety pins
![]() yarn needle
yarn needle
GAUGE
26 sts/34 rows = 4 inches/10 cm in stockinette stitch
PATTERN NOTES
[Knitty's list of standard abbreviations and techniques can be found here.]
Construction method: The bandana-like point of the cowl is formed by working back and forth, gradually adding stitches on each side until the full circumference of the cowl is reached, when it is joined for working in the round until completion. The top edge is ended with an I-cord bind-off and then an I-cord edging is picked up and worked on the bottom edge.
Like the original Clapotis, Seiche features airy ladders that are formed by dropping a column of stitches nearing the end of the project. These columns are initiated with either a yarn over (yo) or a yarn over followed by a decrease (yo, k2tog) and the sides of the column are kept orderly by working to twist the stitches on either side of the ladder (k1 tbl). The placement of stitch markers differs from that used in Clapotis because I found this method easier to track. Clapotis achieves its bias fabric and parallelogram shape by increasing and decreasing on opposite sides of the piece. Seiche achieves its biased look by increasing and decreasing within the stockinette bands between each ladder.
If you're using a gradient yarn like the lovely blue-green Gobsmacked shown here, you may wish to pull off 25 yds/40 m of the beginning colour before casting on. You'll use this to work the bottom I-cord edge after the cowl is completed so that the colour will flow into the bandana point.
If you want a shorter cowl, work fewer repeats between each decrease section. If you want a longer cowl, work more repeats between each decrease section. Each repeat of four rounds accounts for approximately .4 in/1 cm.
Techniques:
- I-cord bind-off and i-cord edge: video tutorial
- cable cast on: photo tutorial | video tutorial
Sl 1: All sts are slipped purlwise with yarn held to wrong side of work.
DIRECTIONS
Seiche Bandana Point
CO 2 sts.
Row 1 [WS]: P1, pfb. 3 sts.
Row 2 [RS]: Sl1wyib, pm, k1, yo, kfb. 5 sts.
Row 3: Sl1wyif, p to last st, pfb. 1 st increased.
Row 4: Sl1wyib, (k1, k1 tbl) twice, kfb. 7 sts.
Row 5: Repeat Row 3.
Row 6: Sl1wyib, k to m, k1 tbl, k1, k1 tbl, k to last st, kfb. 9 sts.
Row 7: Sl1wyif, p to last st, pfb. 1 st increased.
Repeat Rows 6-7 6 more times. 22 sts.
Row 20: Sl1wyib, pm, k1 tbl, yo, k2tog, k to next m, k1 tbl, k1, k1 tbl, k to last st, kfb. 23 sts.
Row 21 and all WS rows through row 41: Sl1wyif, p to last st, pfb. 1 st increased.
Row 22: Sl1wyib, k to m, (k1 tbl, k1, k1 tbl, k6) twice, k to last st, kfb. 25 sts.
Row 24: Sl1wyib, k to m, (k1 tbl, k1, k1 tbl, k6) twice, pm, k1 tbl, yo, k2tog, k1, kfb. 27 sts.
Row 26: Sl1wyib, k to m, (k1 tbl, k1, k1 tbl, k6) twice, k1 tbl, k1, k1 tbl, k to last st, kfb. 1 st increased.
Row 28: Repeat Row 26. 31 sts.
Row 30: Repeat Row 26. 33 sts.
Row 32: Repeat Row 26. 35 sts.
Row 34: Repeat Row 26. 37 sts.
Row 36: Rep Row 26. 39 sts.
Row 38: Sl1wyib, pm, k1 tbl, yo, k2tog, k to m, (k1 tbl, k1, k1 tbl, k6) 3 times, k to last st kfb. 41 sts.
Row 40: Sl1wyib, k to m, (k1 tbl, k1, k1 tbl, k6) 4 times, k to last st, kfb. 43 sts.
Row 42: Sl1wyib, k to m, (k1 tbl, k1, k1 tbl, k6) f4 times, pm, k1 tbl, yo, k2tog, k1, kfb. 45 sts.
Note: In the following two rows, you will place removable stitch markers in the lower edge of the work – these will help you with the lower edging. Do not put them on the needle. You can use small safety pins, if you prefer.
Row 43 [WS]: Clip a removable stitch marker in the lower edge of the stitches at the start of the row, and then Cable CO 27 st. Sl1wyif, p to last st, pfb. 73 sts.
Row 44: Clip a removable stitch marker in the lower edge of the stitches at the start of the row, and then Cable CO 27 sts. Sl1wyib, k3, (pm, k1 tbl, yo, k2tog, k6) 3 times, (k1 tbl, k1, k1 tbl, k6) 5 times, (pm, k1 tbl, yo, k2tog, k6) twice, pm, k1 tbl, yo, k2tog, k2, kfb. 101 sts.
Row 45: Sl1wyif, p to last st, pfb. 102 sts.
Row 46: Sl1wyib, k to m, (k1 tbl, k1, k1 tbl, M1R, k4, k2tog) 10 times, k1 tbl, k1, k1 tbl, k3, kfb. 103 sts.
Row 47: Cable CO 27 sts. Sl1wyif, p to last st, pfb. 131 sts.
Row 48: Cable CO 27 sts. Sl1wyib, k5, (pm, k1 tbl, yo, k2tog, k6) 3 times, (k1 tbl, k1, k1 tbl, k6) 11 times, (pm, k1 tbl, yo, k2tog, k6) twice, pm, k1 tbl, yo, k2tog, k4, kfb. 159 sts.
Row 49: Sl1wyif, p to last st, pfb. 160 sts.
Row 50: Sl1wyib, k6, (k1 tbl, k1, k1 tbl, M1R, k4, k2tog) 16 times, k1 tbl, k1, k1 tbl, k5, kfb. 161 sts.
Row 51: Cable CO 27 st. Sl1wyif, p to last st, pfb. 189 sts.
Row 52: Cable CO 18 sts. (K1 tbl, yo, k2tog, k6, pm) twice, (k1 tbl, yo, k2tog, k6) once, (k1 tbl, k1, k1 tbl, k6) 17 times, (pm, k1 tbl, yo, k2tog, k6) 3 times. 207 sts.
Cowl Body
Check that sts are not twisted around the needle, place contrasting marker, and join for working in the round. You will need to be able to identify the start of the round to work the final edging, you can clip a removable stitch marker in the edge here if you wish.
Set-up Round 1: (K1 tbl, k1, k1 tbl, k6) around.
Set-up Round 2: (K1 tbl, k1, k1 tbl, M1R, k4, k2tog) around.
Set-up Round 3: Repeat Round 1.
Cowl Body pattern:
Round 1: (K1 tbl, k1, k1 tbl, k6) around.
Round 2: Repeat Round 1.
Round 3: (K1 tbl, k1, k1 tbl, M1R, k4, k2tog) around.
Round 4: Repeat Round 1.
Repeat Rounds 1-4 5 more times.
First Decrease section:
Note: The instructions below don't specifically refer to the markers between the repeats, but rather give the count for the number of stitches to be knitted to each marker. This is done because the number of stitches in the repeats changes, and at various points you have different numbers of stitches in alternating repeats. This helps you confirm you have the right number of stitches. In non-bias/decrease rounds, the work within each bracket is just “k1tbl, k1, k1tbl, k to marker”. On a round with decreases, the decrease is always worked in the final two stitches before the marker
Round 1: (K1 tbl, k1, k1 tbl, k6) around.
Round 2: Repeat Round 1.
Round 3: (K1 tbl, k1, k1 tbl, k4, k2tog, k1 tbl, k1, k1 tbl, M1R, k4, k2tog) 11 times, k1 tbl, k1, k1 tbl, k4, k2tog. 195 sts.
Round 4: (K1 tbl, k1, k1 tbl, k5, k1 tbl, k1, k1 tbl, k6) 11 times, k1 tbl, k1, k1 tbl, k5.
Round 5: (K1 tbl, k1, k1 tbl, k5, k1 tbl, k1, k1 tbl, k6) 11 times, k1 tbl, k1, k1 tbl, k5.
Round 6: Repeat Round 5.
Round 7: (K1 tbl, k1, k1 tbl, M1R, k3, k2tog, k1 tbl, k1, k1 tbl, M1R, k4, k2tog) 11 times, k1 tbl, k1, k1 tbl, M1R, k3, k2tog.
Round 8: Repeat Round 5.
Repeat Rounds 5-8 2 more times.
Second decrease section:
Round 1: (K1 tbl, k1, k1 tbl, k5, k1 tbl, k1, k1 tbl, k6) 11 times, k1 tbl, k1, k1 tbl, k5.
Round 2: Repeat Round 1.
Round 3: (K1 tbl, k1, k1 tbl, M1R, k3, k2tog, k1 tbl, k1, k1 tbl, k4, k2tog) 11 times, k1 tbl, k1, k1 tbl, M1R, k3, k2tog. 184 sts.
Round 4: (K1 tbl, k1, k1 tbl, k5) around.
Round 5: (K1 tbl, k1, k1 tbl, k5) around.
Round 6: Repeat Round 5.
Round 7: (k1 tbl, k1, k1 tbl, M1R, k3, k2tog) around.
Round 8: As Round 5.
Repeat Rounds 5-8 once more.
Third decrease section:
Round 1: (K1 tbl, k1, k1 tbl, k5) around.
Round 2: Repeat Round 1.
Round 3: (K1 tbl, k1, k1 tbl, k3, k2tog, k1 tbl, k1, k1 tbl, M1R, k3, k2tog) 11 times, k1 tbl, k1, k1 tbl, k3, k2tog. 172 sts.
Round 4: (K1 tbl, k1, k1 tbl, k4, k1 tbl, k1, k1 tbl, k5) 11 times, k1 tbl, k1, k1 tbl, k4.
Round 5: (K1 tbl, k1, k1 tbl, k4, k1 tbl, k1, k1 tbl, k5) 11 times, k1 tbl, k1, k1 tbl, k4.
Round 6: Repeat Round 5.
Round 7: (K1 tbl, k1, k1 tbl, M1R, k2, k2tog, k1 tbl, k1, k1 tbl, M1R, k3, k2tog) 11 times, k1 tbl, k1, k1 tbl, M1R, k2, k2tog.
Round 8: Repeat Round 5.
Repeat Rounds 5-8 once more.
Fourth decrease section:
Round 1: (K1 tbl, k1, k1 tbl, k4, k1 tbl, k1, k1 tbl, k5) 11 times, k1 tbl, k1, k1 tbl, k4.
Round 2: Repeat Round 1.
Round 3: (K1 tbl, k1, k1 tbl, M1R, k2, k2tog, k1 tbl, k1, k1 tbl, k3, k2tog) 11 times, k1 tbl, k1, k1 tbl, M1R, k2, k2tog. 161 sts.
Round 4: (K1 tbl, k1, k1 tbl, k4) around.
Round 5: (K1 tbl, k1, k1 tbl, k4) around.
Round 6: Repeat Round 5.
Round 7: (K1 tbl, k1, k1 tbl, M1R, k2, k2tog) around.
Round 8: Repeat Round 5.
Repeat Rounds 5-8 once more.
Fifth decrease section:
Round 1: (K1 tbl, k1, k1 tbl, k4) around.
Round 2: Repeat Round 1.
Round 3: (K1 tbl, k1, k1 tbl, k2, k2tog, k1 tbl, k1, k1 tbl, M1R, k2, k2tog) 11 times, k1 tbl, k1, k1 tbl, k2, k2tog. 149 sts.
Round 4: (K1 tbl, k1, k1 tbl, k3, k1 tbl, k1, k1 tbl, k4) 11 times, k1 tbl, k1, k1 tbl, k3.
Round 5: (K1 tbl, k1, k1 tbl, k3, k1 tbl, k1, k1 tbl, k4) 11 times, k1 tbl, k1, k1 tbl, k3.
Round 6: Repeat Round 5.
Round 7: (K1 tbl, k1, k1 tbl, M1R, k1, k2tog, k1 tbl, k1, k1 tbl, M1R, k2, k2tog) 11 times, k1 tbl, k1, k1 tbl, M1R, k1, k2tog.
Round 8: Repeat Round 5.
Repeat Rounds 5-8 once more.
Sixth and final decrease section:
Round 1: K1 tbl, k1, k1 tbl, k3, k1 tbl, k1, k1 tbl, k4) 11 times, k1 tbl, k1, k1 tbl, k3.
Round 2: As Round 1.
Round 3: (K1 tbl, k1, k1 tbl, M1R, k1, k2tog, k1 tbl, k1, k1 tbl, k2, k2tog) 11 times, k1 tbl, k1, k1 tbl, M1R, k1, k2tog. 138 sts.
Round 4: (K1 tbl, k1, k1 tbl, k3) around.
Round 5: (K1 tbl, k1, k1 tbl, k3) around.
Round 6: As Round 5.
Round 7: (K1 tbl, k1, k1 tbl, M1R, k1, k2tog) around.
Round 8: As Round 5.
Next round, drop stitches: (K1 tbl, drop next st and allow to ladder down then pick up the top ladder by lifting with the left-hand needle and k into the back leg, k1 tbl, k3) around. Do not ladder down the dropped sts all the way at this point. Laddering down causes the k1tbl sts at either side to move far apart, and that would make picking up stitches for finishing the bottom edge more difficult.
Final round: K to end, removing markers.
Top edge:
Work I-cord BO as follows:
Turn work so the WS is facing. Working an I-cord bind-off from the wrong side will help counter the natural tendency of a stockinette-based fabric to roll onto itself. The I-cord BO is worked by first adding 3 sts that become the cord, and then working each row as knit 2 sts of the cord, and then knit a decrease with the last st of the cord and the first live st of the edge, thus “using up” one live st.
Using knit CO, CO 3 sts.
[(K2, ssk, return 3 sts to LH needle) three times, (k3, return 3 sts to LH needle)] around, until 3 sts remain.
BO 3 sts.
Break yarn leaving 12 in/30 cm tail. Duplicate st over beginning and ending of the I-cord to join and neaten the fabric just under the join.
Bottom edge:
Place a locking stitch marker or safety pin in the point of the bandana. As with the top BO edge, the I-cord for the bottom will be picked up with the RS facing, and then worked from the WS to help reduce the roll of the fabric. If you used a gradient yarn, this is where you will use the small amount of the beginning colour that you put aside. The exact number of sts in each section isn't necessary to match as long as your number is just a few sts more or fewer.
With RS facing and starting at the beginning of round, rejoin yarn and pick up and knit sts around the bottom edge of the cowl, at a rate of one st for every cast on st and and one stitch for every other row in the diagonal edges of the point (either in the bump of the kfb or the larger slipped stitch, whichever you find easiest): 90 sts to first marker, 22 sts to second marker at bandana point, 21 sts to third marker, 81 sts to end. Total 214 sts.
Turn work so the WS is facing. Using knitting-on method, CO 3 sts.
Work i-cord bind off around lower edge, as follows:
First section:
I-cord bind-off row: [(K2, ssk, return 3 sts to LH needle) three times, (k3, return 3 sts to LH needle)].
Repeat this row until you reach the first marker, remove marker.
Second section:
I-cord bind-off row: [(K2, ssk, return 3 sts to LH needle) twice, (k3, return 3 sts to LH needle)]
Repeat this row until until you reach the marker at the bandana point
Third section, bandana point:
I-cord bind-off row: (K3, return 3 sts to LH needle) twice, (k2, ssk with the st at the bandana point, return 3 sts to LH needle), remove marker, (k3, return 3 sts to LH needle) twice.
Fourth section:
I-cord bind-off row: [(K2, ssk, return 3 sts to LH needle) twice, (k3, return 3 sts to LH needle)].
Repeat this row to next marker.
Last section:
I-cord bind-off row: [(K2, ssk, return 3 sts to LH needle) three times, (k3, return 3 sts to LH needle)] to the end of round. 3 sts remain.
BO 3 sts.
Break yarn leaving 12 in/30 cm tail. Duplicate st over beginning and ending of the I-cord to join and neaten the fabric just under the join.
FINISHING
Gently encourage the dropped sts to ladder all the way down to the bottom edge. Wash in tepid water using wool wash, gently squeeze out and roll in an old towel to remove as much water as possible, then lay flat to dry, adjusting occasionally so creases don't form. Do not pin or stretch. Weave in ends.
ABOUT THE DESIGNER
 After a career of producing large-scale municipal festivals and events, Lynne now splits her time between designing knitwear and producing stand-up comedy festivals and live shows in Ontario, Canada. She's funny for a regular person.
She thanks Jeyas B. and Steve Goodtime for being good sports and modelling. You can check out Steve Goodtime’s appearances on America’s Got Talent and Canada’s Got Talent on his Instagram and count yourself lucky indeed if you find him performing in the wild.
You can find Lynne's work as Etcgirl on Ravelry and thatetcgirl on Instagram.
Pattern & images © 2024 Lynne Sosnowski