Subjunction, a free knitting pattern from Knitty.com.
INTRODUCTION
Subjunction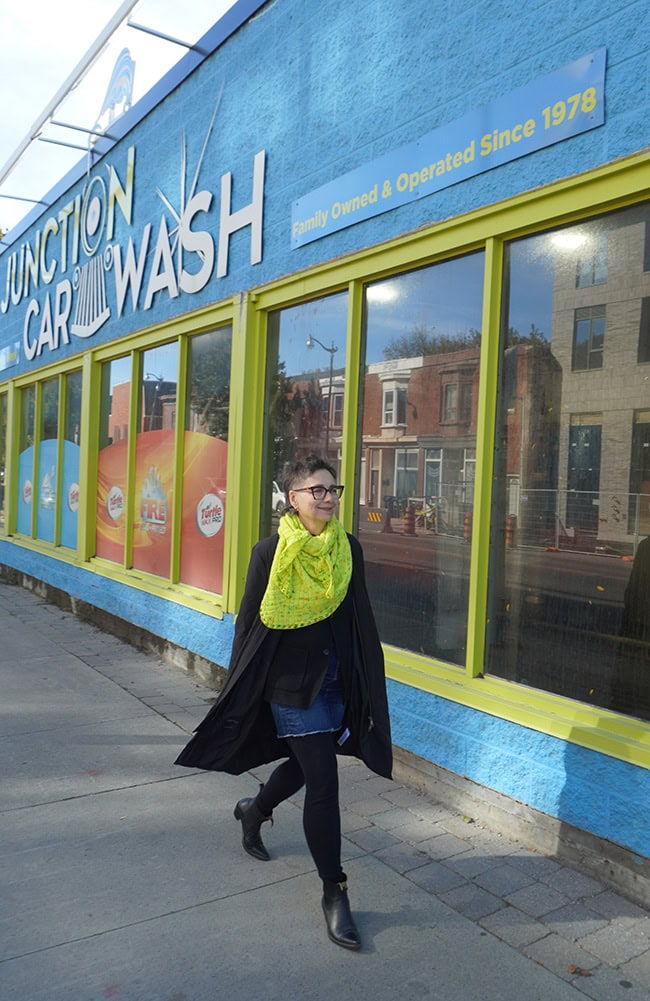
by Kate Atherley

sub•junc•tion (səbˈdʒʌŋk ʃən)
Noun 1. subjunction - the act of supplementing
subjoining, supplementation
expanding upon, expansion - adding information or detail
This is my favorite type of shawl for late fall and early winter: large and brightly colored! As the daylight gets shorter, and we all seem to retreat into our dark winter gear – so much black, navy, charcoal and chocolate brown – we need something that ensures we're easy to see at night, and brings a bit of cheer.
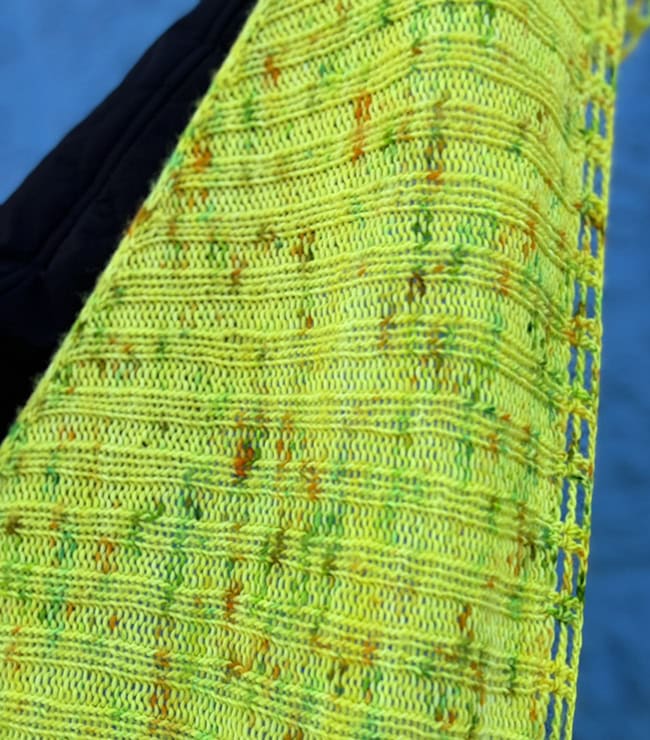
It's also my favorite in another way: a not-at-all fussy stitch pattern. Ribbing might seem like an unusual choice for a shawl, but the fabric drapes beautifully when you wrap it around yourself, and you do get into the rhythm of the knitting, I promise – it's quite meditative. I like these types of shawls for everyday, as sometimes lace can feel a bit too pretty, a bit too precious, a bit too delicate for wearing over my well-worn black puffer jacket when walking the dog. And as the name suggests, a little extra detail at the end of a very simple knit makes for just enough interest to make it feel special.
I've used a speckly variegated yarn in just about the brightest color that exists: go with what brings you joy. This design is very amenable to substitutions of yarn colors and thicknesses: just work until it's the size you want. Two skeins of fingering-weight yarn make a generous wrap.
There's a few interesting technical details: I use a 4-stitch stockinette stitch edging that rolls to look like i-cord, but there's none of the issue with i-cord pulling vertically or causing the edge to be too tight. And I've started it with a stockinette stitch tab, which is a fun variant of the more common garter tab. If you've not done one before, don't worry, there's full instructions.
I have also introduced a variant on the useful-but-fiddly pfb increase.
 model: Kate Atherley
photos: Amy Sadler
SIZE
One
FINISHED MEASUREMENTS
Width: 74 inches/188 cm
Length: 28 inches/71 cm
See Pattern Notes for size adjustment tips
MATERIALS
Yarn
Undercover Otter Singularity [100% superwash merino, 400 yds/ 366 m per 100 g skein]; 2 skeins; color: Old Tom Whiskey
Note: Sample uses all of both balls.
Yarn Characteristics
Yarn is a loosely spun single, something between a heavy laceweight and a lighter fingering weight. It's a neon shade with relatively infrequent speckles.
Recommended needle size
[always use a needle size that gives you the gauge listed below - every knitter's gauge is unique]
US #6/ 4 mm circular needle –30 inches/75 cm long or longer
one US #8/5 mm needle – a single DPN, straight or short circular, for working the bind-off
US D/3 mm crochet hook
Notions
1 ring-style stitch marker
1 removable stitch marker or safety pin, to mark the RS of the fabric
yarn needle
GAUGE
Approximately 20 sts/34 rows = 4 inches/ 10 cm in (k2, p2) ribbing.
Note: Gauge is not critical for this project but working at a different gauge will affect finished size and yardage required.
PATTERN NOTES
[Knitty's list of standard abbreviations and techniques can be found here.]
Construction method: Worked from the top down, shawl begins with a stockinette stitch tab and ends with a crochet edging over a useful slighty-stretchy bind off.
Yarn Substitution:
You can use any yarn you wish; choose needles a size or two larger than recommended on the ball band,in order to get a drapey fabric. I recommend a solid, nearly-solid or lightly-speckled yarn. The ribbing would cause a strongly variegated yarn to look muddled.
Size adjustments: The shawl is easily adjusted: work until it's the size you want, or until you've just about run out of yarn. Leave yourself about 10 times the width of the final row in yarn for the binding off.
Kfb: Knit into the front and back of the stitch. 1 st increased to 2.
Pf-kb: Purl into the front and then knit into the back of the stitch. 1 st increased to 2. This is a slightly-easier-to-work
PATTERN STITCHES
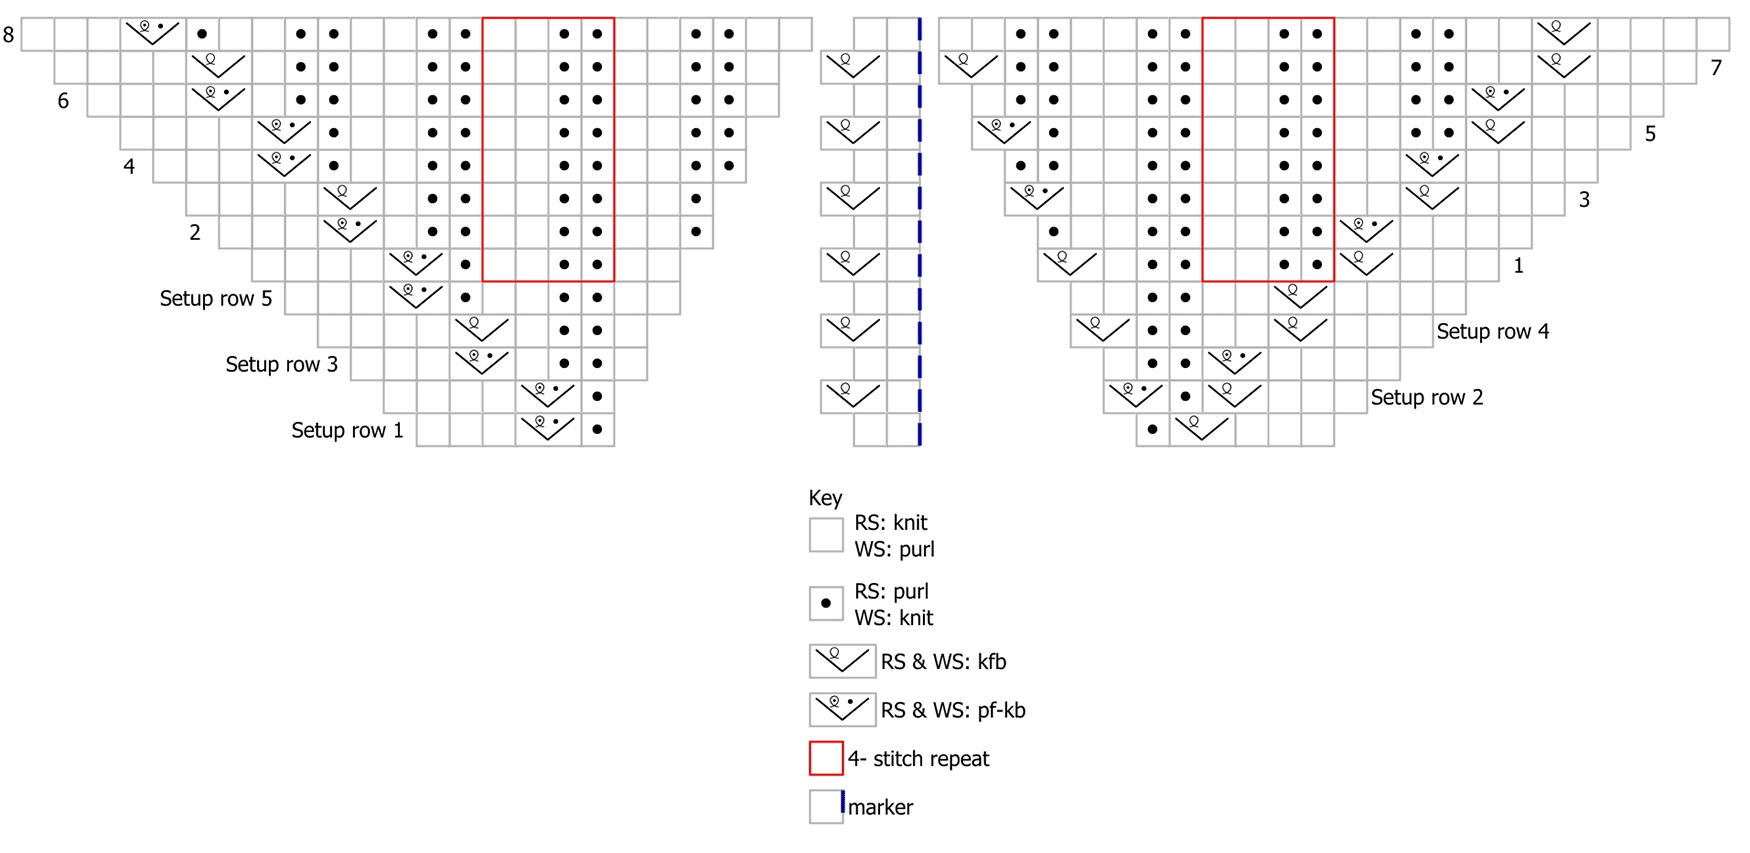
CHART
View and download CHART
WRITTEN INSTRUCTIONS
Setup Section:
Setup row 1 [WS]: P3, pf-kb, k1, p2, pm, k1, kfb, p3. 14 sts.
Setup row 2 [RS]: K3, kfb, p1, pf-kb, sm, k1, kfb, p1, pf-kb, k4. 18 sts.
Setup row 3: P3, pf-kb, p1, k2, p4, k2, pf-kb, p4. 20 sts.
Setup row 4: K3, kfb, k2, p2, kfb, sm, k1, kfb, k1, p2, k1, kfb, k4. 24 sts.
Setup row 5: P3, pf-kb, k1, p2, k2, p6, k2, p2, kfb, p4. 26 sts.
Body of Shawl:
Row 1 [RS]: K3, kfb, (p2, k2) to 4 sts before m, p2, k1, kfb, sm, k1, kfb, k2, (p2, k2) to last 6 sts, p1, pf-kb, k4. 4 sts increased.
Row 2 [WS]: P3, pf-kb, p1, (k2, p2) to 3 sts before m, (k1, p2) twice, (k2, p2) to last 7 sts, k2, pf-kb, p4. 2 sts increased.
Row 3: K3, kfb, (k2, p2) to 3 sts before m, k2, pf-kb, sm, k1, kfb, p1, (k2, p2) to last 6 sts, k1, pfb, k4. 4 sts increased.
Row 4: P3, pf-kb, k1, (p2, k2) to last 7 sts, p2, pf-kb, p4. 2 sts increased.
Row 5: K3, kfb, (p2, k2) to 2 sts before m, p1, pf-kb, sm, k1, kfb, (p2, k2) to last 6 sts, p1, pf-kb, k4. 4 sts increased.
Row 6: P3, pf-kb, p1, (k2, p2) to 1 st before m, (p2, k2) to last 5 sts, pf-kb, p4. 2 sts increased.
Row 7: K3, kfb, (k2, p2) to 1 st before m, kfb, sm, k1, kfb, k1, (p2, k2) to last 8 sts, p2, k1, kfb, k4. 4 sts increased.
Row 8: P3, pf-kb, k1, (p2, k2) to 4 sts before m, p6, (k2, p2) to last 5 sts, kfb, p4. 2 sts increased.
DIRECTIONS
Stockinette stitch tab
Using the smaller needle and your preferred method, cast on 4 stitches.
Starting with a RS row, work 6 rows in stockinette stitch.
Next row, set up shawl [RS]: K4, pick up and knit 4 sts along the side edge of the stockinette stitch tab, working under a single strand at the edge of the strip, pick up and knit 4 sts in the cast-on edge. 12 sts.
Setup section
Work from Chart or written instructions as you prefer.
Note: If you're using a hand-dyed yarn: Join second ball of yarn before you work Setup row 2, leaving first attached. Throughout, alternate the two balls, working 2 rows in one before changing to the other. This helps avoid pooling or inconsistency in color.
Body of shawl
Repeat Chart Rows 1-8 until you've just about run out of yarn, ending with a RS row.
Note: It looks tidiest if you end on Chart Row 3 of the pattern, but it's not crucial.
Bind off
Note: You need 6 times the width of the final row in yarn to work the bind off. Read ahead: this bind off is not conventional and requires attention.
Using the larger needle in your right hand to work the stitches as you go, bind off on WS, working the stitches as they lie (knitting the knits and purling the purls), and at the same time, after every p2 take the yarn to the back over the right-hand needle, to make a yo, and immediately lift the other stitch on the right needle over it, to bind that new stitch off. These extra stitches add a bit more flexibility to the edge. Do NOT cut the yarn when you’re finished; leave the final stitch live.
Crochet edge:
Transfer the final stitch to your crochet hook and turn work so that RS is facing. Let the 4 stitches of the knit edging roll towards the WS.
Row 1 [RS]: Ch2, work dc into the fourth of the 4 knit stitches of the edging, [ch3, work dc into each of the next 2 knit stitches] across, to just before the second edging; ch 3, then work dc into the first and second of the knit stitches of the edging, letting it roll towards to the WS. Turn.
Note that in Row 1 you’re working into the stitches of the knit ribs, skipping the stitches of the purl ribs.
Row 2 [WS]: Ch2, work dc into the second of the first two dc sts, [ch 3, work dc into next 2 dc] until you reach the center spine, ch4, work dc into next 2 dc, ch4, [work dc into next 2 dc, ch 3] until you reach the edging, work 2 dc into the last 2 dc of the row.
Cut yarn and finish up, pulling yarn out through final stitch.
FINISHING
Wash, according to washing instructions for yarn. Lay flat to dry. There is no need to stretch or pin, but if you do want to, only place pins along the top edge to straighten it out. Do not stretch or pin the the bind off edge or crochet edging, as you don't want to take the bounce out of the ribbing. Once dry, weave in all ends.
ABOUT THE DESIGNER
 Kate Atherley is Knitty's Managing Technical Editor and a knitting author and teacher. The combination of her university degree in mathematics, professional experience in software development and usability, and training in garment and fashion design give her a unique perspective. Her latest book – Circular Knitting for Beginners and Beyond – is getting rave reviews.
Pattern © 2026 Kate Atherley; Images © 2026 Amy Sadler