Grandma Knitty Home
Knitty®: little purls of wisdomKnitty®: little purls of wisdom
sponsor

Find exactly what you're looking for

spacer

The answer to your question about Knitty is probably here!

spacer

Take home something Knitty today

spacer

Advertise with Knitty

spacer

Get your cool stuff reviewed in Knitty

spacer

Full information about how  to get published in Knitty

spacer

Read exactly what FREE PATTERNS really means...respect our designers and authors rights [and thank you]

spacer

Read exactly what FREE PATTERNS really means...respect our designers and authors rights [and thank you]

sidebarwhiterule

Knitty is produced in a pro-rabbit environment

spacer

© Knitty 2002-2008. All rights reserved. Unauthorized reproduction prohibited. This means you.spacer
 

Patterns<click for more!
Print With Images Print Without Images
upperLeft upperRight
lowerLeft lowerRight
Pink Needles
Yarn4Socks
Title
Title Beauty
spacer model: Emily Johnson spacer photos: David Galli

Tangy

With these socks I wanted an antique, almost Victorian patina, something akin to the yellowed corners of lace handkerchiefs, or a weathered bookstrap buckled around a McGuffey’s Reader. The subtle variegation of the pink and brown yarn creates a delicately aged quality, and the colorwork pattern suggests both the ironwork of a rusty garden gate, and the old-fashioned trellis roses that might be twining around it, blooming their last in the late summer. The faux seam that begins at the bottom of the foot and continues up the back of the leg is not only an added nostalgic touch, but serves the dual function of reducing the jog at the join between rounds, and providing a useful point away from which to increase for the calf. The final effect is a dusty, feminine memory of a girlish beauty, with just a touch of the femme fatale lurking behind her shy curls.

The stitch pattern is involved, but logical: symmetrical both horizontally and vertically, with sections that grow and shrink predictably. You may find yourself memorizing it surprisingly quickly. One last note: for a petite girl I have fairly serious calves (my father calls the calves that run in our family “awesome”). This got me thinking about all the different foot-to-calf ratios out there, and I wrote the pattern to include an individually customized upper section which will fit a calf anywhere from 9.5 to 24 inches in circumference. Happy romancing!
SIZE
To fit average-sized woman’s foot; customizable calf width and height.
 
FINISHED MEASUREMENTS
Foot circumference: 8.5 inches
Calf circumference: Customizable; between 9.5 and 24 inches
 
MATERIALS
Sundara Yarn Sock Yarn [100% superwash merino; 350yd/320m per 100g skein]; 1 skein each color
spacer [MC] Brown over Cocoa
spacer [CC] Mushroom over Blush

Note: These were limited-edition colors; any two solid or semi-solid sock yarn colors in equivalent weights and yardages will work beautifully.
This pattern, as I knit it, left me with about 20 yards of the main color and only slightly more of the contrast color. Those with larger feet and/or calves will probably require more yarn.


Recommended needle size:
spacer 1 set of five US #2/2.75mm double-point needles
spacer 1 set of five US #1/2.25mm double-point needles
[always use a needle size that gives you the gauge listed below -- every knitter's gauge is unique]

spacer Tapestry needle
 
GAUGE
36 sts/36 rows = 4 inches in charted colorwork pattern
 
PATTERN NOTES
[Knitty's list of standard abbreviations and techniques can be found here]
 
Calf Shaping: This pattern includes directions for a customizable calf section. To calculate your target number of calf stitches, measure the circumference of the fullest part of your calf in inches, then multiply the number of inches by 7.25. (This is the stitch gauge with the fabric stretched enough for the socks to stay up, rather than the gauge with the fabric relaxed.) Round the resulting number to the nearest even number: this will be your target number.

The stitch pattern does not repeat an even number of times over the foot or leg. Instead, the partial pattern repeat is mirrored across the faux seam created by the column of seam stitches at the back of the foot and leg.

Toe-Up Cast On Methods:
There are three different cast on methods that would work for this sock. Choose the one you prefer:
Directions for the Middle East Wrap Cast On (used in the sock shown) can be found here.

Directions for the Magic Cast On can be found here.

Directions for the Figure 8 Cast On can be found here.

m1L: Make 1 left-slanting knit stitch: Insert left needle, from front to back, under strand of yarn which runs between last stitch on left needle and first stitch on right needle; knit into back of this stitch.

m1R: Make 1 right-slanting knit stitch: Insert left needle, from back to front, under strand of yarn which runs between last stitch on left needle and first stitch on right needle; knit into front of this stitch.

SSt (Seam Stitch): Using the right needle, lift the right leg of the first stitch in the row below the next st on the left needle, place it on the left needle and knit it together with the first stitch on the left needle.

1x1 Rib (Worked in the round over an even number of sts):
Round 1: [K1, p1] to end.
Repeat this round for 1x1 Rib.

GardenGateCHT1gardengateCHTkey

GardenGateCHT2

GardenGateCHT3

 
DIRECTIONS
gardengateALTblank
TOE
Using larger needles and one of the cast on methods listed in the Pattern Notes, CO 12 sts (6 sts on each of two needles).

K 1 round as described in the directions for the cast on method you chose.

In the next round, sts will be distributed between 4 needles, which will be designated Needles 1 through 4. “First needle” and “second needle” refer to the 2 needles which currently hold the 12 sts.

Next Round: Using Needle 1 and continuing from end of first round, pick up and k 2 sts in space between needles, then k first 3 sts from first needle; using Needle 2, k remaining 3 sts from first needle, pick up and k 2 sts in space between needles; using Needle 3, k first 3 sts from second needle; using Needle 4, k remaining 3 sts from second needle, then k first picked-up st from Needle 1. Slip last st from Needle 2 to beginning of Needle 3. 16 sts: each needle holds 4 sts. Beginning of round is located at side of toe.

Increase Round: [K1, m1, k to end of needle; k to last st on needle, m1, k1] twice. 4 sts increased.
Repeat this round 7 times more. 48 sts.

Work Increase Round. K 1 round.
Repeat these 2 rounds 4 times more. 68 sts.

K all sts on Needle 1; this point (center of sole) will now be beginnning of round. The needle which had been Needle 2 will now become Needle 1, Needle 3 will become Needle 2, etc.

FOOT
Next Round: SSt using MC, join CC and work Round 1 of Chart 1.
Note: Throughout pattern, SSt is worked using MC.

Continue in pattern as set, working SSt in first st of each round and all other sts following Chart 1, until work measures 7.5 inches or approx. 1.5 inches less than desired length, ending with Round 1 of chart.

gardengateHEELSblank
HEEL
Work sts on Needle 1 following Round 2 of chart. Turn work.

Short row heel will be worked back and forth over 34 sts on Needles 1 and 4 only; sts on Needles 2 and 3 will be held for instep. Heel is worked using MC only. Do not break CC.

Row 1 [WS]: Sl 1 purlwise, p30, W&T.
Row 2 [RS]: K28, W&T.
Row 3 [WS]: P27, W&T.
Row 4 [RS]: K26, W&T.
Row 5 [WS]: P27, W&T.
Row 6 [RS]: K26, W&T.
Row 7 [WS]: P25, W&T.
Row 8 [RS]: K24, W&T.
Row 9 [WS]: P23, W&T.
Row 10 [RS]: K22, W&T.
Row 11 [WS]: P21, W&T.
Row 12 [RS]: K20, W&T.
Row 13 [WS]: P19, W&T.
Row 14 [RS]: K18, W&T.
Row 15 [WS]: P17, W&T.
Row 16 [RS]: K16, W&T.
Row 17 [WS]: P15, W&T.
Row 18 [RS]: K14, W&T.
Row 19 [WS]: P13, W&T.
Row 20 [RS]: K12, W&T.
Row 21 [WS]: P13, working wrap together with wrapped st, W&T.
Note: From this point, when working W&T, you will be adding a second wrap to a st which is already wrapped.
Row 22 [RS]: K14, working wrap together with wrapped st, W&T.
Row 23 [WS]: P15, working wraps together with wrapped st, W&T.
Row 24 [RS]: K16, working wraps together with wrapped st, W&T.
Row 25 [WS]: P17, working wraps together with wrapped st, W&T.
Row 26 [RS]: K18, working wraps together with wrapped st, W&T.
Row 27 [WS]: P19, working wraps together with wrapped st, W&T.
Row 28 [RS]: K20, working wraps together with wrapped st, W&T.
Row 29 [WS]: P21, working wraps together with wrapped st, W&T.
Row 30 [RS]: K22, working wraps together with wrapped st, W&T.
Row 31 [WS]: P23, working wraps together with wrapped st, W&T.
Row 32 [RS]: K24, working wraps together with wrapped st, W&T.
Row 33 [WS]: P25, working wraps together with wrapped st, W&T.
Row 34 [RS]: K26, working wraps together with wrapped st, W&T.
Row 35 [WS]: P27, working wraps together with wrapped st, W&T.
Row 36 [RS]: K28, working wraps together with wrapped st, W&T.
Row 37 [WS]: P29, working wraps together with wrapped st. Turn work, but do not wrap st.
Row 38 [RS]: Sl 1 purlwise, k29, working wraps together with last wrapped st, k2. You should be at the end of Needle 1, with MC and CC ready to begin working instep sts.

gardengateSIDEblank
LEG
Work sts on Needles 2, 3 and 4 following Round 2 of Chart 1.

Working SSt in first st of each round, work Rounds 3-16 of Chart 1 once, work Rounds 1-16 twice, then work Round 1 once more.

Shape Calf:
Important: Before you proceed, see Pattern Notes re. Calf Shaping.

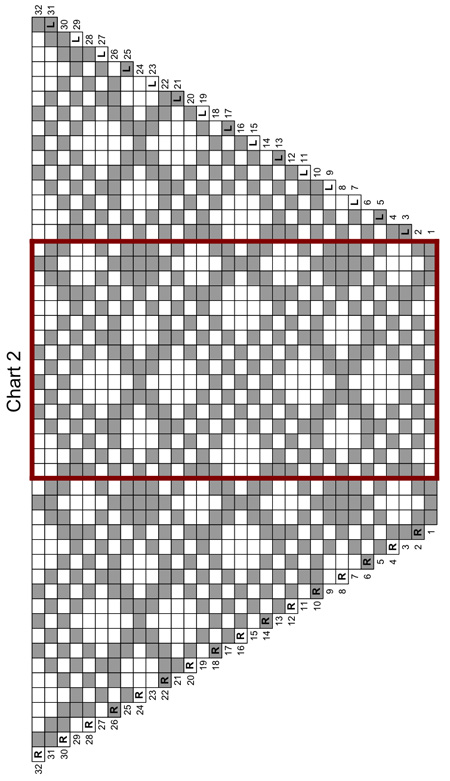
Continuing to work SSt in first st of each round, begin working Chart 2, increasing as indicated. Continue working Rounds 1-32 of Chart 2 until you achieve your target number of sts.

Once target number is reached, make a note of the last round of Chart 2 worked.
If you have not already printed out the charts for this pattern, print out Chart 3 now; you will need to mark and alter it.

Preparing Chart 3:
Count the number of sts at each side of the outlined Pattern Repeat section of Chart 2, for the last round you worked. This is the number of sts you will want to have at each side of the outlined repeat section of Chart 3. (For example, if the last round you worked of Chart 2 was Round 15, there would be 10 sts to the left of the repeat section and 7 sts to the right.) Draw vertical lines on Chart 3 to indicate these sts; you may wish to cut out or fold the chart along these lines. When working from Chart 3, as with the other charts, the portions to the left and right of the outlined repeat section are worked once only in each round, and the repeat section is worked as many times as needed.

Beginning with the next pattern round, work following Chart 3 until leg is 1 inch less than desired length. Break CC.

CUFF
Using smaller needles and MC, k 1 round.
Work in 1x1 Rib until cuff measures 0.75 inch. Break MC.
Using CC, work 1 round in 1x1 Rib. BO all sts loosely in pattern.
 
FINISHING
Weave in ends. Block if desired.
 
ABOUT THE DESIGNER

designernameBlank

Emily Johnson is a native of Portland, Oregon, where she lives with her partner David Galli. Emily and David are working on a long-term design project based on Emily’s family tree.

Check out the Family Trunk Project.